Add a Home Page
Last Updated: July 2024
In this tutorial you will create a home page for the Google Earth Engine app that you created in Part 1: Dataset Viewer. This page will contain introductory information about that app. This will involve moving the current "home page", which contains the map viewer, to a new endpoint. Then you will set up a new controller and template for the new home page. The following topics will be reviewed in this tutorial:
Adding a new view to your app
Responsive web design using Bootstrap
Bootstrap Grid System
Bootstrap Fluid Containers
Custom styling with CSS
Linking to other pages and navigation
Placeholder content for development: lorem ipsum and images

0. Start From Previous Solution (Recommended)
We recommend you use the previous solution as a starting point for Part 2:
git clone https://github.com/tethysplatform/tethysapp-earth_engine
cd tethysapp-earth_engine
git checkout -b plot-data-solution plot-data-solution-4.5
1. Move Map View to Viewer Endpoint
Currently, the map viewer page is the "home" page of the app as evidenced by it being rendered by a controller called home and a template called home.html. In this step you will rename these to "viewer" to make way for the new home page. You will also change it's endpoint from the root endpoint to a new endpoint to allow the new home page to use the root endpoint.
Rename
templates/earth_engine/home.htmltotemplates/earth_engine/viewer.html.Rename
homecontroller toviewerincontrollers.py:
@controller
def viewer(request):
    """
    Controller for the app viewer page.
    """
Change the
rendercall at the end of theviewercontroller to use the newtemplates/earth_engine/viewer.htmlincontrollers.py:
return App.render(request, 'viewer.html', context)
Set custom URLs for the
get_image_collectionandget_time_series_plotcontrollers incontrollers.py: so that their URLs are relative to theviewerurl:
@controller(url='viewer/get-image-collection')
def get_image_collection(request):
    ...
@controller(url='viewer/get-time-series-plot')
def get_time_series_plot(request):
    ...
2. Create New Home Endpoint
In this step you will create a new home controller and home.html template for the new home page.
Create a new
templates/earth_engine/home.htmlwith the following contents:
{% extends tethys_app.package|add:"/base.html" %}
{% load static tethys %}

{% block app_content %}
<h1>Home Page</h1>
{% endblock %}
Create a new
homecontroller incontrollers.py:
@controller
def home(request):
    """
    Controller for the app home page.
    """
    context = {}
    return App.render(request, 'home.html', context)
Navigate to http://localhost:8000/apps/earth-engine/ and verify that the new home page loads with text "Home Page".
Exit the app and launch it again from the Apps Library to verify that loads the new home page.
Navigate to http://localhost:8000/apps/earth-engine/viewer/ and verify that the map view still functions as it should. Be sure to test loading a dataset or two and plot data at a location.
4. Layout Home Page Grid with Bootstrap
In this step, you will create a responsive two column layout using the Bootstrap Grid System, which is part of the Bootstrap CSS framework. Bootstrap provides a number of simple recipes for implementing common HTML + CSS patterns. It is built-in with Tethys Platform, so no additional installation is required.
Create a
<div>element with classcontainer-fluidin theapp_contentblock:
{% block app_content %}
<div id="home-content-container" class="container-fluid">
</div>
{% endblock %}
Note
The container-fluid allows the width of the container to grow and shrink dynamically or fluidly with screen size. It also has smaller margins than the normal container class.
Add a
<div>element with classrow:
{% block app_content %}
<div  id="home-content-container" class="container-fluid">
  <div class="row">
  </div>
</div>
{% endblock %}
Add two column
<div>elements with widths of 2/3rds (8/12ths) and 1/3rd (4/12ths) the width of the container, respectively:
{% block app_content %}
<div  id="home-content-container" class="container-fluid">
  <div class="row">
    <div class="col-md-8">
    </div>
    <div class="col-md-4">
    </div>
  </div>
</div>
{% endblock %}
Note
Each row in a Bootstrap Grid can be divided into as many as 12 columns by specifying different numbers at the end of the col-md-X classes. A column of size 1 is effectively 1/12th of the width of the row. For example, to divide a row into two equal columns you would add two columns with size of 6 (6/12ths).
Our home page has two columns but instead of being evenly divided, one of them takes up 8 of the available 12 column widths and the other takes the remaining 4 column widths. This effectively give our columns a 2 to 1 ratio.
Add two rows to the second column, each containing a full-width (12/12) column:
{% block app_content %}
<div  id="home-content-container" class="container-fluid">
  <div class="row">
    <div class="col-md-8">
    </div>
    <div class="col-md-4">
      <div class="row">
        <div class="col-md-12">
        </div>
      </div>
      <div class="row">
        <div class="col-md-12">
        </div>
      </div>
    </div>
  </div>
</div>
{% endblock %}
Add container
<div>elements with the idsabout-container,resources-container, andget-started-containerto each terminating column. Also add theinfo-containerclass to each of these<div>elements to allow for consistent styling in a later step:
{% block app_content %}
<div  id="home-content-container" class="container-fluid">
  <div class="row">
    <div class="col-md-8">
      <div id="about-container" class="info-container">
      </div>
    </div>
    <div class="col-md-4">
      <div class="row">
        <div class="col-md-12">
          <div id="resources-container" class="info-container">
          </div>
        </div>
      </div>
      <div class="row">
        <div class="col-md-12">
          <div id="get-started-container" class="info-container">
          </div>
        </div>
       </div>
    </div>
  </div>
</div>
{% endblock %}
5. Create About Panel Content
In this step we'll add a the title and some filler content to the About panel of the home page. The filler content was generated using a Lorem Ipsum generator. This is a commonly used strategy that allows the developer to test the structure and style of the page even if the content has not been finalized yet.
Add the title, "About", and a few paragraphs of filler text (lorem ipsum) to the
<div>element with idabout-container. Use theinfo-titleclass on the title element to allow for consistent styling of all the titles in a later step. Place the placeholder filler text in<p>elements:
<div id="about-container" class="info-container">
  <h2 class="info-title">About</h2>
  <p>Lorem ipsum dolor sit amet, consectetur adipiscing elit, sed do eiusmod tempor incididunt ut labore et dolore magna aliqua. Eget est lorem ipsum dolor sit amet. Morbi tincidunt augue interdum velit euismod in pellentesque.</p>
  <p>Ac felis donec et odio pellentesque. Quis ipsum suspendisse ultrices gravida dictum fusce ut. Curabitur gravida arcu ac tortor dignissim convallis aenean et tortor. Sed euismod nisi porta lorem mollis. Nisi scelerisque eu ultrices vitae. Sit amet consectetur adipiscing elit duis. At in tellus integer feugiat scelerisque varius morbi enim.</p>
</div>
Download
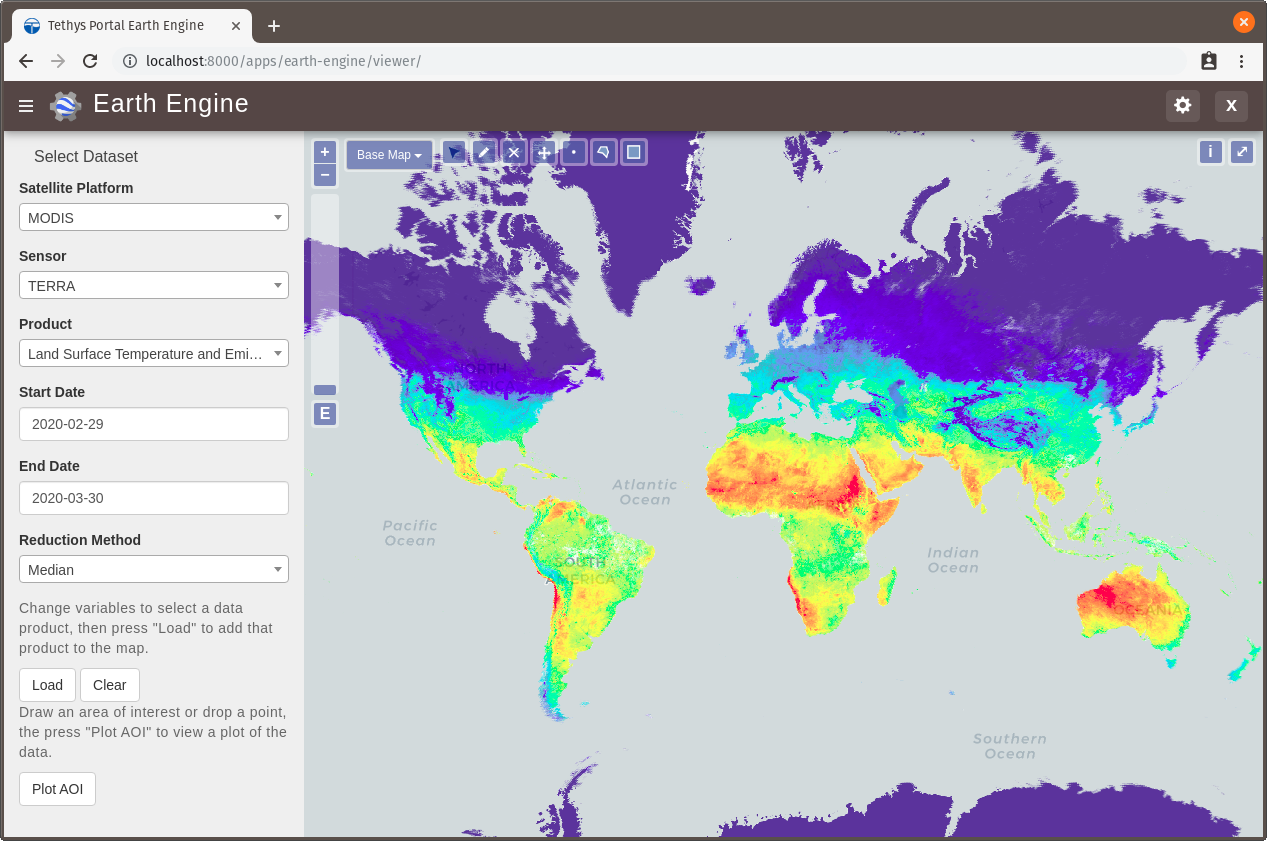
this screenshotor take your own screenshot of the Earth Engine app and save it aspublic/images/earth-engine-viewer.png.Add the screenshot to the
<div>element with idabout-container. Use the built-instatictag to get the path to the image:
<div id="about-container" class="info-container">
  <h2 class="info-title">About</h2>
  <p>Lorem ipsum dolor sit amet, consectetur adipiscing elit, sed do eiusmod tempor incididunt ut labore et dolore magna aliqua. Eget est lorem ipsum dolor sit amet. Morbi tincidunt augue interdum velit euismod in pellentesque.</p>
  <p>Ac felis donec et odio pellentesque. Quis ipsum suspendisse ultrices gravida dictum fusce ut. Curabitur gravida arcu ac tortor dignissim convallis aenean et tortor. Sed euismod nisi porta lorem mollis. Nisi scelerisque eu ultrices vitae. Sit amet consectetur adipiscing elit duis. At in tellus integer feugiat scelerisque varius morbi enim.</p>
  <img id="feature-image" src="{% static tethys_app|public:'images/earth-engine-viewer.png' %}">
</div>
Navigate to http://localhost:8000/apps/earth-engine/ and verify that the title "About", filler paragraphs, and screenshot appear in the panel on the left.
6. Create Resources Panel Content
In this step we'll add the content to the Resources panel of the home page. The Resources panel needs to contain a list of links to external resources related to our app.
Add the title, "Resources", to the
<div>element with idresources-container. Again, use theinfo-titleclass on the title element.
<div id="resources-container" class="info-container">
  <h2 class="info-title">Resources</h2>
</div>
Download the following images or find three images of your own and save them to
public/images/:
Note
In addition to Lorem Ipsum generators, there are also placeholder image generators that can be used to generate placeholder images for development. Most of these services allow you to specify the size of the images and some of them allow you to specify text that is shown on the image.
Add three resources to the
<div>element with idresources-container. Use Bootstrap Flex Utilities to create media "objects" for each resource. Each media object includes, a title, a short description and a thumbnail image. The image is wrapped in an<a>tag that can be used to provide a link to an external resource. Again, use the built-instatictag to get the paths for the images.
<div id="resources-container" class="info-container">
  <h2 class="info-title">Resources</h2>
  <div class="d-flex align-items-center">
    <div class="flex-shrink-0">
      <a href="#coast">
        <img class="media-object" src="{% static tethys_app|public:'images/coast_80_80.jpg' %}" alt="coast">
      </a>
    </div>
    <div class="media-body flex-grow-1 ms-3">
      <h4 class="media-heading">Lorem Ipsum Dolor</h4>
      Lorem ipsum dolor sit amet, consectetur adipiscing elit, sed do eiusmod tempor incididunt ut labore et dolore magna aliqua.
    </div>
  </div>

  <div class="d-flex align-items-center mt-2">
    <div class="flex-shrink-0">
      <a href="#condensation">
        <img class="media-object" src="{% static tethys_app|public:'images/condensation_80_80.jpg' %}" alt="condensation">
      </a>
    </div>
    <div class="media-body flex-grow-1 ms-3">
      <h4 class="media-heading">Ut Enim Ad Minim</h4>
      Ut enim ad minim veniam, quis nostrud exercitation ullamco laboris nisi ut aliquip ex ea commodo consequat.
    </div>
  </div>

  <div class="d-flex align-items-center mt-2">
    <div class="flex-shrink-0">
      <a href="#waterfall">
        <img class="media-object" src="{% static tethys_app|public:'images/waterfall_80_80.jpg' %}" alt="waterfall">
      </a>
    </div>
    <div class="media-body flex-grow-1 ms-3">
      <h4 class="media-heading">Duis Aute Irure</h4>
      Duis aute irure dolor in reprehenderit in voluptate velit esse cillum dolore eu fugiat nulla pariatur.
    </div>
  </div>
</div>
Navigate to http://localhost:8000/apps/earth-engine/ and verify that the title "Resource" and three media elements with images appear in the panel on the top right. At this point things may look a bit messy with images overlapping. We'll take care of these issues in a later step. For now, we'll focus on developing the structure of the page.
7. Create Get Started Panel Content
In this step you will add the content to the Get Started panel. This panel is arguably the most important panel on the home page, as it will provde the "Launch Viewer" button that will link to the viewer page.
Add the title, "Get Started", a short paragraph, and a "Launch Viewer" link to the
<div>element with idget-started-container. Again, use theinfo-titleclass on the title element. Use theurltag with the name of the viewer controller to get the link to the Viewer page:
<div class="info-container">
  <h2 class="info-title">Get Started</h2>
  <p>Press the button below to launch the viewer</p>
  <a id="get-started-btn" href="{% url tethys_app|url:'viewer' %}">Launch Viewer</a>
</div>
Navigate to http://localhost:8000/apps/earth-engine/ and verify that the title "Get Started", paragraph, and Launch Viewer link appear in the panel on the bottom right. Click on the Launch Viewer link to verify that it directs the user to the map view page.
8. Customize Style of Home Page
The Bootstrap CSS framework provides a good base for styling pages in the apps. The home page at this point has the correct 2-column layout that we were after, but it is a fairly bland page and the screenshot image is not contained in it's column. In this step, you'll add a new style sheet for the home page and customize the theme of the home page.
Create a new
public/css/home.cssstylesheet.Include the
public/css/home.cssstylesheet intemplates/earth_engine/home.htmlby adding thestylesblock:
{% block styles %}
  {{ block.super }}
  <link rel="stylesheet" href="{% static tethys_app|public:'css/home.css' %}" />
{% endblock %}
Add the following lines to
public/css/home.cssto customize the appearance of theinfo-containerpanels:
.info-container {
  background-color: #0000009f;
  box-shadow: 3px 5px 3px rgba(0,0,0,0.35);
  padding: 10px;
  margin-bottom: 30px;
}

.info-container .info-title {
  color: #067ef5;
  text-shadow: 2px 2px #000000;
}

.info-container p {
  color: #eee;
  text-shadow: 2px 2px #000000;
  font-size: 16px;
}

.info-container .media-body {
  color: #eee;
  text-shadow: 2px 2px #000000;
}

.info-container .media-object {
  border-radius: 5px;
}

.info-container .media-heading {
  color: #eee;
  text-shadow: 2px 2px #000000;
}

#feature-image {
  width: 100%;
}
Note
Half of the work of styling the home page has already been done, because the HTML elements of the page contain classes and IDs that make it easy to select and style the elements. Generally, you'll want to use classes to group elements that are styled similarly (e.g.: info-container classes) and IDs for elements that are unique (e.g.: get-started-btn).
Refresh the page to see how the styles change the look and feel of the page. Hard-refresh if necessary (CTRL-SHIFT-R or CTRL-F5).
Add the following lines to
public/css/home.cssto make the Launch Viewer link appear and behave like a button:
#get-started-btn {
  display: inline-block;
  border-radius: 15px;
  padding: 5px 10px;
  background-color: #fff;
  color: #044777;
  border: solid 2px rgb(6, 126, 245);
  text-transform: uppercase;
  font-weight: 600;
  align-items: center;
  font-size: 14pt;
  cursor: pointer;
  width: fit-content;
  text-decoration: none !important;
  justify-content: center;
  margin: 10px 0;
}

#get-started-btn:hover {
  background-color: #eee;
}

#get-started-btn:active,
#get-started-btn:focus {
  background-color: #044777;
  color: white;
}
Refresh the page to see how the styles change the look and feel of the page. Hard-refresh if necessary (CTRL-SHIFT-R or CTRL-F5).
Download the
backdrop imageor find your own.Add the following lines to
public/css/home.cssto add a background image to the home page:
#home-content-container {
  padding: 20px;
  min-height: 100%;
  background: url('/static/earth_engine/images/earth-engine-backdrop.png');
  background-color: #d2dadc;
  background-position: center;
  background-repeat: no-repeat
}
Refresh the page to see how the styles change the look and feel of the page. Hard-refresh if necessary (CTRL-SHIFT-R or CTRL-F5).
Notice the white space around the border of the page? This is padding in the content area of our base template. To remove the white space so the backdrop image fills the page, add the following lines to
public/css/home.css:
#inner-app-content {
  padding: 0;
}
9. Test and Verify
Browse to http://localhost:8000/apps/earth-engine/ in a web browser and login if necessary. Verify the following:
The Home page has a background image.
The custom styles for the
info-containerpanels, titles, and Launch Viewer button appear correctly.The Launch Viewer button on the Home page links to the Viewer page.
The Home button appears in the header of the Viewer page and links to the Home page.
Resize the browser window to different widths. The columns should collapse and stack on top of each other for narrow screens.
10. Solution
This concludes this portion of the GEE Tutorial. You can view the solution on GitHub at https://github.com/tethysplatform/tethysapp-earth_engine/tree/home-page-solution or clone it as follows:
git clone https://github.com/tethysplatform/tethysapp-earth_engine
cd tethysapp-earth_engine
git checkout -b home-page-solution home-page-solution-4.5