Gizmos
Last Updated: September 2025
In this recipe, you'll learn how to create and implement Gizmos in your Tethys app. You can think of a Gizmo as a building block that can be used to easily create beautiful interactive controls for your Tethys app with minimal coding.
Some examples of Gizmos are graphs, drop down select inputs, and interactive maps.
For more information and to see all the kinds of Gizmos that can be used in Tethys, check out the Gizmos Documentation
Creating a Gizmo
To add a Gizmo to your page, you'll first need to create a Gizmo in your controller. We'll go through examples of how to do this with a few different Gizmo types:
from tethys_sdk.routing import controller
from tethys_sdk.gizmos import Button
from .app import App

@controller
def home(request):
    save_button = Button(
        display_text='Save',
        name='save-button',
        icon='save',
        style='primary',
        attributes={
            'data-toggle':'tooltip',
            'data-placement':'top',
            'title':'Remove'
        }
    )

    context = {"save_button": save_button}

    return App.render(request, "home.html", context)
from tethys_sdk.routing import controller
from tethys_sdk.gizmos import DatePicker
from .app import App

@controller
def home(request):
    date_picker = DatePicker(
        name = 'start_date',
        display_text='Start Date',
        autoclose=True,
        format='mm-dd-yyyy',
        start_date='01-12-2013',
        start_view='month',
        today_button=True,
        initial='06-23-2015'
    )

    context = {"date_picker": date_picker}

    return App.render(request, "home.html", context)
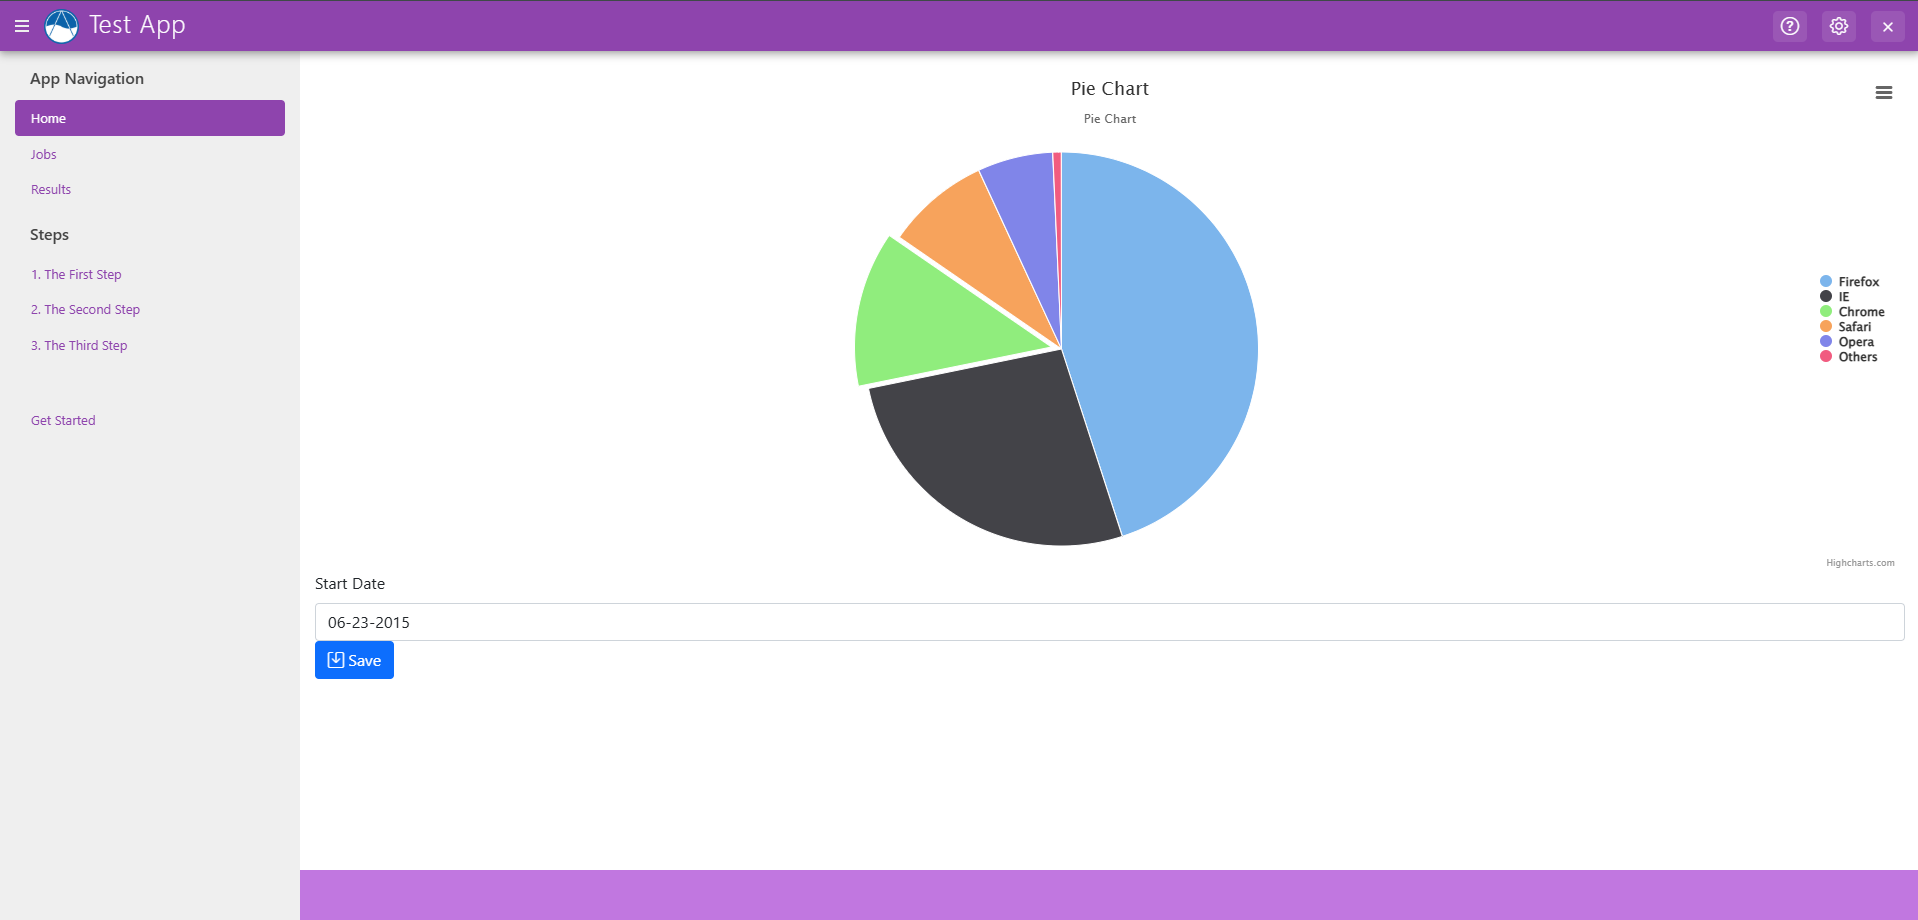
from tethys_sdk.routing import controller
from tethys_sdk.gizmos import PiePlot
from .app import App

@controller
def home(request):
    pie_plot = PiePlot(
        height='500px',
        width='500px',
        engine='highcharts',
        title='Pie Chart',
        subtitle='Pie Chart',
        series=[
            {'name': 'Firefox', 'value': 45.0},
            {'name': 'IE', 'value': 26.8},
            {'name': 'Chrome', 'value': 12.8},
            {'name': 'Safari', 'value': 8.5},
            {'name': 'Opera', 'value': 6.2},
            {'name': 'Others', 'value': 0.7}
        ]
    )

    context = {
        'pie_plot': pie_plot,
    }

    return App.render(request, "home.html", context)
Adding a Gizmo to your page
Now that you've created a Gizmo, you'll need to add that Gizmo to your page by placing it in your template.
In any template that you want to use Gizmos, you'll need to add the following in the template file once:
{% load tethys %}
Next, you'll use the Gizmo tag to place your Gizmo anywhere you'd like in your template:
As an example, this is how you would add the Gizmos from the previous section to your page:
{% gizmo pie_plot %}
{% gizmo date_picker %}
{% gizmo save_button %}
Open your app to test that your gizmos are showing up on the page, it should look something like this:
To see all of the Gizmo types in action, checkout the Gizmo Showcase app. You can visit it here. You can view the code for that Tethys app and Gizmo code examples in the Gizmo Showcase App Documentation