

Secure Map Services
Last Updated: August 2026
This tutorial demonstrates how to use Secure Map Services in a Tethys app. A Secure Map Service lets app developers store the connection information and credentials for map services that require authentication — an API key or an OAuth2 access token — and, when proxying is enabled, consume that service without ever handling the credentials itself or exposing them to the user/browser.
The following topics are covered:
Registering a Secure Map Service in the Tethys Portal admin
Declaring
SecureMapServiceSettingin your app classAdding a secure service to a Map Layout as a layer and as a basemap
Proxying requests so credentials never reach the browser
Changing service parameters at runtime
Requiring users to link an OAuth2 account before being able to access the app.
Utilizing a Secure Map Service as a response to retrieve data from a service and format it for use in your app.
Utilizing a Secure Map Service as an endpoint to make requests to a service from your app using JavaScript.
For more information on Secure Map Services, see the Secure Map Services API Documentation.
0. Prerequisites
For this tutorial, we'll be utilizing two services that require authentication to use their data in your app:
GEGD - a WMS imagery service authenticated with an API key.
GRiD - an OGC/WFS imagery service and REST API authenticated with an OAuth2 access token.
Before beginning this tutorial, make sure you have created an account with each service and have retrieved an API key from the GEGD page.
1. Scaffold a New App
To generate a new app using the scaffold, open a terminal, Activate Your Virtual Environment, and execute the following commands:
tethys scaffold secure_map_tutorial
You will be prompted to enter metadata about your app such as, proper name, version, author, and description. All of these metadata are optional. You can accept the default value that is shown in the square brackets by pressing enter.
You'll then need to install your app by running these commands:
cd tethysapp-secure_map_tutorial
tethys install -d
2. Setup portal_config
Next, in order to use the secure encryption features of a SecureMapService, you'll need a generated portal_config file. You can generate it using the following command:
tethys gen portal_config
If you've already generated a portal_config file, you may still need to generate a salt key in that file. You can do so by running the following command:
tethys settings --generate-salt-key
3. Add a MapLayout
We'll be using a MapLayout for this application, so we'll begin by adding a MapLayout controller to your app. Open your controllers.py file and replace the contents with the following code:
from tethys_sdk.layouts import MapLayout
from tethys_sdk.routing import controller
from .app import App

@controller(name='home')
class SecureMapServiceMapLayout(MapLayout):
    app = App
    base_template = f'{App.package}/base.html'
    template_name = f'{App.package}/home.html'
    map_title = 'Secure Map Services Tutorial'
Next open the home.html in your templates/secure_map_services_tutorial directory and replace the contents with the following code:
{% extends "tethys_layouts/map_layout/map_layout.html" %}
{% load static tethys %}
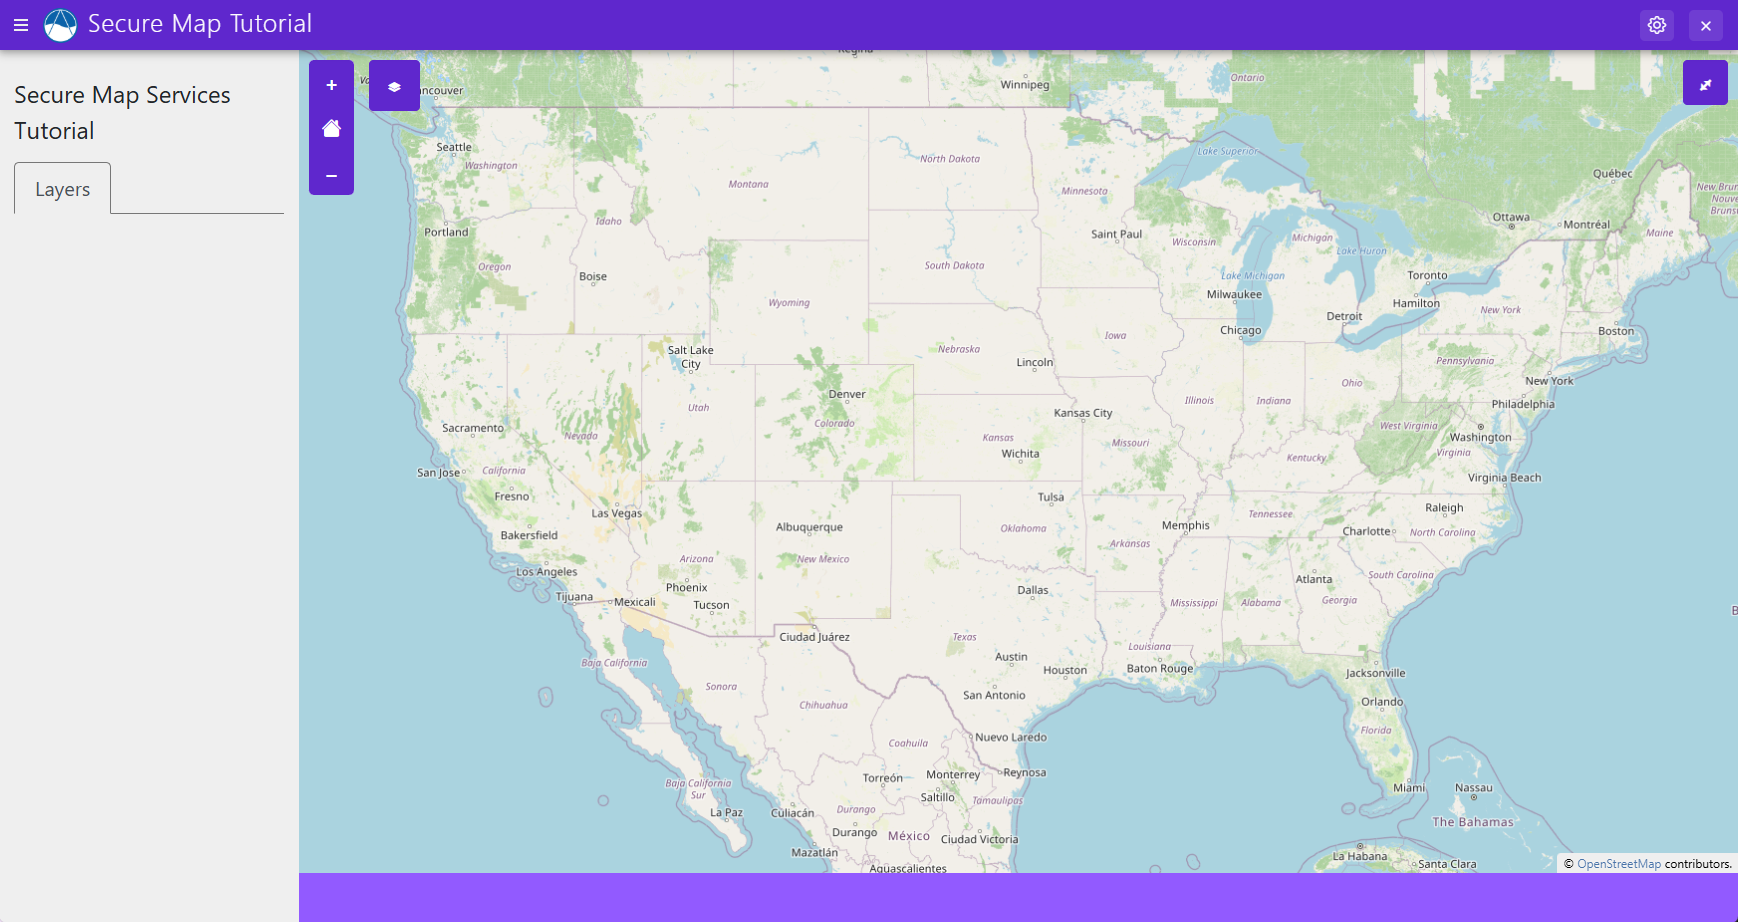
Now go ahead and open your app at localhost:8000 and you should see a fully interactive map like this one:
4. Add a Basemap
Now, you'll be setting up your first SecureMapService that you'll be using as a basemap. You'll want to make sure you have created your GEGD account and have your API key ready.
First, open your app.py file and add the following import to the top of your file:
from tethys_sdk.app_settings import SecureMapServiceSetting
Then add this to your main App class:
class App(TethysAppBase):
    """
    Tethys app class for Secure Map Tutorial.
    """
    name = 'Secure Map Tutorial'
    description = ''
    package = 'secure_map_tutorial'  # WARNING: Do not change this value
    index = 'home'
    icon = f'{package}/images/icon.gif'
    root_url = 'secure-map-tutorial'
    color = '#5f27cd'
    tags = ''
    enable_feedback = False
    feedback_emails = []

    GEGD_SECURE_MAP_SERVICE_NAME = "gegd_secure_map_service"

    def secure_map_service_settings(self):
        """
        Returns the settings for the secure map service.
        """

        secure_map_service_settings = (
            SecureMapServiceSetting(
                name=self.GEGD_SECURE_MAP_SERVICE_NAME,
                description="Secure Map Service for the app to use with GEGD",
                required=True
            ),
        )

        return secure_map_service_settings
Now, you'll need to open your app and go to the app settings and look for the Secure Map Service Settings section. You should see a setting for the GEGD service. Click on the dropdown and select "Add New Secure Map Service" to add your GEGD service.
Use the following configurations for your new Secure Map Service:
Name: GEGD Secure Map Service
Legend Title: GEGD
Authentication Method: API Key
API Key: [YOUR API KEY]
Service Type: WMS
Use Proxy for Requests: True
Parameters:
{
    "maxar_api_key": "${api_key}",
    "layers": "Maxar:Imagery",
    "version": "1.3.0"
}
Then save your new Secure Map Service and assign it to the GEGD Secure Map Service setting, then save your app settings.
Now we'll be adding the GEGD service as a basemap to your MapLayout. Open your controllers.py and add the following to your MapLayout class:
@controller(name='home')
class SecureMapServiceMapLayout(MapLayout):
    app = App
    base_template = f'{App.package}/base.html'
    template_name = f'{App.package}/home.html'
    map_title = 'Secure Map Services Tutorial'
    basemaps = [
        {"WMS": {
            "url": App.get_secure_map_service(App.GEGD_SECURE_MAP_SERVICE_NAME, as_endpoint=True),
            "control_label": "GEGD Map"
        }}
    ]
Now reopen your app and you should see the GEGD imagery on your map.
Notice that if you look at the network traffic in your browser, you will see that the requests to the GEGD service are being proxied through your Tethys Portal and the API key is not visible in the request.
5. Configure for OAuth2 with GRiD
Next, we want to add a map layer using the GRiD service. Before we can authenticate with OAuth2 to do that, we need to make sure your Tethys Portal can be reached over HTTPS and configure it to use GRiD as an OAuth2 provider.
GRiD only accepts https:// redirect URIs, so your portal must be reachable over HTTPS before you can link your GRiD account. Follow the Run a Tethys Development Server over HTTPS recipe to serve your development portal at https://localhost:8443, then continue with this tutorial.
Note
From this point on, access your portal at https://localhost:8443, instead of http://localhost:8000.
Now run this command:
tethys settings --set AUTHENTICATION_BACKENDS "['tethys_services.backends.grid.GRiDOAuth2']"
Then configure your app to require users to link their GRiD account before being able to access it by adding this code to your app class in app.py:
class App(TethysAppBase):
    """
    Tethys app class for Secure Map Tutorial.
    """
    name = 'Secure Map Tutorial'
    description = ''
    package = 'secure_map_tutorial'  # WARNING: Do not change this value
    index = 'home'
    icon = f'{package}/images/icon.gif'
    root_url = 'secure-map-tutorial'
    color = '#5f27cd'
    tags = ''
    enable_feedback = False
    feedback_emails = []
    required_oauth2_providers = ["grid"]
The last step required to configure your application to work with GRiD is to register your application with GRiD to get a client ID and client secret. You can do this by going to the GRiD developer portal and setting up a new application with the following settings:
Navigate to the GRiD application list.
Click Create new application.
Fill out the form:
- Application Name:
Your application's name
- Redirect URIs:
https://localhost:8443/oauth2/complete/grid/
Note
Below the Redirect URIs field, you will see instructions to add a second redirect URI required for the GRiD service to work with Tethys. Add it to the same field, separated from the first by a space. You can update this list later when deploying to a production server.
Copy the generated client ID and client secret and store them somewhere secure.
Submit the form.
Once you've registered your application, you'll need to add the client ID and client secret to your Tethys Portal settings. You can do this by running the following commands:
tethys settings --set OAUTH_CONFIG.SOCIAL_AUTH_GRID_KEY [YOUR CLIENT ID]
tethys settings --set OAUTH_CONFIG.SOCIAL_AUTH_GRID_SECRET [YOUR CLIENT SECRET]
Make sure to restart your Tethys development server after making these changes.
Now when you try to open your app at https://localhost:8443, you will be redirected to your account settings because you haven't linked your account. Scroll down until you find the "Single Sign On" section. Then click on "connect grid". This will redirect you to log in with your GRiD account and bring you back to the account settings. Once you've linked your account, you can go back to the app and you should be able to access it.
6. Add a Map Layer
Next, you'll be setting up your second SecureMapService that you'll be using as a map layer. You'll want to make sure you have created your GRiD account since we'll be using that service for this layer.
Begin by adding a new SecureMapServiceSetting to your app class in app.py:
class App(TethysAppBase):
    """
    Tethys app class for Secure Map Tutorial.
    """
    name = 'Secure Map Tutorial'
    description = ''
    package = 'secure_map_tutorial'  # WARNING: Do not change this value
    index = 'home'
    icon = f'{package}/images/icon.gif'
    root_url = 'secure-map-tutorial'
    color = '#5f27cd'
    tags = ''
    enable_feedback = False
    feedback_emails = []
    required_oauth2_providers = ["grid"]

    GEGD_SECURE_MAP_SERVICE_NAME = "gegd_secure_map_service"
    GRID_SECURE_MAP_SERVICE_NAME = 'grid_secure_map_service'

    def secure_map_service_settings(self):
        """
        Returns the settings for the secure map service.
        """

        secure_map_service_settings = (
            SecureMapServiceSetting(
                name=self.GEGD_SECURE_MAP_SERVICE_NAME,
                description="Secure Map Service for the app to use with GEGD",
                required=True
            ),
            SecureMapServiceSetting(
                name=self.GRID_SECURE_MAP_SERVICE_NAME,
                description='Secure Map Service for app to use with GRiD',
                required=True,
            ),
        )

        return secure_map_service_settings
Now let's configure this new Secure Map Service in the Tethys Portal. Open your app and go to the app settings and scroll down to the Secure Map Service Settings section. You should see a setting for the GRiD service. Click on the dropdown and select "Add New Secure Map Service" to add your GRiD service.
Use the following configurations for your new Secure Map Service:
Name: GRiD Secure Map Service
Legend Title: GRiD
Authentication Method: OAuth2
OAuth2 Provider: grid
Service Type: GML
Use Proxy for Requests: True
Parameters:
{
    "service": "wfs",
    "version": "1.1.0",
    "request": "getfeature",
    "typename": "ms:gridws_raster",
    "maxfeatures": "200"
}
Then save your new Secure Map Service and assign it to the GRiD Secure Map Service setting, then save your app settings.
Our next step will be to add a new map layer to our MapLayout using the GRiD service. Open your controllers.py and add the following to your MapLayout class:
@controller(name='home')
class SecureMapServiceMapLayout(MapLayout):
    ...

    def compose_layers(self, request, map_view, *args, **kwargs):
        grid_layer = App.get_secure_map_service(
            App.GRID_SECURE_MAP_SERVICE_NAME,
            as_layer=True,
        )

        layer_groups = [
            self.build_layer_group(
                id='grid_layer_group',
                display_name='GRiD Layer Group',
                layers=[grid_layer]
            )
        ]
        return layer_groups
Caution
The ellipsis in the code block above indicates code that is not shown for brevity. DO NOT COPY VERBATIM.
Now just go ahead and refresh your app and you should see the GRiD layer on your map. You can toggle the visibility of the layer using the layers control in the top right corner of the map.
7. Update Service Parameters
Now that you have data from GRiD displaying on your map in the form of a layer, you may want to change the parameters of the service to display different data. You can do this by going into the service settings and manually updating the parameters field. But you can also do this in your app dynamically using the update_secure_map_service_params() method in your app code.
Warning
Using the update_secure_map_service_params method writes to the service setting itself, which is shared by every
user and any app(s) using the service. Use it only for persistent changes to a service's parameters.
To change parameters for a single request, pass the param_overrides argument when calling get_secure_map_service.
In order to demonstrate how this can be done dynamically in your app, we'll add a form to the app that will allow the user to select which GRiD layer they want to display on the map. We'll then use the update_secure_map_service_params() method to update the parameters of the GRiD service based on the user's selection.
We'll begin by adding a custom map tab to your MapLayout that will contain this form. Open home.html and add the following code:
{% block custom_map_tabs %}
<li class="nav-item" role="presentation">
    <button class="nav-link" id="custom-tab-toggle" aria-controls="custom-tab-panel" aria-selected="false" type="button" role="tab" data-bs-toggle="tab" data-bs-target="#custom-tab-panel">Custom Tab</button>
</li>
{% endblock %}

{% block custom_map_tab_panels %}
<div class="tab-pane" id="custom-tab-panel" role="tabpanel" aria-labelledby="custom-tab-toggle">
    <form method="POST">
    {% csrf_token %}
    {% gizmo grid_type %}
    {% gizmo update_grid_button %}
    </form>
</div>
{% endblock %}
Now we'll need to add the gizmos for the form to your MapLayout class in controllers.py. Add the following code:
from tethys_sdk.gizmos import Button, SelectInput
...

class SecureMapServiceMapLayout(MapLayout):
    ...

    def get_context(self, request, context, *args, **kwargs):
        context = super().get_context(request, context, *args, **kwargs)
        grid_type = SelectInput(
            name="grid_type",
            display_text="Select GRID Layer",
            options=[
                ("Point Cloud", "pointcloud"),
                ("Raster", "raster"),
            ],
            initial="pointcloud",
        )

        update_grid_button = Button(
            name="update_grid",
            display_text="Update GRID Layer",
            submit=True,
        )

        context["grid_type"] = grid_type
        context["update_grid_button"] = update_grid_button

        return context
Now if you refresh your app, you should see a new tab on the left that you can switch to with a select input and a button. Right now if you click the "Update GRID Layer" button, nothing will happen. We'll need to add a post() method to your MapLayout class to handle the form submission and update the GRiD service parameters.
To add that functionality, first add the following imports to the top of controllers.py:
from django.http import HttpResponse
from django.shortcuts import redirect
Then add the following post() method to your MapLayout class:
class SecureMapServiceMapLayout(MapLayout):
    ...

    def post(self, request, *args, **kwargs):
        grid_type = request.POST.get("grid_type")
        if grid_type not in ["pointcloud", "raster"]:
            return HttpResponse("Invalid GRID layer type selected.", status=400)

        App.update_secure_map_service_params(
            App.GRID_SECURE_MAP_SERVICE_NAME,
            params={
                "typename": f"ms:gridws_{grid_type}",
            },
        )

        return redirect(request.path)
Now go ahead and try selecting a different GRiD layer from the select input and clicking the "Update GRID Layer" button. The app will refresh and you should see the layer on the map update to reflect your selection. You can even go in and look at the service settings and see that the parameters have been updated to reflect your selection.
8. Using a Secure Map Service as a Response
You can access a SecureMapService as a response in order to work directly with the data returned from the service in your Python code. We'll be using this to retrieve spatial data from the GRiD API and format it into GeoJSON to display AOIs on the map.
First, let's add a new SecureMapServiceSetting to your app class in app.py for the GRiD AOI service. This service will be used to both display existing AOIs on the map, and to submit new AOIs to the GRiD service. Add the following code to your app class:
class App(TethysAppBase):
    """
    Tethys app class for Secure Map Tutorial.
    """
    name = 'Secure Map Tutorial'
    description = ''
    package = 'secure_map_tutorial'  # WARNING: Do not change this value
    index = 'home'
    icon = f'{package}/images/icon.gif'
    root_url = 'secure-map-tutorial'
    color = '#5f27cd'
    tags = ''
    enable_feedback = False
    feedback_emails = []
    required_oauth2_providers = ["grid"]

    GEGD_SECURE_MAP_SERVICE_NAME = "gegd_secure_map_service"
    GRID_SECURE_MAP_SERVICE_NAME = 'grid_secure_map_service'
    GRID_SECURE_AOI_MAP_SERVICE_NAME = "grid_secure_aoi_map_service"

    def secure_map_service_settings(self):
        """
        Returns the settings for the secure map service.
        """

        secure_map_service_settings = (
            SecureMapServiceSetting(
                name=self.GEGD_SECURE_MAP_SERVICE_NAME,
                description="Secure Map Service for the app to use with GEGD",
                required=True
            ),
            SecureMapServiceSetting(
                name=self.GRID_SECURE_MAP_SERVICE_NAME,
                description='Secure Map Service for app to use with GRiD',
                required=True,
            ),
            SecureMapServiceSetting(
                name=self.GRID_SECURE_AOI_MAP_SERVICE_NAME,
                description='Secure Map Service for app to use with GRiD for interacting with AOIs',
                required=True
            ),
        )

        return secure_map_service_settings
Use these configurations for the new Secure Map Service:
Name: GRiD AOI Secure Map Service
Endpoint: https://grid.nga.mil/grid/api/v3/aois
Legend Title: GRiD AOIs
Authentication Method: OAuth2
OAuth2 Provider: grid
Service Type: REST/JSON API
Use Proxy for Requests: True
Parameters:
{
    "intersections": "false",
    "intersection_geoms": "false",
    "export_full": "false",
    "sort": "pk"
}
Save your new Secure Map Service and assign it to the GRiD AOI Secure Map Service setting, then save your app settings.
Next, you'll add a new layer to your MapLayout class in controllers.py that will display the existing AOIs on the map.
For that you'll need to first add the following packages to the dependencies of your application. Open your install.yml and edit the requirements block like so:
requirements:
  # Putting in a skip true param will skip the entire section. Ignoring the option will assume it be set to False
  skip: false
  conda:
    channels:
      - conda-forge
    packages:
      - shapely
Then you'll need to actually install the shapely package into your environment. You can do this by running the following command:
conda install -c conda-forge shapely
Next, add the following imports to controllers.py:
from tethys_sdk.layouts import MapLayout
from tethys_sdk.routing import controller
from tethys_sdk.gizmos import SelectInput, Button, MVLayer
from django.http import HttpResponse
from django.shortcuts import redirect
from shapely import wkt
from shapely.geometry import mapping
from .app import App
Now add the following helper function to controllers.py. This function will help format the AOI data returned from the GRiD service into a GeoJSON format that can be used to create a new MVLayer:
def format_aoi_geojson(raw_aoi_data):
    features = []
    for aoi in raw_aoi_data.get("aois", []):
        wkt_str = aoi.get("geom")
        if not wkt_str:
            continue
        try:
            geom = wkt.loads(wkt_str)
        except Exception:
            continue
        features.append(
            {
                "type": "Feature",
                "geometry": mapping(geom),
                "properties": {
                    "pk": aoi.get("pk"),
                    "name": aoi.get("name"),
                    "user": aoi.get("user"),
                    "created_at": aoi.get("created_at"),
                    "area": aoi.get("area"),
                    "notes": aoi.get("notes"),
                    "subscribed": aoi.get("subscribed"),
                    "export_count": len(aoi.get("exports") or []),
                },
            }
        )

    return {
        "type": "FeatureCollection",
        "crs": {"type": "name", "properties": {"name": "EPSG:4326"}},
        "features": features,
    }
Now update your compose_layers() method in your MapLayout class to create a new MVLayer for the AOIs:
def compose_layers(self, request, map_view, *args, **kwargs):
    grid_layer = App.get_secure_map_service(
        App.GRID_SECURE_MAP_SERVICE_NAME,
        as_layer=True,
    )

    grid_aoi_response = App.get_secure_map_service(
        App.GRID_SECURE_AOI_MAP_SERVICE_NAME,
        as_response=True,
        request_user=request.user,
    ).json()

    aois_geojson = format_aoi_geojson(grid_aoi_response)

    aoi_layer = MVLayer(
        source='GeoJSON',
        options=aois_geojson,
        legend_title='GRiD AOIs',
        layer_options={
            'style': {'ol.style.Style': {
                'stroke': {'ol.style.Stroke': {
                    'color': '#ff7800',
                    'width': 2,
                }},
                'fill': {'ol.style.Fill': {
                    'color': 'rgba(255,120,0,0.15)',
                }},
            }},
            "visible": True,
        },
        data={'layer_id': 'grid_aois', 'layer_name': 'grid_aois', "show_legend": True,},
        feature_selection=True,
    )

    layer_groups = [
        self.build_layer_group(
            id='grid_layer_group',
            display_name='GRiD Layer Group',
            layers=[grid_layer, aoi_layer]
        )
    ]
    return layer_groups
Go ahead and refresh your app and you should see the AOIs displayed on the map as a new layer. You can toggle the visibility of the AOI layer using the layers control in the top right corner of the map.
9. Using a Secure Map Service as an Endpoint
The last feature we'll be adding to our app is the ability to use a SecureMapService as an endpoint that can be used to make requests to the service from your app. You'll be using the GRiD service for this example, allowing you to draw AOIs on the map and submitting them to the GRiD service to create new AOIs using the GRiD REST API.
We'll be adding a new form to the custom map tab that will allow the user to set a name for their new AOI.
First, we'll need to make some updates to your controllers.py file.
To start, update your imports:
from tethys_sdk.layouts import MapLayout
from tethys_sdk.routing import controller
from tethys_sdk.gizmos import SelectInput, Button, MVLayer, MVDraw, TextInput
from django.http import HttpResponse
from django.shortcuts import redirect
from shapely import wkt
from shapely.geometry import mapping
from .app import App
Next, you need to add drawing capabilities to your map so that users can draw AOIs on the map that they would like to submit to the GRiD service. We'll be using the MVDraw gizmo for this.
Begin by adding the MVDraw gizmo to your class:
@controller(name='home')
class SecureMapServiceMapLayout(MapLayout):
    app = App
    base_template = f'{App.package}/base.html'
    template_name = f'{App.package}/home.html'
    map_title = 'Secure Map Services Tutorial'
    basemaps = [
        {"WMS": {
            "url": App.get_secure_map_service(App.GEGD_SECURE_MAP_SERVICE_NAME, as_endpoint=True),
            "control_label": "GEGD Map"
        }}
    ]
    draw = MVDraw(
        controls=["Modify", "Delete", "Move", "Polygon", "Box"],
        initial="Move",
        output_format="WKT",
    )
Next, let's add the gizmos you'll need for your new AOI form. Add the following code to your get_context method in controllers.py:
def get_context(self, request, context, *args, **kwargs):
    context = super().get_context(request, context, *args, **kwargs)
    grid_type = SelectInput(
        name="grid_type",
        display_text="Select GRID Layer",
        options=[
            ("Point Cloud", "pointcloud"),
            ("Raster", "raster"),
        ],
        initial="pointcloud",
    )

    update_grid_button = Button(
        name="update_grid",
        display_text="Update GRID Layer",
        submit=True,
    )

    aoi_name = TextInput(
        name="aoi_name",
        display_text="AOI Name",
        placeholder="Enter AOI Name",
    )

    aoi_proxy_endpoint =  App.get_secure_map_service(
        App.GRID_SECURE_AOI_MAP_SERVICE_NAME, as_endpoint=True
    )

    create_aoi_button = Button(
        name="create_aoi",
        display_text="Create AOI",
        submit=False,
        attributes= {"data-proxy-url": aoi_proxy_endpoint, "id": "create-aoi-button"}
    )

    context["grid_type"] = grid_type
    context["update_grid_button"] = update_grid_button
    context["aoi_name"] = aoi_name
    context["create_aoi_button"] = create_aoi_button

    return context
Now you need to add the new gizmos to a form in home.html.
{% block custom_map_tab_panels %}
<div class="tab-pane" id="custom-tab-panel" role="tabpanel" aria-labelledby="custom-tab-toggle">
    <form method="POST">
        {% csrf_token %}
        {% gizmo grid_type %}
        {% gizmo update_grid_button %}
    </form>
    <form method="POST">
        {% csrf_token %}
        {% gizmo aoi_name %}
        {% gizmo create_aoi_button %}
    </form>
</div>
{% endblock %}
Next, we need to add some custom JavaScript to handle the AOI form submission and send the request.
Open the public/js folder and create a new file named aoi.js and add the following code:
$(document).ready(function() {
    $("#create-aoi-button").click(function() {
        var aoi_name = $("#aoi_name").val();
        var geometry = JSON.parse($("#map_view_geometry").val()).geometries[0].wkt;

        var proxyUrl = $(this).data("proxy-url");
        $.ajax({
            url: proxyUrl,
            type: "POST",
            data: {
                name: aoi_name,
                geom: geometry
            },
            headers: {
                "X-CSRFToken": $("input[name='csrfmiddlewaretoken']").val()
            },
            success: function(response) {
                console.log("AOI created successfully:", response);
            },
            error: function(xhr, status, error) {
                console.error("Error creating AOI:", error);
            }
        })
    })
});
Now just include the new JavaScript file in your home.html file by adding this code block:
{% block scripts %}
    {{ block.super }}
    <script src="{% static 'secure_map_tutorial/js/aoi.js' %}"></script>
{% endblock %}
Now just refresh the page and you should be able to draw an AOI on the map, enter a name for it, and click the "Create AOI" button to submit it to the GRiD service. You can check your GRiD account to see if the new AOI was created successfully, or just refresh the page and the AOI should be there with the other already existing AOIs.
That's it! You've now successfully created a Tethys app that uses Secure Map Services to display data from GEGD and GRiD, and allows users to create new AOIs on the map using the GRiD service.
For more information, see the Secure Map Services API Documentation.
10. Solution
This concludes the tutorial. You can view the solution code for this tutorial in the tethysapp-secure_map_tutorial repository on GitHub. You can clone the repository using the following command:
git clone https://github.com/tethysplatform/tethysapp-secure_map_tutorial