

WebSockets Concepts
Last Updated: July 2024
This tutorial introduces WebSocket communication concepts for Tethys developers. A consumer will be created to notify other users when a dam has been added to the app database by someone else, giving the user the option to reload the app to visualize the location of the new dam. The topics covered include:
Extending Templates
Django Channels Consumers
WebSocket Connections
Channel Layers
New Dam Notification
0. Start From Advanced Solution (Optional)
If you wish to use the advanced solution as a starting point:
git clone https://github.com/tethysplatform/tethysapp-dam_inventory
cd tethysapp-dam_inventory
git checkout -b advanced-solution advanced-4.6
Note
This tutorial can also be built on any other advanced solution, such as the Tethys Quotas tutorial solution.
1. Extending Templates
In order to limit these notifications to the home page, we will be extending the map layout template to include a message box that will display when a new dam is added.
Begin by adding a new file called
home.htmlto thetemplates/dam_inventorydirectory. Add the following code to the file:{% extends "tethys_layouts/map_layout/map_layout.html" %} {% load tethys_gizmos %}This code extends the default map layout template, while allowing us to make manual additions later. It also prepares the template for including custom Tethys Gizmos later.
Now add this line to your
HomeMapcontroller class:@controller(name="home") class HomeMap(MapLayout): app = App base_template = f'{App.package}/base.html' template_name = f'{App.package}/home.html' map_title = 'Dam Inventory' map_subtitle = 'Tutorial' basemaps = ['OpenStreetMap', 'ESRI'] show_properties_popup = True plot_slide_sheet = True ...Refresh the application home page and make sure the default map layout is still loaded up correctly.
2. Django Channels Consumers
Consumer classes are the equivalent of controller functions when working with WebSockets on Tethys.
Create a new file called
consumers.pyand add the following code:from channels.generic.websocket import AsyncWebsocketConsumer from tethys_sdk.routing import consumer @consumer(name='dam_notification', url='dams/notifications/') class NotificationsConsumer(AsyncWebsocketConsumer): async def authorized_connect(self): print("-----------WebSocket Connected-----------") async def authorized_disconnect(self, close_code): pass
Note
The consumer decorator is used to define the URL for Consumer classes, similar to how the controller decorator is used for controller functions.
3. WebSocket Connections
A handshake needs to be established between the client and server when creating a WebSocket connection. We will use the standard JavaScript WebSocket API to do this.
Create a
WebSocket connectionby adding the following code tohome.html:{% block after_app_content %} {{ block.super }} <script> var notification_ws = new WebSocket('ws://' + window.location.host + '/apps/dam-inventory/dams/notifications/ws/'); </script> {% endblock %}
A WebSocket URL follows a pattern similar to tethys app HTTP URLs. The differences being that the URL starts with ws:// instead of http(s)://, ends with a "ws". For example: ws://tethys.host.com/apps/base-app-name/base-ws-url/ws/. If the base name of the app is included in the WebSocket URL, it will not be duplicated. This is the same behavior for HTTP URLs.
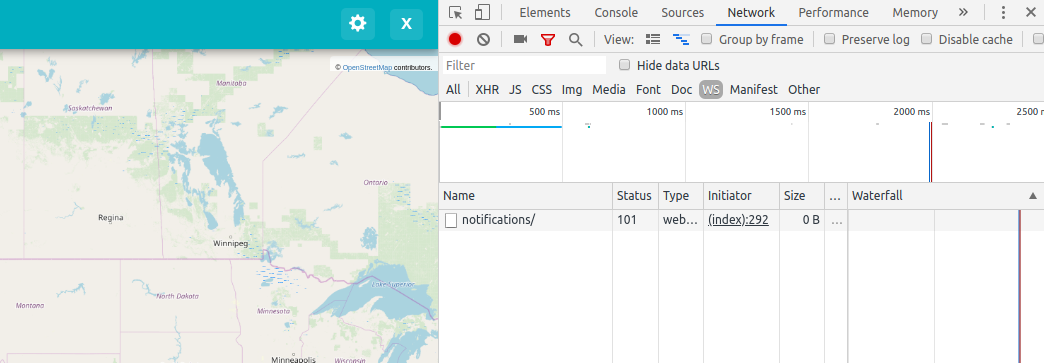
Upon loading the app home page, the "WebSocket Connected" message will be printed to the terminal. The WebSocket connection can also be accessed from the browser by right-clicking and selecting inspect, network and filtering by "WS" as displayed in the image below.
4. Channel Layers
A channel layer is needed for two or more app instances to communicate between each other (e.g. two different users interacting with the same app at the same time). A channel layer provides a backend where WebSocket messages can be stored and then accessed by the different app instances. The updated consumer in this step opens a communication link (channel_name) in the "notification" channel group on connect, and closes it on disconnect. A new async function has also been added to handle messages.
Update the
consumer classto look like this.... import json ... @consumer(name='dam_notification', url='dams/notifications/') class NotificationsConsumer(AsyncWebsocketConsumer): async def authorized_connect(self): await self.channel_layer.group_add("notifications", self.channel_name) print(f"Added {self.channel_name} channel to notifications") async def authorized_disconnect(self, close_code): await self.channel_layer.group_discard("notifications", self.channel_name) print(f"Removed {self.channel_name} channel from notifications") async def dam_notifications(self, event): message = event['message'] await self.send(text_data=json.dumps({'message': message})) print(f"Got message {event} at {self.channel_name}")Note
The respective print messages set on connect and disconnect will appear in the terminal when the app home is opened or closed.
Channel layersrequire a backend to store theWebSocket messagescoming from different app instances. These messages can be stored in memory. Run the follow command to update your portal configurations:tethys settings --set CHANNEL_LAYERS.default.BACKEND channels.layers.InMemoryChannelLayerNote
Django Channelsrecommends the use of an external backend store for production environments. Thechannels-redispython package plusRedis Serverare the default recommendation. For more information seeDjango Channelschannel layers and deploying sections.
Channel Layer Definitions
Term
Simplified definition
channel name
Communication link unique to an app instance.
channel group
Communication link for different app instances to talk to each other.
channel layer
The mechanism that enables communication between different app instances.
channel layer backend
A backend database to store group messages.
5. New Dam Notification
Now that we have a working WebSocket connection and a communication backend is set, let's add the programming logic.
Add the following code to the
add_dam controllerincontrollers.py.from channels.layers import get_channel_layer from asgiref.sync import async_to_sync ... @controller(url='dams/add', permissions_required='add_dams') def add_dam(request): """ Controller for the Add Dam page. """ # Default Values name = '' owner = 'Reclamation' river = '' date_built = '' location = '' # Errors name_error = '' owner_error = '' river_error = '' date_error = '' location_error = '' # Handle form submission if request.POST and 'add-button' in request.POST: # Get values has_errors = False name = request.POST.get('name', None) owner = request.POST.get('owner', None) river = request.POST.get('river', None) date_built = request.POST.get('date-built', None) location = request.POST.get('geometry', None) # Validate if not name: has_errors = True name_error = 'Name is required.' if not owner: has_errors = True owner_error = 'Owner is required.' if not river: has_errors = True river_error = 'River is required.' if not date_built: has_errors = True date_error = 'Date Built is required.' if not location: has_errors = True location_error = 'Location is required.' if not has_errors: # Get value of max_dams custom setting max_dams = app.get_custom_setting('max_dams') # Query database for count of dams Session = app.get_persistent_store_database('primary_db', as_sessionmaker=True) session = Session() num_dams = session.query(Dam).count() # Only add the dam if custom setting doesn't exist or we have not exceed max_dams if not max_dams or num_dams < max_dams: add_new_dam(location=location, name=name, owner=owner, river=river, date_built=date_built) else: messages.warning(request, 'Unable to add dam "{0}", because the inventory is full.'.format(name)) new_num_dams = session.query(Dam).count() if new_num_dams > num_dams: channel_layer = get_channel_layer() async_to_sync(channel_layer.group_send)( "notifications", { "type": "dam_notifications", "message": "New Dam" } ) return App.redirect(App.reverse('home')) messages.error(request, "Please fix errors.") ...This piece of code checks to see if a new dam has been added and if so it sends a message to the notification group. Notice that the type of the group message is
dam_notifications.Note
Channel layerscan easily be accessed from within a consumer by callingself.channel_layer. From outside theconsumerthey can be called withchannels.layers.get_channel_layer.Note
Channel layersare purelyasynchronousso they need to be wrapped in a converter likeasync_to_syncto be used from synchronous code.Let's create a message box to display our notification when a new app is added. Add the following code to the
get_contextmethod in yourHomeMapclass incontrollers.py.from tethys_sdk.gizmos import MessageBox ... def get_context(self, request, context, *args, **kwargs): # Add custom context variables context.update({ 'can_add_dams': has_permission(request, 'add_dams'), }) message_box = MessageBox( name='notification', title='', dismiss_button='Nevermind', affirmative_button='Refresh', affirmative_attributes='onClick=window.location.href=window.location.href;' ) context.update({"message_box": message_box}) # Call the MapLayout get_context method to initialize the map view context = super().get_context(request, context, *args, **kwargs) return contextThis
gizmocreates an empty message box with a current page refresh. It will be populated in the next step based on ourWebSocket connection.Add a
MessageBoxgizmo to the home view and modify theJavaScriptto display the message box when a "New Dam" message is recieved. Replace the code in theafter_app_contentblock of thehome.htmlwith the following:{% block after_app_content %} {% gizmo message_box %} <script> var notification_ws = new WebSocket('ws://' + window.location.host + '/apps/dam-inventory/dams/notifications/ws/'); var n_div = $("#notification"); var n_title = $("#notificationLabel"); var n_content = $('#notification .lead'); notification_ws.onmessage = function (e) { var data = JSON.parse(e.data); if (data["message"] = "New Dam") { n_title.html('Dam Notification'); n_content.html('A new dam has been added. Refresh this page to load it.'); n_div.modal('show'); } }; </script> {% endblock %}Test the
WebSocket communicationby opening two instances of the dam inventory app at the same time. Add a dam in one instance, a message box will display on the home of the other instance suggesting a refresh to display the newly added dam.
6. Solution
This concludes the WebSockets tutorial. You can view the solution on GitHub at https://github.com/tethysplatform/tethysapp-dam_inventory or clone it as follows:
git clone https://github.com/tethysplatform/tethysapp-dam_inventory
cd tethysapp-dam_inventory
git checkout -b websocket-solution websocket-4.6