Single Sign On (Optional)

Last Updated: December 2020

Important

This feature requires the social-auth-app-django library to be installed. Starting with Tethys 5.0 or if you are using micro-tethys-platform, you will need to install social-auth-app-django using conda or pip as follows:

# conda: conda-forge channel strongly recommended
conda install -c conda-forge social-auth-app-django

# pip
pip install social-auth-app-django

Tethys Portal supports authenticating users with several social authentication and single sign on providers such as Google, Facebook, and LinkedIn via the OAuth 2.0 method. The social authentication and authorization features have been implemented using the Python Social Auth module. Social login is disabled by default, because enabling it requires registering your tethys portal instance with each provider.

Enable Social Login

Use the following instructions to setup social login for the providers you desire.

Caution

Beginning with Tethys Platform 3.0 you must configure the social auth settings in the portal_config.yml file. See Tethys Portal Configuration for more details on how to create and configure this file. For instructions on how to configure social auth for previous versions of Tethys Platform please refer to the documentation specific to your version.

Azure Active Directory

  1. Sign up for a free Microsoft Developer account or sign in with an existing account if you already have one. See: https://azure.microsoft.com/en-us/free/

  2. Create an Azure AD or Azure AD B2C Tenant on Microsoft Azure Portal if you do not already have one. See: Quickstart: Set up a tenant

    Note

    Tethys Platform supports single sign on with both the Azure AD and Azure AD B2C environments.

  3. Register a new application. See: Register a new application using the Azure portal

  • Select Web as the type of app.

  • Enter one of the following for the redirect URL:

    • If using an Azure AD Tenant and you selected either Accounts in any organizational directory or Accounts in any organizational directory and personal Microsoft accounts:

      http://<SERVER_DOMAIN_NAME>/oauth2/complete/azuread-oauth2/
      
    • If using an Azure AD Tenant and you selected Accounts in this organizational directory only:

      http://<SERVER_DOMAIN_NAME>/oauth2/complete/azuread-tenant-oauth2/
      
    • If using an Azure AD B2C Tenant:

      http://<SERVER_DOMAIN_NAME>/oauth2/complete/azuread-b2c/
      
  1. On the Overview page of the App Registration you created in the previous step, note the Application (client) ID and Directory (tenant) ID for use in step 7.

  2. Select Certificates & secrets from the menu on the left. Create a Client Secret and note it's value for use in step 7.

  3. Enable the appropriate authentication backend:

    • If using an Azure AD Tenant and you selected either Accounts in any organizational directory or Accounts in any organizational directory and personal Microsoft accounts:

      tethys settings --set AUTHENTICATION_BACKENDS "['social_core.backends.azuread.AzureADOAuth2']"
      
    • If using an Azure AD Tenant and you selected Accounts in this organizational directory only:

      tethys settings --set AUTHENTICATION_BACKENDS "['social_core.backends.azuread_tenant.AzureADTenantOAuth2']"
      
    • If using an Azure AD B2C Tenant:

      tethys settings --set AUTHENTICATION_BACKENDS "['social_core.backends.azuread_b2c.AzureADB2COAuth2']"
      
  4. Set the appropriate settings:

    • If using an Azure AD Tenant and you selected either Accounts in any organizational directory or Accounts in any organizational directory and personal Microsoft accounts:

      tethys settings --set OAUTH_CONFIG.SOCIAL_AUTH_AZUREAD_OAUTH2_KEY <Application/Client ID> --set OAUTH_CONFIG.SOCIAL_AUTH_AZUREAD_OAUTH2_SECRET <Client Secret>
      
    • If using an Azure AD Tenant and you selected Accounts in this organizational directory only:

      tethys settings --set OAUTH_CONFIG.SOCIAL_AUTH_AZUREAD_TENANT_OAUTH2_KEY <Application/Client ID> --set OAUTH_CONFIG.SOCIAL_AUTH_AZUREAD_TENANT_OAUTH2_SECRET <Client Secret> --set OAUTH_CONFIG.SOCIAL_AUTH_AZUREAD_TENANT_OAUTH2_TENANT_ID <Directory/Tenant ID>
      
    • If using an Azure AD B2C Tenant:

      tethys settings --set OAUTH_CONFIG.SOCIAL_AUTH_AZUREAD_B2C_OAUTH2_KEY <Application/Client ID> --set OAUTH_CONFIG.SOCIAL_AUTH_AZUREAD_B2C_OAUTH2_SECRET <Client Secret> --set OAUTH_CONFIG.SOCIAL_AUTH_AZUREAD_B2C_OAUTH2_TENANT_ID <Directory/Tenant ID> --set OAUTH_CONFIG.SOCIAL_AUTH_AZUREAD_B2C_OAUTH2_POLICY <Custom User Flow>
      

      Note

      Use b2c_ as the value of SOCIAL_AUTH_AZUREAD_B2C_OAUTH2_POLICY if you do not have a custom user flow. See: User flows in Azure Active Directory B2C for more information.

References

For more detailed information about using Azure Active Directory social authentication see the following articles:

Active Directory Federation Services (AD FS)

  1. Coordinate with the administrator of your organization's Windows server that is running AD FS to create a new App Registration for your Tethys Portal (see Step 2).

    Important

    Tethys Platform only supports authenticating with AD FS 2016 or later.

  2. Follow the App Registration in AD FS section of the AD FS MSAL Web app (server app) calling web APIs documentation to register your Tethys Portal with the AD FS server with the following considerations:

    • On the Welcome tab:
      • Select Server application accessing a web API as the Template.

    • On the Server application tab:
      • Note the Client Identifier for use in Step 3.

      • Enter the following for the Redirect URI:

        http://<SERVER_DOMAIN_NAME>/oauth2/complete/adfs-oidc/
        
    • On the Configure Application Credentials tab:
      • Note the Secret that is generated for use in Step 3.

    • On the Configure Web API* tab:
      • Add the FQDN of your Tethys Portal as an Identifier.

    • On the Configure Application Permissions tab:
      • Only the openid scope is required. However, you may consider permitting the email and profile scopes as well to allow Tethys Portal to populate its user profile.

    Important

    You do not need to complete the Code Configuration section.

  3. Add the appropriate settings to the portal_config.yml file using the tethys settings command:

    Add the tethys_services.backends.adfs.ADFSOpenIdConnect backend to the AUTHENTICATION_BACKENDS setting:

    tethys settings --set AUTHENTICATION_BACKENDS "['tethys_services.backends.adfs.ADFSOpenIdConnect']"
    

    Use the Client Identifier and Secret obtained in Step 2 to set the SOCIAL_AUTH_ADFS_OIDC_KEY and SOCIAL_AUTH_ADFS_OIDC_SECRET settings, respectively. Also, set the SOCIAL_AUTH_ADFS_OIDC_DOMAIN setting with the Fully Qualified Domain Name (FQDN) of your AD FS server (e.g. "https://adfs.my-org.com"):

    tethys settings --set OAUTH_CONFIG.SOCIAL_AUTH_ADFS_OIDC_KEY <Client Identifier> --set OAUTH_CONFIG.SOCIAL_AUTH_ADFS_OIDC_SECRET <Secret> --set OAUTH_CONFIG.SOCIAL_AUTH_ADFS_OIDC_DOMAIN <AD FS FQDN>
    

References

For more detailed information about using Active Directory Federation Services social authentication see the following articles:

Facebook

  1. Create a Facebook Developer Account

    You will need a Facebook developer account to register your Tethys Portal with Facebook. To create an account, visit https://developers.facebook.com and sign in with a Facebook account.

  2. Create a Facebook App

    1. Point to My Apps and select Create App.

    2. Fill out the form and press Create App ID button.

  3. Setup OAuth

    1. Scroll down and locate the tile titled Facebook Login.

    2. Press the Setup button on the tile (or Settings if setup previously).

    3. Specify the following for the Valid OAuth Redirect URIs field:

    https://<SERVER_DOMAIN_NAME>/oauth2/complete/facebook/
    

    Note

    Replace <SERVER_DOMAIN_NAME> with the value determined during the Preparation step.

    Note

    Localhost domains are automatically enabled when the app is in development mode, so you don't need to add them for Facebook OAuth logins.

    1. Press the Save Changes button.

    1. Make the app public you wish by changing the toggle switch in the header from Off to On.

    Note

    The Facebook app must be public to allow Facebook authentication to non-localhost Tethys Portals.

  4. Expand the Settings menu on the left and select Basic. Note the App ID and App Secret.

  5. Add the appropriate settings to the portal_config.yml file using the tethys settings command:

    Add the social_core.backends.facebook.FacebookOAuth2 backend to the AUTHENTICATION_BACKENDS setting:

    tethys settings --set AUTHENTICATION_BACKENDS "['social_core.backends.facebook.FacebookOAuth2']"
    

    Copy the App ID and App Secret to the SOCIAL_AUTH_FACEBOOK_KEY and SOCIAL_AUTH_FACEBOOK_SECRET settings, respectively:

    tethys settings --set OAUTH_CONFIG.SOCIAL_AUTH_FACEBOOK_KEY <App ID> --set OAUTH_CONFIG.SOCIAL_AUTH_FACEBOOK_SECRET <App Secret>
    

References

For more detailed information about using Facebook social authentication see the following articles:

Google

  1. Create a Google Developer Account

    Follow these instructions to register your project and create a client ID: Setting Up OAuth 2.0. Provide the following as you setup OAuth2:

    1. Provide Authorized JavaScript Origins

    As a security precaution, Google will only accept authentication requests from the hosts listed in the Authorized JavaScript Origins box. Add the domain of your Tethys Portal to the list. Optionally, you may add a localhost domain to the list to be used during testing:

    https://<SERVER_DOMAIN_NAME>
    http://localhost:8000
    

    Note

    Replace <SERVER_DOMAIN_NAME> with the value determined during the Preparation step.

    1. Provide Authorized Redirect URIs

    You also need to provide the callback URI for Google to call once it has authenticated the user. This follows the pattern http://<host>/oauth2/complete/google-oauth2/:

    https://<SERVER_DOMAIN_NAME>/oauth2/complete/google-oauth2/
    https://localhost:8000/oauth2/complete/google-oauth2/
    

    Note

    Replace <SERVER_DOMAIN_NAME> with the value determined during the Preparation step.

    Note

    Some Google APIs are free to use up to a certain quota of hits. Be sure to familiarize yourself with the terms of use for each service.

  2. Add the appropriate settings to the portal_config.yml file using the tethys settings command:

    Add the social_core.backends.google.GoogleOAuth2 backend to the AUTHENTICATION_BACKENDS setting:

    tethys settings --set AUTHENTICATION_BACKENDS "['social_core.backends.google.GoogleOAuth2']"
    

    Copy the Client ID and Client secret into the SOCIAL_AUTH_GOOGLE_OAUTH2_KEY and SOCIAL_AUTH_GOOGLE_AUTH2_SECRET settings, respectively:

    tethys settings --set OAUTH_CONFIG.SOCIAL_AUTH_GOOGLE_OAUTH2_KEY <Client ID> --set OAUTH_CONFIG.SOCIAL_AUTH_GOOGLE_OAUTH2_SECRET <Client secret>
    

References

For more detailed information about using Google social authentication see the following articles:

HydroShare

Important

This feature requires the hs_restclient library to be installed. Starting with Tethys 5.0 or if you are using micro-tethys-platform, you will need to install hs_restclient using conda or pip as follows:

# conda: conda-forge channel strongly recommended
conda install -c conda-forge hs_restclient

# pip
pip install hs_restclient
  1. Create a HydroShare Account

    You will need a HydroShare account to register your Tethys Portal with HydroShare. To create an account, visit https://www.hydroshare.org.

  2. Create and setup a HydroShare Application

    1. Navigate to https://www.hydroshare.org/o/applications/register/.

    2. Name: Give this OAuth app a name. It is recommended to use the domain of your Tethys Portal instance as the name, like: www.my-tethys-portal.com

    3. Client id: Leave unchanged. Note this value for step 3.

    4. Client secret: Leave unchanged. Note this value for step 3.

    5. Client type: Select "Confidential".

    6. Authorization grant type: Select "Authorization code".

    7. Redirect uris: Add the call back URLs. The protocol (http or https) that matches your Tethys Portal settings should be included in this url. For example:

    if your Tethys Portal was located at the domain ``https://www.my-tethys-portal.com``:
        https://www.my-tethys-portal.com/oauth2/complete/hydroshare/
    
    if your Tethys Portal was on a local development machine:
        http://localhost:8000/oauth2/complete/hydroshare/
        or
        http://127.0.0.1:8000/oauth2/complete/hydroshare/
    
    1. Press the "Save" button.

  3. Add the appropriate settings to the portal_config.yml file using the tethys settings command:

    Add the tethys_services.backends.hydroshare.HydroShareOAuth2 backend to the AUTHENTICATION_BACKENDS setting:

    tethys settings --set AUTHENTICATION_BACKENDS "['tethys_services.backends.hydroshare.HydroShareOAuth2']"
    

    Assign the Client id and Client secret to the SOCIAL_AUTH_HYDROSHARE_KEY and SOCIAL_AUTH_HYDROSHARE_SECRET settings, respectively:

    tethys settings --set OAUTH_CONFIG.SOCIAL_AUTH_HYDROSHARE_KEY <Client id> --set OAUTH_CONFIG.SOCIAL_AUTH_HYDROSHARE_SECRET <Client secret>
    
  4. Work with HydroShare in your app

Once user has logged in Tethys through HydroShare OAuth, your app is ready to retrieve data from HydroShare on behalf of this HydroShare user using HydroShare REST API Client (hs_restclient). A helper function is provided to make this integration smoother.

# import helper function
from tethys_services.backends.hs_restclient_helper import get_oauth_hs

# your controller function
def home(request)

    # put codes in a 'try..except...' statement
    try:
        # pass in request object
        hs = get_oauth_hs(request)

        # your logic goes here. For example: list all HydroShare resources
        for resource in hs.getResourceList():
            print(resource)

    except Exception as e:
        # handle exceptions
        pass
  1. (Optional) Link to a testing HydroShare instance

    The production HydroShare is located at https://www.hydroshare.org/. In some cases you may want to link your Tethys Portal to a testing HydroShare instance, like hydroshare-beta. Tethys already provides OAuth backends for hydroshare-beta and hydroshare-playground. To activate them, you need to go through steps 1-3 for each backend (replace www.hydroshare.org with the testing domain urls accordingly).

    At step 3:

    1. Append the following classes in AUTHENTICATION_BACKENDS settings:

      hydroshare-beta:

      tethys_services.backends.hydroshare_beta.HydroShareBetaOAuth2

      hydroshare-playground:

      tethys_services.backends.hydroshare_playground.HydroSharePlaygroundOAuth2

    2. Assign the Client ID and Client Secret to the following variables:

      hydroshare-beta:

      SOCIAL_AUTH_HYDROSHARE_BETA_KEY

      SOCIAL_AUTH_HYDROSHARE_BETA_SECRET

      hydroshare-playground:

      SOCIAL_AUTH_HYDROSHARE_PLAYGROUND_KEY

      SOCIAL_AUTH_HYDROSHARE_PLAYGROUND_SECRET

    Note

    To prevent any unexpected behavior in section (4), a Tethys account SHOULD NOT be associated with multiple HydroShare social accounts.

References

For more detailed information about using HydroShare social authentication see the following articles:

ArcGIS Online or ArcGIS Enterprise Portal

Note

There are a few differences when enabling social login against ArcGIS Online vs ArcGIS Enterprise Portal. Pay close attention to the steps below for these differences.

  1. Log in to your existing ArcGIS Online or ArcGIS Enterprise Portal account

  2. Create an Application Item

    1. Browse to your "Content"

    2. Select "Add Item" and choose "An Application" from the dropdown

    3. In the popup, choose "Application" as the "Type"

    4. For the "Title", type "Tethys Platform" or anything else you choose

    5. Type one or more tags of your choice, such as "Tethys"

    6. Click "Add Item"

  3. Update the Application Registration metadata

    1. On the newly-created "Item" page, select the "Settings" tab

    2. Scroll to the "Application" section at the very bottom of the page

    3. Click the "Update" button under the "App Registration" subsection

    4. For "Redirect URI", type "https://<SERVER_DOMAIN_NAME>", replacing <SERVER_DOMAIN_NAME> with the value determined during the Preparation step.

    5. Click "Add"

    6. Click "Update"

  4. Take note of the App ID and App Secret (click "Show Secret" to view the latter) for Step 5.

  5. Add the appropriate settings to the portal_config.yml file using the tethys settings command:

    1. If you are configuring your Tethys Portal to authenticate users against ArcGIS Online:

      Add the social_core.backends.arcgis.ArcGISOAuth2 backend to the AUTHENTICATION_BACKENDS setting:

      tethys settings --set AUTHENTICATION_BACKENDS "['social_core.backends.arcgis.ArcGISOAuth2']"
      

      Copy the Client ID and Client Secret to the SOCIAL_AUTH_ARCGIS_KEY and SOCIAL_AUTH_ARCGIS_SECRET settings, respectively:

      tethys settings --set OAUTH_CONFIG.SOCIAL_AUTH_ARCGIS_KEY <Client ID> --set OAUTH_CONFIG.SOCIAL_AUTH_ARCGIS_SECRET <Client Secret>
      
    2. If you are configuring your Tethys Portal to authenticate users against an ArcGIS Enterprise Portal:

      Add the tethys_services.backends.arcgis_portal.ArcGISPortalOAuth2 backend to the AUTHENTICATION_BACKENDS setting:

      tethys settings --set AUTHENTICATION_BACKENDS "['tethys_services.backends.arcgis_portal.ArcGISPortalOAuth2']"
      

      Copy the Client ID and Client Secret to the SOCIAL_AUTH_ARCGIS_KEY and SOCIAL_AUTH_ARCGIS_SECRET settings, respectively:

      tethys settings --set OAUTH_CONFIG.SOCIAL_AUTH_ARCGIS_KEY <Client ID> --set OAUTH_CONFIG.SOCIAL_AUTH_ARCGIS_SECRET <Client Secret>
      

      Copy the root URL at which your ArcGIS Enterprise Portal is hosted to the SOCIAL_AUTH_ARCGIS_PORTAL_URL setting.

      tethys settings --set OAUTH_CONFIG.SOCIAL_AUTH_ARCGIS_PORTAL_URL <Portal URL>
      

      Note

      If unsure of the <Portal URL> value, browse to the "Home" tab of your ArcGIS Enterprise Portal, and then copy the URL up to but NOT including "/home/" (e.g. a home page at "https://arcgis_enterprise_host.domain.com/portal/home" would yield "https://arcgis_enterprise_host.domain.com/portal").

References

For more detailed information about using the ArcGIS Online or ArcGIS Enterprise Portal social logins see the following articles:

LinkedIn

  1. Create a LinkedIn Developer Account

    You will need a LinkedIn developer account to register your Tethys Portal with LinkedIn. To create an account, visit https://developer.linkedin.com/my-apps and sign in with a LinkedIn account.

  2. Create a LinkedIn Application

    1. Navigate back to https://www.linkedin.com/developers/apps, if necessary and press the Create App button.

    2. Fill out the form and press Create App.

  3. Open the Auth tab and note the Client ID and Client Secret for Step 5.

  4. Setup OAuth

    1. Add the call back URLs under the OAuth 2.0 settings section:

      https://<SERVER_DOMAIN_NAME>/oauth2/complete/linkedin-oauth2/
      http://localhost:8000/oauth2/complete/linkedin-oauth2/
      

      Note

      Replace <SERVER_DOMAIN_NAME> with the value determined during the Preparation step.

  5. Add the appropriate settings to the portal_config.yml file using the tethys settings command:

    Add the social_core.backends.linkedin.LinkedinOAuth2 backend to the AUTHENTICATION_BACKENDS setting:

    tethys settings --set AUTHENTICATION_BACKENDS "['social_core.backends.linkedin.LinkedinOAuth2']"
    

    Copy the Client ID and Client Secret to the SOCIAL_AUTH_LINKEDIN_OAUTH2_KEY and SOCIAL_AUTH_LINKEDIN_OAUTH2_SECRET settings, respectively:

    tethys settings --set OAUTH_CONFIG.SOCIAL_AUTH_LINKEDIN_OAUTH2_KEY <Client ID> --set OAUTH_CONFIG.SOCIAL_AUTH_LINKEDIN_OAUTH2_SECRET <Client Secret>
    

References

For more detailed information about using LinkedIn social authentication see the following articles:

Okta

Tethys Platform supports two methods of Okta single sign on: OAuth 2.0 and OpenID Connect. Both methods should work and accomplish the same result. At the time of writing there were bugs in the extra dependency required by the OpenID Connect method that prevented it from working properly. Until the bugs are addressed, we recommend using the OAuth 2.0 method.

  1. If you would like to use the OpenID Connect method, you will need to install an additional dependency (skip if using OAuth2 method):

    conda install -c conda-forge python-jose
    

    Warning

    At the time of writing, the jose package contained syntax errors that made the OpenID Connect method unusable.

  2. Create an Okta Developer Account

    You will need an Okta developer account to register your Tethys Portal with Okta. To create an account, visit https://developer.okta.com/signup/.

  3. Create an Okta Application

    Follow the steps outlined in this document to create an Okta application: Create an Okta application. Set the callback URL as follows:

    OAuth 2.0 method (recommended):

    https://<SERVER_DOMAIN_NAME>/oauth/complete/okta-oauth2/
    

    OpenID Connect method:

    http://<SERVER_DOMAIN_NAME>/oauth2/complete/okta-openidconnect/
    
  4. Select the General tab of the application and note the Client ID and Client Secret for Step 5.

  5. Navigate back to the Dashboard page of the developer console and note the Org URL, located near the top right side of the page. The Org URL is needed for step 5.

  6. Add the appropriate settings to the portal_config.yml file using the tethys settings command:

    1. Add the appropriate authentication backend:

      OAuth 2.0 method (recommended):

      tethys settings --set AUTHENTICATION_BACKENDS "['social_core.backends.okta.OktaOAuth2']"
      

      OpenID method interface:

      tethys settings --set AUTHENTICATION_BACKENDS "['social_core.backends.okta_openidconnect.OktaOpenIdConnect']"
      
    2. Use the Client ID, Client Secret, and Org URL to set the appropriate KEY, CLIENT, and API_URL settings, respectively:

      OAuth 2.0 method (recommended):

      tethys settings --set OAUTH_CONFIG.SOCIAL_AUTH_OKTA_OAUTH2_KEY <Client ID> --set OAUTH_CONFIG.SOCIAL_AUTH_OKTA_OAUTH2_SECRET <Client Secret> --set OAUTH_CONFIG.SOCIAL_AUTH_OKTA_OAUTH2_API_URL <Org URL>
      

      OpenID Connect method:

      tethys settings --set OAUTH_CONFIG.SOCIAL_AUTH_OKTA_OPENIDCONNECT_KEY <Client ID> --set OAUTH_CONFIG.SOCIAL_AUTH_OKTA_OPENIDCONNECT_SECRET <Client Secret> --set OAUTH_CONFIG.SOCIAL_AUTH_OKTA_OPENIDCONNECT_API_URL <Org URL>
      

References

For more detailed information about using Okta social authentication see the following articles:

OneLogin

Important

Currently the OneLogin backend requires an older version (4.0.2) of the social-auth-core library than is currently installed by default with Tethys. To use the OneLogin backend you will need to ensure that your environment has social-auth-core==4.0.2.

You can install the compatible version of social-auth-core into an existing environment with the following command:

conda install --experimental-solver libmamba -c conda-forge social-auth-core=4.0.2 openssl=1

Or you can ensure that you get the compatible version when you create your environment with this command:

conda create --experimental-solver libmamba -n tethys -c tethysplatform -c conda-forge tethys-platform social-auth-core=4.0.2
  1. Create an OneLogin Developer Account

    You will need a OneLogin developer account to register your Tethys Portal with OneLogin. To create an account, visit https://www.onelogin.com/developer-signup.

  2. Create an OneLogin Application

    Follow the steps outlined in this document to add your portal as an app in OneLogin: Connect an OIDC enabled app.

    1. When prompted, set the redirect URL as follows:

      http://<SERVER_DOMAIN_NAME>/oauth2/complete/onelogin-oidc/
      http://localhost:8000/oauth2/complete/onelogin-oidc/
      
    2. If you wish, you may also want to specify the login URL for your portal:

      http://<SERVER_DOMAIN_NAME>/accounts/login/
      http://localhost:8000/accounts/login/
      
    3. On the SSO tab, set the Token Endpoint Authentication Method to POST.

  3. Select the SSO tab if you are not on it already and note the Client ID and Client Secret for Step 5.

  4. Point to Settings > Account Settings and note the Subdomain for step 5 (e.g.: https://example.onelogin.com).

  5. Add the appropriate settings to the portal_config.yml file using the tethys settings command:

    1. Add the appropriate authentication backend:

      tethys settings --set AUTHENTICATION_BACKENDS "['tethys_services.backends.onelogin.OneLoginOIDC']"
      
    2. Use the Client ID, Client Secret, and Subdomain to set the appropriate KEY, CLIENT, and SUBDOMAIN settings, respectively:

      tethys settings --set OAUTH_CONFIG.SOCIAL_AUTH_ONELOGIN_OIDC_KEY <Client ID> --set OAUTH_CONFIG.SOCIAL_AUTH_ONELOGIN_OIDC_SECRET <Client Secret> --set OAUTH_CONFIG.SOCIAL_AUTH_ONELOGIN_OIDC_SUBDOMAIN <Subdomain> OAUTH_CONFIG.SOCIAL_AUTH_ONELOGIN_OIDC_TOKEN_ENDPOINT_AUTH_METHOD "POST"
      

References

For more detailed information about using OneLogin social authentication see the following articles:

Multi-Tenant SSO

A multi-tenant SSO provider is one that provides separate instances of it's SSO services for each organization or tenant that uses it. Each instance of the service is accessed via a different URL (e.g.: my-organization.onelogin.com, login.microsoftonline.com/<tenant-id>/, adfs.my-organization.com). Tethys Portal provides custom backends for some of the multi-tenant SSO providers that are able to handle multiple sets of credentials, one for each tenant. The providers supported include Okta, OneLogin, AzureAD, and AD FS.
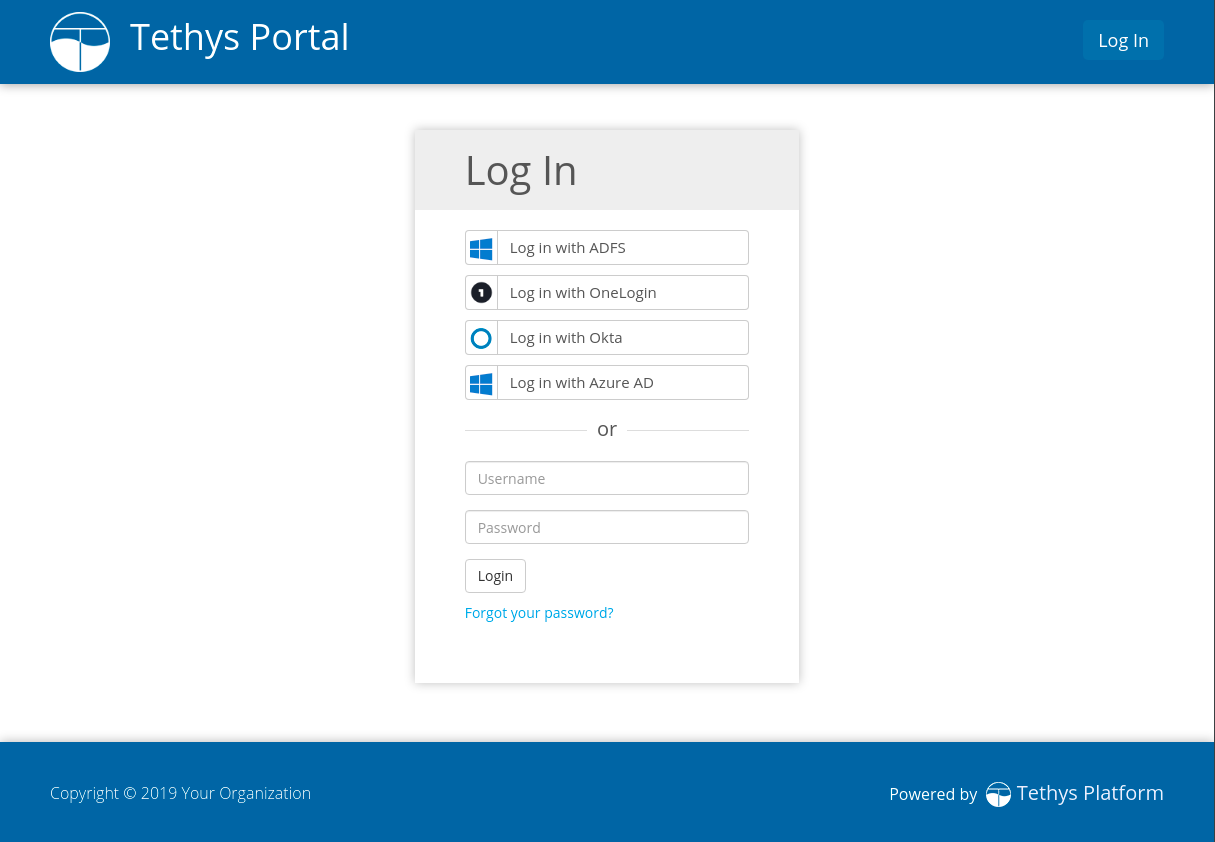
Authentication Flow

The multi-tenant SSO authentication flow introduces an additional step in the authentication process that prompts the user for an identifier called a Tenant Key. Usually the Tenant Key is just the name of their organization or some variant of it. To illustrate the multi-tenant SSO authentication flow, consider the following example:

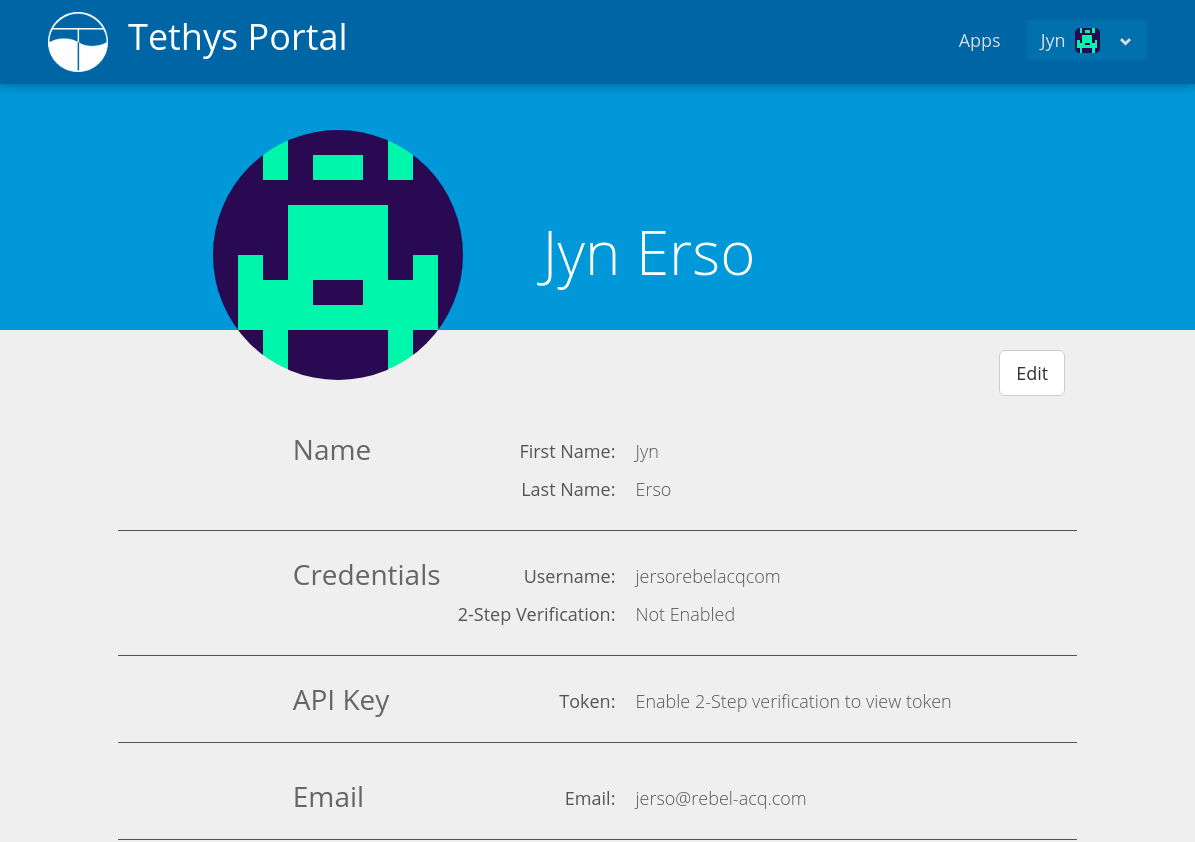
Jyn Erso would like to log in to a Tethys Portal that has been configured to use her company's SSO provider, OneLogin. To login, Jyn completes the following steps:

  1. She navigates to the login page for the Tethys Portal: http://tethys.not-real.org/login/

../../../../../_images/multi-tenant-login-page.png
  1. Next, Jyn clicks on the Log In with OneLogin link.

  2. She enters the name of her company, "Rebel Acquisitions", as the Tenant Key and presses the Next button.

../../../../../_images/multi-tenant-tenant-page.png
  1. She is redirected to the authentication page for her company: http://rebel-acq.onelogin.com/login2/

../../../../../_images/multi-tenant-onelogin-page.png
  1. She enters her username and password as usual.

  2. Jyn is then returned to the Tethys Portal, now logged in.
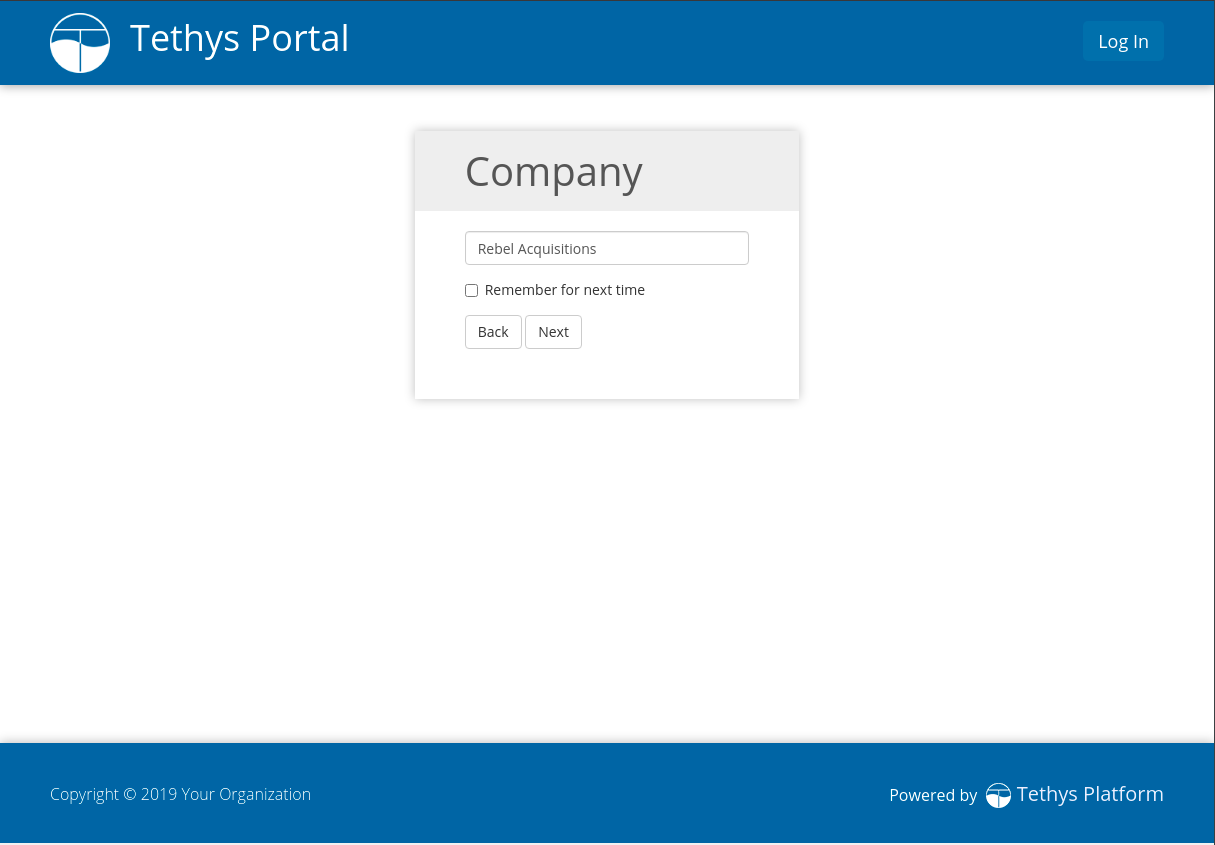
../../../../../_images/multi-tenant-logged-in.png

Note

The default title for the page that requests the Tenant Key (see screenshot for step 3) is "Tenant", but it can be customized via the SSO_TENANT_ALIAS setting:

SSO_TENANT_ALIAS: 'Company'

Configuration

Configuring multi-tenant SSO backends is similar to configuring other SSO backends. The primary difference is that you will need to provide the required settings (i.e. KEY, SECRET, etc.) for multiple tenants instead of globally for the backend. All of these tenant settings are organized under a MULTI_TENANT setting for the backend, and settings for each tenant are grouped under a Tenant Key. For example:

SOCIAL_AUTH_ONELOGIN_OIDC_MULTI_TENANT:
  tenant1:
    SOCIAL_AUTH_ONELOGIN_OIDC_KEY: <Tenant 1 Key>
    SOCIAL_AUTH_ONELOGIN_OIDC_SECRET: <Tenant 1 Secret>
    SOCIAL_AUTH_ONELOGIN_OIDC_SUBDOMAIN: <Tenant 1 Subdomain>
    SOCIAL_AUTH_ONELOGIN_OIDC_TOKEN_ENDPOINT_AUTH_METHOD: "POST"
  tenant2:
    SOCIAL_AUTH_ONELOGIN_OIDC_KEY: <Tenant 2 Key>
    SOCIAL_AUTH_ONELOGIN_OIDC_SECRET: <Tenant 2 Secret>
    SOCIAL_AUTH_ONELOGIN_OIDC_SUBDOMAIN: <Tenant 2 Subdomain>
    SOCIAL_AUTH_ONELOGIN_OIDC_TOKEN_ENDPOINT_AUTH_METHOD: "POST"

Tenant Keys

A Tenant Key is a string that is used to identify a set of settings for a tenant under one of the MULTI_TENANT settings. Tenant Keys may only contain the following characters:

  • any lowercase letter

  • any number

  • spaces

  • hyphens (-)

  • underscores (_)

Care should be taken when selecting Tenant Keys, as users will be required to enter it whenever they login to your Tethys Portal using that tenant. The values provided by users are normalized to all lower case characters before attempting the lookup in the MULTI_AUTH settings. In other words, "Rebel Acquisitions", "rebel acquisitions" and "REBEL ACQUISITIONS" are all normalized to the Tenant Key "rebel acquisitions".

Please use the following guidelines when choosing a Tenant Key:

  • Choose something easy to remember and intuitive for the user.

  • Use the name of the organization or a short variant of it if possible.

  • Tenant keys may include spaces to allow for more intuitive values for users.

  • Users may use title case or any other case when entering the Tenant Key, but the Tenant Key must always be specified using lowercase letters in the portal_config.yml.

The following values are examples of invalid Tenant Keys for the portal_config.yml:

  • "Rebel Acquisitions" -> no uppercase characters allowed.

  • "palpatine & vaders" -> the "&" character is not allowed.

  • "watto's_repair" -> no apostrophes allowed.

The following values are examples of valid Tenant Keys for the portal_config.yml:

  • "rebel acquisitions"

  • "palpatine and vaders"

  • "wattos_repair"

  • "maz-kanatas"

The following is an example of a MULTI_TENANT setting with valid Tenant Keys:

SOCIAL_AUTH_ONELOGIN_OIDC_MULTI_TENANT:
  rebel acquisitions:
    ...
  palpatine and vaders:
    ...
  wattos_repair:
    ...
  maz-kanatas:
    ...

Note

The following regular expression is used to validate Tenant Keys: '^[\w\s_-]+$'. You may override this value with your own using the SSO_TENANT_REGEX setting:

SSO_TENANT_REGEX: '^[\w\s^$_-]+$'

See Regular expression operations for more details on valid regular expression syntax in Python.

Azure AD Multi Tenant

  1. Follow the normal steps for registering the Tethys Portal with the organization's AzureAD tenant and obtain the Application (client) ID, Client Secret, and Directory (tenant) ID (see: Azure Active Directory Steps 3-5).

  2. Enable the appropriate multi-tenant backend for Azure AD:

    • If using an Azure AD Tenant and you selected Accounts in this organizational directory only:

      AUTHENTICATION_BACKENDS:
        - tethys_services.backends.azuread.AzureADTenantOAuth2MultiTenant
      

      Warning

      Do not enable both the AzureADTenantOAuth2MultiTenant and AzureADTenantOAuth2 backends at the same time. The AzureADTenantOAuth2MultiTenant will fall back to behaving like the AzureADTenantOAuth2 if the MULTI_TENANT setting is not present, so it is not necessary to use both.

    • If using an Azure AD B2C Tenant:

      AUTHENTICATION_BACKENDS:
        - tethys_services.backends.azuread.AzureADB2COAuth2MultiTenant
      

      Warning

      Do not enable both the AzureADB2COAuth2MultiTenant and AzureADB2COAuth2 backends at the same time. The AzureADB2COAuth2MultiTenant will fall back to behaving like the AzureADB2COAuth2 if the MULTI_TENANT setting is not present, so it is not necessary to use both.

  3. Add the appropriate MULTI_TENANT setting with the settings for one or more tenants grouped under the desired Tenant Key:

    • If using an Azure AD Tenant and you selected Accounts in this organizational directory only:

      SOCIAL_AUTH_AZUREAD_TENANT_OAUTH2_MULTI_TENANT:
        <tenant_key>:
          SOCIAL_AUTH_AZUREAD_TENANT_OAUTH2_KEY: <Application/Client ID>
          SOCIAL_AUTH_AZUREAD_TENANT_OAUTH2_SECRET: <Client Secret>
          SOCIAL_AUTH_AZUREAD_TENANT_OAUTH2_TENANT_ID: <Directory/Tenant ID>
        <tenant_key>:
          SOCIAL_AUTH_AZUREAD_TENANT_OAUTH2_KEY: <Application/Client ID>
          SOCIAL_AUTH_AZUREAD_TENANT_OAUTH2_SECRET: <Client Secret>
          SOCIAL_AUTH_AZUREAD_TENANT_OAUTH2_TENANT_ID: <Directory/Tenant ID>
      
    • If using an Azure AD B2C Tenant:

      SOCIAL_AUTH_AZUREAD_B2C_OAUTH2_MULTI_TENANT:
        <tenant_key>:
          SOCIAL_AUTH_AZUREAD_B2C_OAUTH2_KEY: <Application/Client ID>
          SOCIAL_AUTH_AZUREAD_B2C_OAUTH2_SECRET: <Client Secret>
          SOCIAL_AUTH_AZUREAD_B2C_OAUTH2_TENANT_ID: <Directory/Tenant ID>
          SOCIAL_AUTH_AZUREAD_B2C_OAUTH2_POLICY: b2c_
        <tenant_key>:
          SOCIAL_AUTH_AZUREAD_B2C_OAUTH2_KEY: <Application/Client ID>
          SOCIAL_AUTH_AZUREAD_B2C_OAUTH2_SECRET: <Client Secret>
          SOCIAL_AUTH_AZUREAD_B2C_OAUTH2_TENANT_ID: <Directory/Tenant ID>
          SOCIAL_AUTH_AZUREAD_B2C_OAUTH2_POLICY: b2c_
      

AD FS Multi Tenant

  1. Follow the normal steps for registering the Tethys Portal on with the AD FS server and obtain the Client Identifier, Secret, and Server Domain Name (see: Active Directory Federation Services (AD FS) Steps 1-2).

  2. Enable the multi-tenant backend for AD FS:

    AUTHENTICATION_BACKENDS:
      - tethys_services.backends.adfs.ADFSOpenIdConnectMultiTenant
    

    Warning

    Do not enable both the ADFSOpenIdConnectMultiTenant and ADFSOpenIdConnect backends at the same time. The ADFSOpenIdConnectMultiTenant will fall back to behaving like the ADFSOpenIdConnect if the MULTI_TENANT setting is not present, so it is not necessary to use both.

  3. Add the MULTI_TENANT setting with the settings for one or more AD FS servers grouped under the desired Tenant Key:

    SOCIAL_AUTH_ADFS_OIDC_MULTI_TENANT:
      <tenant_key>:
        SOCIAL_AUTH_ADFS_OIDC_KEY: <Client Identifier>
        SOCIAL_AUTH_ADFS_OIDC_SECRET: <Secret>
        SOCIAL_AUTH_ADFS_OIDC_DOMAIN: <Server Domain Name>
      <tenant_key>:
        SOCIAL_AUTH_ADFS_OIDC_KEY: <Client Identifier>
        SOCIAL_AUTH_ADFS_OIDC_SECRET: <Secret>
        SOCIAL_AUTH_ADFS_OIDC_DOMAIN: <Server Domain Name>
    

Okta Multi Tenant

  1. Follow the normal steps for registering the Tethys Portal with the organization's Okta instance and obtain the Client ID, Client Secret, and Org URL (see: Okta Steps 2-4).

  2. Enable the appropriate multi-tenant backend for Azure AD:

    • OAuth 2.0 method (recommended):

      AUTHENTICATION_BACKENDS:
        - tethys_services.backends.okta.OktaOauth2MultiTenant
      

      Warning

      Do not enable both the OktaOauth2MultiTenant and OktaOAuth2 backends at the same time. The OktaOauth2MultiTenant will fall back to behaving like the OktaOAuth2 if the MULTI_TENANT setting is not present, so it is not necessary to use both.

    • OpenID Connect method:

      AUTHENTICATION_BACKENDS:
        - tethys_services.backends.okta.OktaOpenIdConnectMultiTenant
      

      Warning

      Do not enable both the OktaOpenIdConnectMultiTenant and OktaOpenIdConnect backends at the same time. The OktaOpenIdConnectMultiTenant will fall back to behaving like the OktaOpenIdConnect if the MULTI_TENANT setting is not present, so it is not necessary to use both.

  3. Add the appropriate MULTI_TENANT setting with the settings for one or more tenants grouped under the desired Tenant Key:

    • OAuth 2.0 method (recommended):

      SOCIAL_AUTH_OKTA_OAUTH2_MULTI_TENANT:
        <tenant_key>:
          SOCIAL_AUTH_OKTA_OAUTH2_KEY: <Client ID>
          SOCIAL_AUTH_OKTA_OAUTH2_SECRET: <Client Secret>
          SOCIAL_AUTH_OKTA_OAUTH2_API_URL: <Org URL>
        <tenant_key>:
          SOCIAL_AUTH_OKTA_OAUTH2_KEY: <Client ID>
          SOCIAL_AUTH_OKTA_OAUTH2_SECRET: <Client Secret>
          SOCIAL_AUTH_OKTA_OAUTH2_API_URL: <Org URL>
      
    • OpenID Connect method:

      SOCIAL_AUTH_OKTA_OPENIDCONNECT_MULTI_TENANT:
        <tenant_key>:
          SOCIAL_AUTH_OKTA_OPENIDCONNECT_KEY: <Client ID>
          SOCIAL_AUTH_OKTA_OPENIDCONNECT_SECRET: <Client Secret>
          SOCIAL_AUTH_OKTA_OPENIDCONNECT_API_URL: <Org URL>
        <tenant_key>:
          SOCIAL_AUTH_OKTA_OPENIDCONNECT_KEY: <Client ID>
          SOCIAL_AUTH_OKTA_OPENIDCONNECT_SECRET: <Client Secret>
          SOCIAL_AUTH_OKTA_OPENIDCONNECT_API_URL: <Org URL>
      

OneLogin Multi Tenant

  1. Follow the normal steps for registering the Tethys Portal on with the OneLogin server and obtain the Client ID, Client Secret, and Subdomain (see: OneLogin Steps 2-4).

  2. Enable the multi-tenant backend for OneLogin:

    AUTHENTICATION_BACKENDS:
      - tethys_services.backends.onelogin.OneLoginOIDCMultiTenant
    

    Warning

    Do not enable both the OneLoginOIDCMultiTenant and OneLoginOIDC backends at the same time. The OneLoginOIDCMultiTenant will fall back to behaving like the OneLoginOIDC if the MULTI_TENANT setting is not present, so it is not necessary to use both.

  3. Add the MULTI_TENANT setting with the settings for one or more OneLogin servers grouped under the desired Tenant Key:

    SOCIAL_AUTH_ONELOGIN_OIDC_MULTI_TENANT:
      <tenant_key>:
        SOCIAL_AUTH_ONELOGIN_OIDC_KEY: <Client ID>
        SOCIAL_AUTH_ONELOGIN_OIDC_SECRET: <Client Secret>
        SOCIAL_AUTH_ONELOGIN_OIDC_SUBDOMAIN: <Subdomain>
        SOCIAL_AUTH_ONELOGIN_OIDC_TOKEN_ENDPOINT_AUTH_METHOD: "POST"
      <tenant_key>:
        SOCIAL_AUTH_ONELOGIN_OIDC_KEY: <Client ID>
        SOCIAL_AUTH_ONELOGIN_OIDC_SECRET: <Client Secret>
        SOCIAL_AUTH_ONELOGIN_OIDC_SUBDOMAIN: <Subdomain>
        SOCIAL_AUTH_ONELOGIN_OIDC_TOKEN_ENDPOINT_AUTH_METHOD: "POST"
    

Social Auth Settings

Beginning with Tethys Platform 3.0.0 the social auth settings are configured in the portal_config.yml file. The following is a summary of all the settings that would need to be added for the various supported social auth backends.

Caution

Social authentication requires Tethys Platform 1.2.0 or later. For instructions on how to configure social auth for previous versions of Tethys Platform please refer to the documentation specific to your version.

The following settings in the portal_config.yml are used to configure social authentication:

AUTHENTICATION_BACKENDS:
  - social_core.backends.azuread.AzureADOAuth2
  - social_core.backends.azuread_tenant.AzureADTenantOAuth2
  - tethys_services.backends.azuread.AzureADTenantOAuth2MultiTenant
  - social_core.backends.azuread_b2c.AzureADB2COAuth2
  - tethys_services.backends.azuread.AzureADB2COAuth2MultiTenant
  - tethys_services.backends.adfs.ADFSOpenIdConnect
  - tethys_services.backends.adfs.ADFSOpenIdConnectMultiTenant
  - social.backends.facebook.FacebookOAuth2
  - social.backends.google.GoogleOAuth2
  - tethys_services.backends.hydroshare.HydroShareOAuth2
  - social.backends.linkedin.LinkedinOAuth2
  - social_core.backends.okta.OktaOAuth2
  - tethys_services.backends.okta.OktaOauth2MultiTenant
  - social_core.backends.okta_openidconnect.OktaOpenIdConnect
  - tethys_services.backends.okta.OktaOpenIdConnectMultiTenant
  - tethys_services.backends.onelogin.OneLoginOIDC
  - tethys_services.backends.onelogin.OneLoginOIDCMultiTenant

OAUTH_CONFIG:
  SOCIAL_AUTH_AZUREAD_OAUTH2_KEY: ''
  SOCIAL_AUTH_AZUREAD_OAUTH2_SECRET: ''

  SOCIAL_AUTH_AZUREAD_TENANT_OAUTH2_MULTI_TENANT: <tenants>
  SOCIAL_AUTH_AZUREAD_TENANT_OAUTH2_KEY: ''
  SOCIAL_AUTH_AZUREAD_TENANT_OAUTH2_SECRET: ''
  SOCIAL_AUTH_AZUREAD_TENANT_OAUTH2_TENANT_ID: ''

  SOCIAL_AUTH_AZUREAD_B2C_OAUTH2_MULTI_TENANT: <tenants>
  SOCIAL_AUTH_AZUREAD_B2C_OAUTH2_KEY: ''
  SOCIAL_AUTH_AZUREAD_B2C_OAUTH2_SECRET: ''
  SOCIAL_AUTH_AZUREAD_B2C_OAUTH2_TENANT_ID: ''
  SOCIAL_AUTH_AZUREAD_B2C_OAUTH2_POLICY: 'b2c_'

  SOCIAL_AUTH_ADFS_OIDC_MULTI_TENANT: <tenants>
  SOCIAL_AUTH_ADFS_OIDC_KEY: ''
  SOCIAL_AUTH_ADFS_OIDC_SECRET: ''
  SOCIAL_AUTH_ADFS_OIDC_DOMAIN: ''

  SOCIAL_AUTH_FACEBOOK_KEY: ''
  SOCIAL_AUTH_FACEBOOK_SECRET: ''
  SOCIAL_AUTH_FACEBOOK_SCOPE: ['email']

  SOCIAL_AUTH_GOOGLE_OAUTH2_KEY: ''
  SOCIAL_AUTH_GOOGLE_OAUTH2_SECRET: ''

  SOCIAL_AUTH_HYDROSHARE_KEY: ''
  SOCIAL_AUTH_HYDROSHARE_SECRET: ''

  SOCIAL_AUTH_LINKEDIN_OAUTH2_KEY: ''
  SOCIAL_AUTH_LINKEDIN_OAUTH2_SECRET: ''

  SOCIAL_AUTH_OKTA_OAUTH2_MULTI_TENANT: <tenants>
  SOCIAL_AUTH_OKTA_OAUTH2_KEY: ''
  SOCIAL_AUTH_OKTA_OAUTH2_SECRET: ''
  SOCIAL_AUTH_OKTA_OAUTH2_API_URL: ''

  SOCIAL_AUTH_OKTA_OPENIDCONNECT_MULTI_TENANT: <tenants>
  SOCIAL_AUTH_OKTA_OPENIDCONNECT_KEY: ''
  SOCIAL_AUTH_OKTA_OPENIDCONNECT_SECRET: ''
  SOCIAL_AUTH_OKTA_OPENIDCONNECT_API_URL: ''

  SOCIAL_AUTH_ONELOGIN_OIDC_MULTI_TENANT: <tenants>
  SOCIAL_AUTH_ONELOGIN_OIDC_KEY: ''
  SOCIAL_AUTH_ONELOGIN_OIDC_SECRET: ''
  SOCIAL_AUTH_ONELOGIN_OIDC_SUBDOMAIN: ''
  SOCIAL_AUTH_ONELOGIN_OIDC_TOKEN_ENDPOINT_AUTH_METHOD: "POST"

You can use the tethys settings command to easily set the settings in the portal_config.yml. For example:

tethys settings --set AUTHENTICATION_BACKENDS "['social_core.backends.google.GoogleOAuth2', 'social_core.backends.facebook.FacebookOAuth2']"
tethys settings --set OAUTH_CONFIG.SOCIAL_AUTH_GOOGLE_OAUTH2_KEY <Client ID> --set OAUTH_CONFIG.SOCIAL_AUTH_GOOGLE_OAUTH2_SECRET <Client secret>
tethys settings --set OAUTH_CONFIG.SOCIAL_AUTH_FACEBOOK_KEY <App ID> --set OAUTH_CONFIG.SOCIAL_AUTH_FACEBOOK_SECRET <App Secret>

Important

Remember to restart the Tethys servers to effect any changes to the portal_config.yml:

sudo supervisor restart all