Visualize THREDDS Services with Leaflet
Last Updated: June 2022
In this tutorial you will learn how to add a Leaflet map to a Tethys App for visualizing layers from a THREDDS server. This tutorial is adapted from Time Dimension Example 1 and the Siphon NCSS Time Series Example. The following topics will be covered in this tutorial:
Using external JavaScript libraries in Tethys Apps
Fetch calls with JavaScript
Recursive Python Functions
Logging in Python
0. Start From Previous Solution (Optional)
If you wish to use the previous solution as a starting point:
git clone https://github.com/tethysplatform/tethysapp-thredds_tutorial.git
cd tethysapp-thredds_tutorial
git checkout -b thredds-service-solution thredds-service-solution-4.2
1. Add Leaflet Map to Home View
Leaflet is not officially supported by Tethys Platform as a Gizmo, but it can easily be added manually as follows:
Include the Leaflet libraries in your app. Leaflet can be added a number of different ways as documented on their Download page. For this tutorial use the CDN option. Replace the contents of
templates/thredds_tutorial/home.htmlwith:
{% extends tethys_app.package|add:"/base.html" %}
{% load tethys %}

{% block styles %}
  {{ block.super }}
  <link rel="stylesheet" href="https://unpkg.com/leaflet@1.8.0/dist/leaflet.css"
   integrity="sha512-hoalWLoI8r4UszCkZ5kL8vayOGVae1oxXe/2A4AO6J9+580uKHDO3JdHb7NzwwzK5xr/Fs0W40kiNHxM9vyTtQ=="
   crossorigin=""/>
{% endblock %}

{% block global_scripts %}
  {{ block.super }}
  <script src="https://unpkg.com/leaflet@1.8.0/dist/leaflet.js"
   integrity="sha512-BB3hKbKWOc9Ez/TAwyWxNXeoV9c1v6FIeYiBieIWkpLjauysF18NzgR1MBNBXf8/KABdlkX68nAhlwcDFLGPCQ=="
   crossorigin=""></script>
{% endblock %}

{% block header_buttons %}
{% endblock %}

{% block app_content %}
  <div id="leaflet-map"></div>
{% endblock %}

{% block app_actions_override %}
{% endblock %}
Write a bit of JavaScript to initialize the map using the JavaScript closure pattern for organization. Create a method called
init_mapinpublic/js/leaflet_map.jswith the following contents:
/*****************************************************************************
* FILE: Leaflet Map Module for THREDDS Tutorial
* DATE: 13 December 2019
* AUTHOR: Nathan Swain
* COPYRIGHT: (c) Aquaveo 2019
* LICENSE: BSD 2-Clause
*****************************************************************************/
/*****************************************************************************
* LIBRARY WRAPPER
*****************************************************************************/
var LEAFLET_MAP = (function() {
"use strict"; // And enable strict mode for this library
/************************************************************************
* MODULE LEVEL / GLOBAL VARIABLES
*************************************************************************/
var public_interface, // Object returned by the module
m_map; // The Leaflet Map
/************************************************************************
* PRIVATE FUNCTION DECLARATIONS
*************************************************************************/
// Map Methods
var init_map;
/************************************************************************
* PRIVATE FUNCTION IMPLEMENTATIONS
*************************************************************************/
// Map Methods
init_map = function() {
// Create Map
m_map = L.map('leaflet-map', {
zoom: 3,
center: [0, 0],
fullscreenControl: true,
});
// Add Basemap
L.tileLayer('https://{s}.tile.openstreetmap.org/{z}/{x}/{y}.png', {
attribution: '© <a href="https://www.openstreetmap.org/copyright">OpenStreetMap</a> contributors'
}).addTo(m_map);
};
/************************************************************************
* DEFINE PUBLIC INTERFACE
*************************************************************************/
/*
* Library object that contains public facing functions of the package.
* This is the object that is returned by the library wrapper function.
* See below.
* NOTE: The functions in the public interface have access to the private
* functions of the library because of JavaScript function scope.
*/
public_interface = {};
/************************************************************************
* INITIALIZATION / CONSTRUCTOR
*************************************************************************/
// Initialization: jQuery function that gets called when
// the DOM tree finishes loading
$(function() {
init_map();
});
return public_interface;
}()); // End of package wrapper
Remove the padding around the content area and override the styles for the app actions area so that the map fills the content area. Create
public/css/leaflet_map.csswith the following contents:
/* Map Format */
#app-content-wrapper #app-content {
    height: 100%;
}

#inner-app-content {
    height: 100%;
    padding: 0;
}

#leaflet-map {
    height: 100%;
}

/* Remove padding on bottom where app-actions section used to be */
#app-content-wrapper #app-content {
    padding-bottom: 0;
}
Include the new stylesheet and JavaScript modules in
templates/thredds_tutorial/home.html:
{% extends tethys_app.package|add:"/base.html" %}
{% load static tethys %}

{% block styles %}
  {{ block.super }}
  <link rel="stylesheet" href="https://unpkg.com/leaflet@1.8.0/dist/leaflet.css"
   integrity="sha512-hoalWLoI8r4UszCkZ5kL8vayOGVae1oxXe/2A4AO6J9+580uKHDO3JdHb7NzwwzK5xr/Fs0W40kiNHxM9vyTtQ=="
   crossorigin=""/>
  <link rel="stylesheet" href="{% static tethys_app|public:'css/leaflet_map.css' %}"/>
{% endblock %}

{% block global_scripts %}
  {{ block.super }}
  <script src="https://unpkg.com/leaflet@1.8.0/dist/leaflet.js"
   integrity="sha512-BB3hKbKWOc9Ez/TAwyWxNXeoV9c1v6FIeYiBieIWkpLjauysF18NzgR1MBNBXf8/KABdlkX68nAhlwcDFLGPCQ=="
   crossorigin=""></script>
{% endblock %}

{% block scripts %}
  {{ block.super }}
  <script src="{% static tethys_app|public:'js/leaflet_map.js' %}" type="text/javascript"></script>
{% endblock %}
Tip
Load the static library and use the static tag to reference scripts, stylesheets, and other resources in your public directory.
Remove superfluous navigation links in
templates/thredds_tutorial/base.html:
{% block app_navigation_items %}
{% endblock %}
Verify that the Leaflet map is now in the app. Browse to http://localhost:8000/apps/thredds-tutorial in a web browser and login if necessary. The leaflet map should appear in the content area of the app and fill it.
2. Create Controls for Selecting Datasets
In this step, you'll create controls to allow the user to search for and select a dataset and variable to visualize on the map. THREDDS WMS services provide a number of color ramps and styles out-of-the-box. You'll also create a control for changing the style of the layer.
Define gizmos for the dataset selection controls in the
homecontroller ofcontrollers.py. Replace the contents ofcontrollers.pywith:
from tethys_sdk.routing import controller
from tethys_sdk.gizmos import SelectInput


@controller
def home(request):
    """
    Controller for the app home page.
    """
    # Retrieve dataset options from the THREDDS service
    datasets = []

    dataset_select = SelectInput(
        display_text='Dataset',
        name='dataset',
        multiple=False,
        options=datasets,
        initial=None,
        select2_options={
            'placeholder': 'Select a dataset',
            'allowClear': False
        }
    )

    variable_select = SelectInput(
        display_text='Variable',
        name='variable',
        multiple=False,
        options=(),
        select2_options={
            'placeholder': 'Select a variable',
            'allowClear': False
        }
    )

    style_select = SelectInput(
        display_text='Style',
        name='style',
        multiple=False,
        options=(),
        select2_options={
            'placeholder': 'Select a style',
            'allowClear': False
        }
    )

    context = {
        'dataset_select': dataset_select,
        'variable_select': variable_select,
        'style_select': style_select,
    }
    return App.render(request, 'home.html', context)
Add the controls to the
app_navigation_itemsblock intemplates/thredds_tutorial/home.html:
{% block app_navigation_items %}
  <li class="title">Query</li>
  {% gizmo dataset_select %}
  {% gizmo variable_select %}
  {% gizmo style_select %}
{% endblock %}
Left align the section titles in the navigation by adding the following to
public/css/main.css:
#app-content-wrapper #app-content #app-navigation .nav li.title {
    padding-left: 0;
}
Verify that the controls are in the app and functioning properly. Browse to http://localhost:8000/apps/thredds-tutorial in a web browser and login if necessary. There should be three controls in the app navigation area on the left: Dataset, Variable, and Style.
Tip
If the app navigation window is not open, use the hamburger menu next to the app icon to open it.
3. Initialize Dataset Select Control
At this point the select controls are empty and don't do anything. In this step, you'll query the THREDDS service to populate the dataset select control with a list of available datasets to visualize. You'll narrow the query to only those datasets that have the WMS service enabled.
Create a new Python module
thredds_methods.pywith the following contents:
def parse_datasets(catalog):
    """
    Collect all available datasets that have the WMS service enabled.

    Args:
        catalog(siphon.catalog.TDSCatalog): A Siphon catalog object bound to a valid THREDDS service.

    Returns:
        list<2-tuple<dataset_name, wms_url>: One 2-tuple for each dataset.
    """
    datasets = []

    for dataset_name, dataset_obj in catalog.datasets.items():
        dataset_wms_url = dataset_obj.access_urls.get('wms', None)
        if dataset_wms_url:
            datasets.append((dataset_name, f'{dataset_name};{dataset_wms_url}'))

    for _, catalog_obj in catalog.catalog_refs.items():
        d = parse_datasets(catalog_obj.follow())
        datasets.extend(d)

    return datasets
Note
This function is recursive, meaning it calls itself. Since THREDDS datasets can be located at arbitrary paths, sometimes nested in deep folder hierarchies, the function needs to be able to follow the paths down to find all the datasets. In this case, it searches for both datasets and new catalogs. When it encounters a new catalog, it calls itself again, initiating a search for dataset and new catalogs at that level. The dataset are collected and returned back up the call stack.
Tip
Depending on the size of the catalog and the connection speed, this function can take quite bit of time to parse all of the datasets. This can be especially annoying when developing. One strategy to deal with slow catalog services during development is to temporarily mock the data.
If you print the data returned by the function and copy it into a temporary variable, you can have the function return that instead. Then the function will run instantaneously during development. Don't forget to change the code back when you are done.
Mocking the data look something like this:
temp_datasets = [('Full Collection (Reference / Forecast Time) Dataset',
                  'Full Collection (Reference / Forecast Time) '
                  'Dataset;https://thredds.ucar.edu/thredds/wms/grib/NCEP/GFS/Global_0p5deg/TwoD'),
                 ('Best GFS Half Degree Forecast Time Series',
                  'Best GFS Half Degree Forecast Time '
                  'Series;https://thredds.ucar.edu/thredds/wms/grib/NCEP/GFS/Global_0p5deg/Best'),
                 ('Latest Collection for GFS Half Degree Forecast',
                  'Latest Collection for GFS Half Degree Forecast;https://thredds.ucar.edu/thredds/wms/grib/NCEP/GFS/Global_0p5deg/GFS_Global_0p5deg_20200228_0000.grib2')]


def parse_datasets(catalog):
    """
    Collect all available datasets that have the WMS service enabled.

    Args:
        catalog(siphon.catalog.TDSCatalog): A Siphon catalog object bound to a valid THREDDS service.

    Returns:
        list<2-tuple<dataset_name, wms_url>: One 2-tuple for each dataset.
    """
    # datasets = []
    #
    # for dataset_name, dataset_obj in catalog.datasets.items():
    #     dataset_wms_url = dataset_obj.access_urls.get('wms', None)
    #     if dataset_wms_url:
    #         datasets.append((dataset_name, f'{dataset_name};{dataset_wms_url}'))
    #
    # for _, catalog_obj in catalog.catalog_refs.items():
    #     d = parse_datasets(catalog_obj.follow())
    #     datasets.extend(d)
    #
    # return datasets
    # TODO: DON'T FORGET TO UNCOMMENT
    return temp_datasets
Handling the slow connection or large catalog problem in production is trickier. One option would be to implement a cache. A simple caching mechanism could be implemented by writing the results to a file the first time the function is called and then loading the results from that file every time after that. This introduces new problem though: how do you update the cache when the catalog updates?
If your app requires only a specific subset of datasets and the entire THREDDS catalog, then it would probably be better to provide a list of hard-coded datasets, similar to what was done in the Google Earth Engine tutorial. How you handle this problem is ultimately dependent on the needs of your application.
Modify the
homecontroller incontrollers.pyto call theparse_datasetsfunction to get a list of all datasets available on the THREDDS service:
from django.shortcuts import render
from tethys_sdk.routing import controller
from tethys_sdk.gizmos import SelectInput
from .app import App
from .thredds_methods import parse_datasets
@controller
def home(request):
    """
    Controller for the app home page.
    """
    catalog = App.get_spatial_dataset_service(app.THREDDS_SERVICE_NAME, as_engine=True)

    # Retrieve dataset options from the THREDDS service
    print('Retrieving Datasets...')
    datasets = parse_datasets(catalog)
    initial_dataset_option = datasets[0]
    from pprint import pprint
    pprint(datasets)
    pprint(initial_dataset_option)

    dataset_select = SelectInput(
        display_text='Dataset',
        name='dataset',
        multiple=False,
        options=datasets,
        initial=initial_dataset_option,
        select2_options={
            'placeholder': 'Select a dataset',
            'allowClear': False
        }
    )

    ...
Tip
If you encounter HTTPS/SSL verification issues (e.g. due to using a self-signed SSL certificate during development), you may want to disable SSL verification of the THREDDS catalog engine. To do so, import the Siphon session manager and then set the verify setting to False before retrieving your catalog engine:
from siphon.http_util import session_manager
session_manager.set_session_options(verify=False)
catalog = App.get_spatial_dataset_service('my_thredds_service', as_engine=True)
Warning
DO NOT DISABLE SSL VERIFICATION FOR APPS IN PRODUCTION.
Verify that
homecontroller is using the newparse_datasetfunction to find THREDDS datasets. Browse to http://localhost:8000/apps/thredds-tutorial in a web browser and login if necessary. After the home page loads, inspect the log messages in the terminal where Tethys is running. Thepprintcalls in our controller should print the object being returned from theparse_datasetfunction in the terminal. It should also populate the options for the Dataset control.
4. Create Endpoint for Getting Available WMS Layers
Each time a new dataset is selected, the options in the variable and style controls need to be updated to match the variables and styles of the new dataset. This information can be found by querying the WMS endpoint of the dataset provided by THREDDS. Querying the WMS endpoint is most easily accomplished by using the OWSLib Python library. In this step you will implement a new controller that will use OWSLib to retrieve the information and call it using fetch anytime a new dataset is selected.
Add the following
get_layers_for_wmsfunction tothredds_methods.py:
from owslib.wms import WebMapService
def get_layers_for_wms(wms_url):
    """
    Retrieve metadata from a WMS service including layers, available styles, and the bounding box.

    Args:
        wms_url(str): URL to the WMS service endpoint.

    Returns:
        dict<layer_name:dict<styles,bbox>>: A dictionary with a key for each WMS layer available and a dictionary value containing metadata about the layer.
    """
    wms = WebMapService(wms_url)
    layers = wms.contents
    from pprint import pprint
    print('WMS Contents:')
    pprint(layers)

    layers_dict = dict()
    for layer_name, layer in layers.items():
        layer_styles = layer.styles
        layer_bbox = layer.boundingBoxWGS84
        leaflet_bbox = [[layer_bbox[1], layer_bbox[0]], [layer_bbox[3], layer_bbox[2]]]
        layers_dict.update({
            layer_name: {
                'styles': layer_styles,
                'bbox': leaflet_bbox
            }
        })

    print('Layers Dict:')
    pprint(layers_dict)
    return layers_dict
Tip
If you encounter HTTPS/SSL verification issues (e.g. due to using a self-signed SSL certificate during development), you may want to disable SSL verification of the WebMapService engine. To do so, import the OWSLib Authentication class and create an auth object with verify set to False. Then pass this auth object to the WebMapService constructor:
from owslib.util import Authentication
auth = Authentication(verify=False)
wms = WebMapService(wms_url, auth=auth)
Note
At the time of writing there was an open issue with the verify parameter of an Authentication object being negated when set to False, making this work around not work. See: OWSLib Issue 609.
Warning
DO NOT DISABLE SSL VERIFICATION FOR APPS IN PRODUCTION.
Create the
get_wms_layerscontroller incontrollers.py:
from django.http import HttpResponseNotAllowed, JsonResponse
from .thredds_methods import parse_datasets, get_layers_for_wms
@controller
def get_wms_layers(request):
    json_response = {'success': False}

    if request.method != 'GET':
        return HttpResponseNotAllowed(['GET'])

    try:
        wms_url = request.GET.get('wms_url', None)

        print(f'Retrieving layers for: {wms_url}')
        layers = get_layers_for_wms(wms_url)

        json_response.update({
            'success': True,
            'layers': layers
        })

    except Exception:
        json_response['error'] = f'An unexpected error has occurred. Please try again.'

    return JsonResponse(json_response)
5. Stub Out the Variable and Style Control JavaScript Methods
In this step you will use the new get-wms-layers endpoint to get a list of layers and their attributes (e.g. styles) to update the variable and style controls.
Add the following new variables to the MODULE LEVEL / GLOBAL VARIABLES section of
public/js/leafet_map.js:
var m_layer_meta,        // Map of layer metadata indexed by variable
    m_curr_dataset,      // The current selected dataset
    m_curr_variable,     // The current selected variable/layer
    m_curr_style,        // The current selected style
    m_curr_wms_url;      // The current WMS url
Add the following module function declarations to the PRIVATE FUNCTION DECLARATIONS section of
public/js/leafet_map.js:
// Control Methods
var init_controls, update_variable_control, update_style_control;
Add the following module function stubs to the PRIVATE FUNCTION IMPLEMENTATIONS section of
public/js/leafet_map.js, just below theinit_mapmethod:
// Control Methods
init_controls = function() {
    console.log('Initializing controls...');
};

// Query the current WMS for available layers and add them to the variable control
update_variable_control = function() {
    console.log('Updating variable control...');
};

// Update the available style options on the style control
update_style_control = function() {
    console.log('Updating style control...');
};
Note
These functions are method stubs that will be implemented in the following steps.
Call the
init_controlsmethod when the module initializes. Replace the INITIALIZATION / CONSTRUCTOR section ofpublic/js/leafet_map.jswith the following updated implementation:
/************************************************************************
*                  INITIALIZATION / CONSTRUCTOR
*************************************************************************/

// Initialization: jQuery function that gets called when
// the DOM tree finishes loading
$(function() {
    init_map();
    init_controls();
});
6. Implement Variable and Style Control Methods
In this step you will implement the dataset controll JavaScript methods in public/js/leaflet_map.js.
Here is a brief explanation of each method that will be implemented in this step:
init_controls: adds on-change handlers for each control so that you can implement the logic that happens whenever a control is changed. Called when the module initializes after page load.
update_variable_control: will call the new
get-wms-layersendpoint and create new select options for the variable control with the returned list of layers. It will also save the layer data for use by other methods.update_style_control: will use the saved layer metadata to generate style options for the style select.
Replace the
init_controlsmethod stub inpublic/js/leaflet_map.jswith the following implementation:
init_controls = function() {
    // Define what happens when the dataset select input changes
    $('#dataset').on('change', function() {
        let dataset_wms = $('#dataset').val();
        let dataset_wms_parts = dataset_wms.split(';');
        m_curr_dataset = dataset_wms_parts[0];
        m_curr_wms_url = dataset_wms_parts[1];

        // Update variable control with layers provided by the new WMS
        update_variable_control();
    });

    // Define what happens when the variable select input changes
    $('#variable').on('change', function() {
        m_curr_variable = $('#variable').val();

        // Update the styles
        update_style_control();
    });

    // Define what happens when the style select input changes
    $('#style').on('change', function() {
        m_curr_style = $('#style').val();
    });

    $('#dataset').trigger('change');
};
Replace the
update_variable_controlmethod stub inpublic/js/leaflet_map.jswith the following implementation:
update_variable_control = function() {
    // Use REST endpoint to get WMS layers
    fetch('./get-wms-layers/?' + new URLSearchParams({'wms_url': m_curr_wms_url}))
      .then((response) => response.json())
      .then((data) => {
        if (!data.success) {
            console.log('An unexpected error occurred!');
            return;
        }

        // Clear current variable select options
        $('#variable').select2().empty();

        // Save layer metadata
        m_layer_meta = data.layers;

        // Create new variable select options
        let first_option = true;
        for (var layer in data.layers) {
            if (first_option) {
                m_curr_variable = layer;
            }

            let new_option = new Option(layer, layer, first_option, first_option);
            $('#variable').append(new_option);
            first_option = false;
        }

        // Trigger a change to refresh the select box
        $('#variable').trigger('change');
      });
};
Replace the
update_style_controlmethod stub inpublic/js/leaflet_map.jswith the following implementation:
update_style_control = function() {
    let first_option = true;
    for (var style in m_layer_meta[m_curr_variable].styles) {
        if (first_option) {
            m_curr_style = style;
        }

        let new_option = new Option(style, style, first_option, first_option);
        $('#style').append(new_option);
        first_option = false;
    }

    $('#style').trigger('change');
};
Verify that the Variable and Style controls are updated properly when the dataset changes. Browse to http://localhost:8000/apps/thredds-tutorial in a web browser and login if necessary. Use the Dataset control to select a new dataset and verify that the Variable and Style options update accordingly. Inspect the terminal where Tethys is running to see the output from the print statement we added for debugging in Step 4.
7. Add Time-Dimension Plugin to Leaflet Map
Many of the datasets hosted on THREDDS servers have time as a dimension. In this step you will add the Time-Dimension plugin to the Leaflet map so that it can visualize data with the time dimension. The plugin adds a time slider control to the map and provides a way to load and visualize WMS layers with a time dimension.
Include the Time-Dimension Leaflet plugin libraries to
templates/thredds_tutorial/home.html:
{% block styles %}
  {{ block.super }}
  <link rel="stylesheet" href="https://unpkg.com/leaflet@1.8.0/dist/leaflet.css"
   integrity="sha512-hoalWLoI8r4UszCkZ5kL8vayOGVae1oxXe/2A4AO6J9+580uKHDO3JdHb7NzwwzK5xr/Fs0W40kiNHxM9vyTtQ=="
   crossorigin=""/>
  <link rel="stylesheet" href="https://cdn.jsdelivr.net/npm/leaflet-timedimension@1.1.1/dist/leaflet.timedimension.control.min.css" />
  <link rel="stylesheet" href="{% static tethys_app|public:'css/leaflet_map.css' %}"/>
{% endblock %}

{% block global_scripts %}
  {{ block.super }}
  <script src="https://unpkg.com/leaflet@1.8.0/dist/leaflet.js"
   integrity="sha512-BB3hKbKWOc9Ez/TAwyWxNXeoV9c1v6FIeYiBieIWkpLjauysF18NzgR1MBNBXf8/KABdlkX68nAhlwcDFLGPCQ=="
   crossorigin=""></script>
  <script type="text/javascript" src="https://cdn.jsdelivr.net/npm/iso8601-js-period@0.2.1/iso8601.min.js"></script>
  <script type="text/javascript" src="https://cdn.jsdelivr.net/npm/leaflet-timedimension@1.1.1/dist/leaflet.timedimension.min.js"></script>
{% endblock %}
Enable the Time Dimension control when initializing the map by replacing the
init_mapmethod inpublic/js/leaflet_map.jswith this updated implementation:
init_map = function() {
// Create Map
m_map = L.map('leaflet-map', {
zoom: 3,
center: [0, 0],
fullscreenControl: true,
timeDimension: true,
timeDimensionControl: true
});
// Add Basemap
L.tileLayer('https://{s}.tile.openstreetmap.org/{z}/{x}/{y}.png', {
attribution: '© <a href="https://www.openstreetmap.org/copyright">OpenStreetMap</a> contributors'
}).addTo(m_map);
};
Verify that the Time-Dimension control is enabled. Browse to http://localhost:8000/apps/thredds-tutorial in a web browser and login if necessary. There should now be a time slider control at the bottom of the map.
8. Add Selected Dataset Layer to Map
In this step, you'll create the update_layer method that will add the THREDDS dataset WMS layer to the Leaflet map.
Add the following new variables to the MODULE LEVEL / GLOBAL VARIABLES section of
public/js/leafet_map.js:
var m_layer,             // The layer
    m_td_layer;          // The Time-Dimension layer
Add the following module function declarations to the PRIVATE FUNCTION DECLARATIONS section of
public/js/leafet_map.js:
var update_layer;
Insert the
update_layermethod just after theinit_mapmethod inpublic/js/leaflet_map.js:
update_layer = function() {
    if (m_td_layer) {
        m_map.removeLayer(m_td_layer);
    }

    // Layer
    m_layer = L.tileLayer.wms(m_curr_wms_url, {
        layers: m_curr_variable,
        format: 'image/png',
        transparent: true,
        colorscalerange: '250,350',  // Hard-coded color scale range won't work for all layers
        abovemaxcolor: "extend",
        belowmincolor: "extend",
        numcolorbands: 100,
        styles: m_curr_style
    });

    // Wrap WMS layer in Time Dimension Layer
    m_td_layer = L.timeDimension.layer.wms(m_layer, {
        updateTimeDimension: true
    });

    // Add Time-Dimension-Wrapped WMS layer to the Map
    m_td_layer.addTo(m_map);
};
Call the
update_layermethod when the style changes. Replace the on-change handler for the style control (i.e.$('#style').on('change', ...);) defined in theinit_controlsmethod inpublic/js/leaflet_map.jswith this updated implementation:
// Define what happens when the style select input changes
$('#style').on('change', function() {
    m_curr_style = $('#style').val();

    // Update the layer with the new styles
    update_layer();
});
Use the bounding box retrieved from the WMS service to automatically frame the selected layer on the map. Replace the on-change handler for the variable control (i.e.
$('#variable').on('change', ...);) defined in theinit_controlsmethod with this updated implementation:
$('#variable').on('change', function() {
    m_curr_variable = $('#variable').val();

    // Update the styles
    update_style_control();

    // Zoom to the bounding box of the new layer
    let bbox = m_layer_meta[m_curr_variable].bbox;
    m_map.fitBounds(bbox);
});
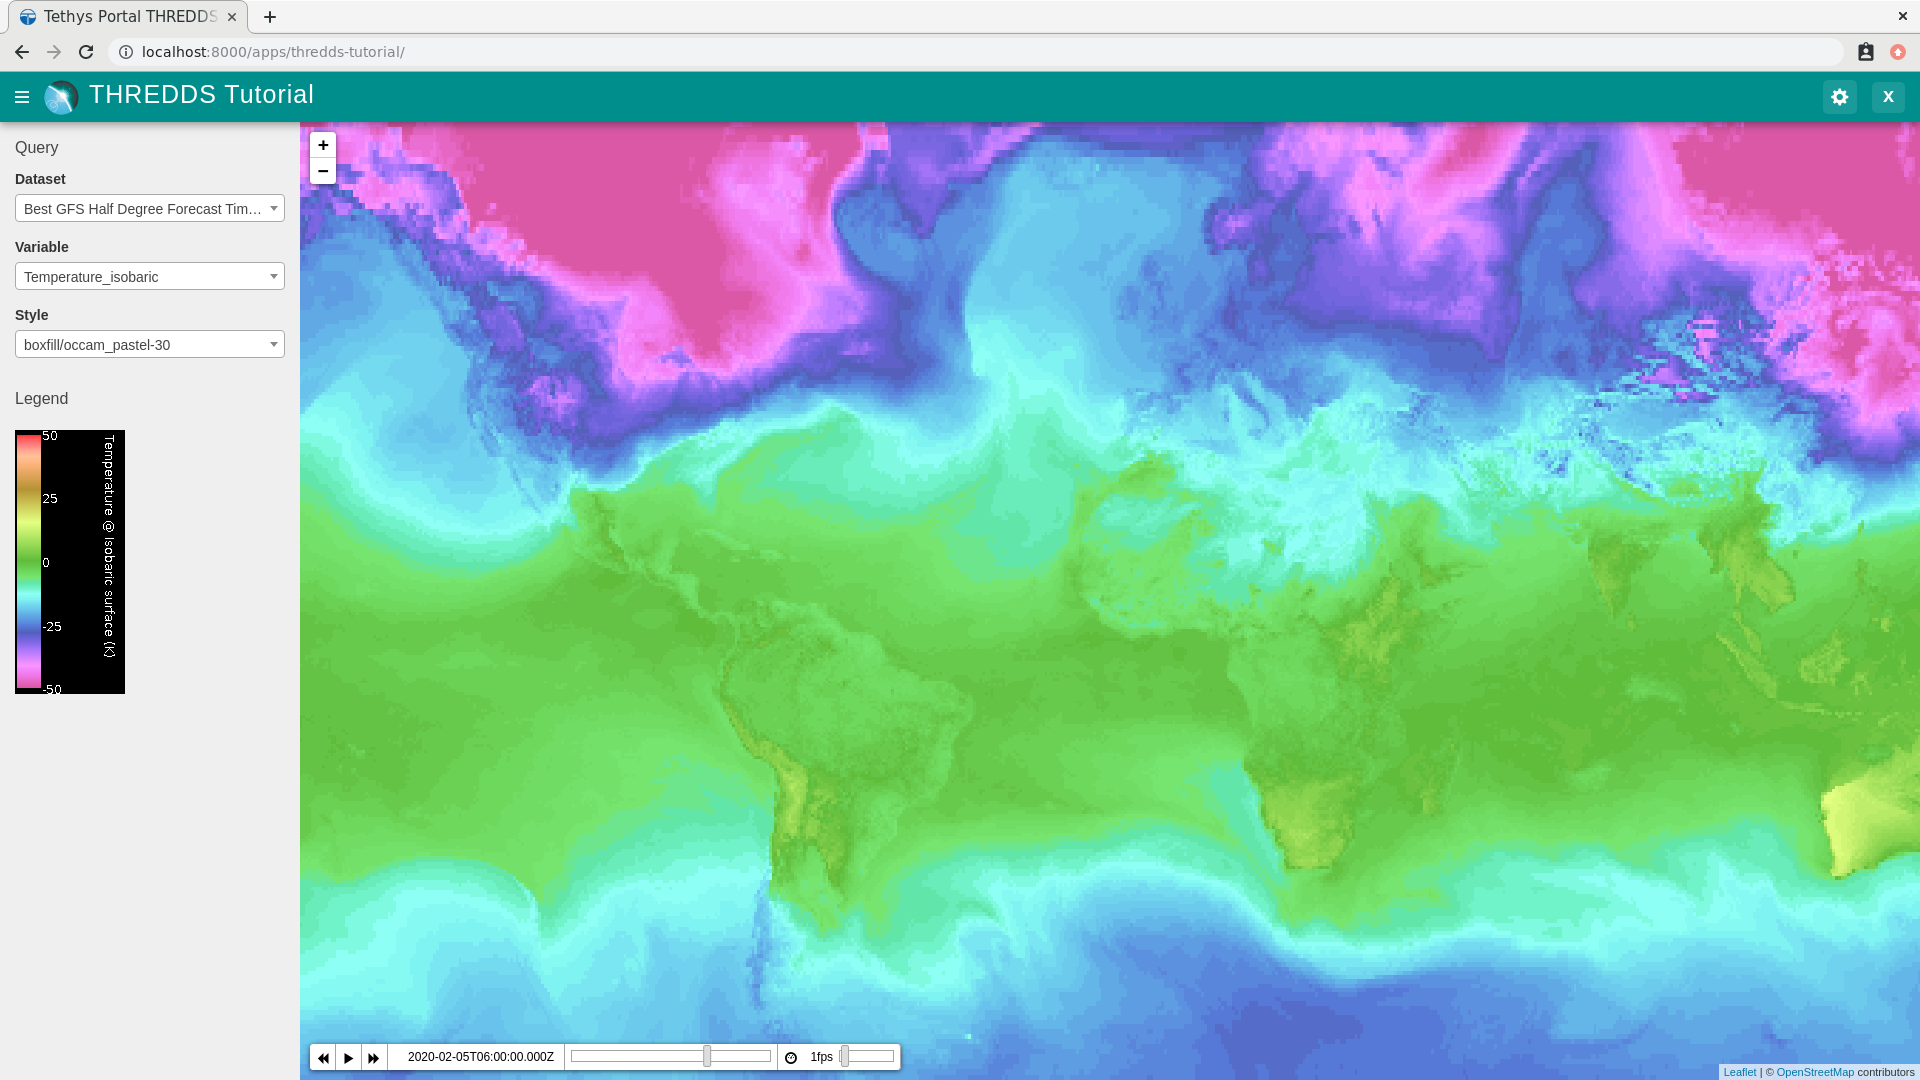
Verify that the layers show up on the map. Browse to http://localhost:8000/apps/thredds-tutorial in a web browser and login if necessary. Select the "Best GFS Half Degree Forecast Time Series" dataset using the Dataset control to test a time-varying layer. Press the Play button on the Time-Dimension control to animate the layer.
9. Implement Legend for Layers
The THREDDS implementation of the WMS standard includes support for the GetLayerGraphic request. In this step you'll use this request to generate a legend image for the layer and style selected.
Add an HTML element for the legend just under the dataset select controls to
templates/thredds_tutorial/home.html:
{% block app_navigation_items %}
  <li class="title">Query</li>
  {% gizmo dataset_select %}
  {% gizmo variable_select %}
  {% gizmo style_select %}
  <div id="legend">
  </div>
{% endblock %}
Add the following module function declarations to the PRIVATE FUNCTION DECLARATIONS section of
public/js/leafet_map.js:
// Legend Methods
var update_legend, clear_legend;
To display the legend image, simply add an image element and set the
srcattribute to theGetLegendGraphicrequest URL. Add theupdate_legendmethod after theupdate_style_controlmethod inpublic/js/leaflet_map.js:
// Legend Methods
update_legend = function() {
    let legend = m_layer_meta[m_curr_variable].styles[m_curr_style].legend;
    $('#legend').html('<li class="title">Legend<h1></li><img src="' + legend + '">');
};
Clearing the legend is just a matter of removing the image element. Add the
clear_legendmethod after theupdate_legendmethod inpublic/js/leaflet_map.js:
clear_legend = function() {
    $('#legend').html('');
};
Replace the
update_layermethod inpublic/js/leaflet_map.jswith the following implementation.update_layerwill now call theclear_legendandupdate_legendmethods before and after updating the layer, respectively:
update_layer = function() {
    if (m_td_layer) {
        m_map.removeLayer(m_td_layer);
    }

    // Clear the legend
    clear_legend();

    // Layer
    m_layer = L.tileLayer.wms(m_curr_wms_url, {
        layers: m_curr_variable,
        format: 'image/png',
        transparent: true,
        colorscalerange: '250,350',  // Hard-coded color scale range won't work for all layers
        abovemaxcolor: "extend",
        belowmincolor: "extend",
        numcolorbands: 100,
        styles: m_curr_style
    });

    // Wrap WMS layer in Time Dimension Layer
    m_td_layer = L.timeDimension.layer.wms(m_layer, {
        updateTimeDimension: true
    });

    // Add Time-Dimension-Wrapped WMS layer to the Map
    m_td_layer.addTo(m_map);

    // Update the legend graphic
    update_legend();
};
Verify that the legend has been added to the app. Browse to http://localhost:8000/apps/thredds-tutorial in a web browser and login if necessary. The legend should appear under the Query controls in the navigation window on the left. Change the style and verify that the legend updates accordingly.
10. Implement a Map Loading Indicator
Depending on the speed of the THREDDS server and the user's internet connection, loading the layers on the map may take some time. In this step you'll add a loading indicator so that the user knows when the app is working on loading layers.
Download this
animated map loading imageor find one that you like and save it to thepublic/imagesdirectory.Create a new stylesheet called
public/css/loader.csswith styles for the loader elements:
#loader {
    display: none;
    position: absolute;
    top: calc(50vh - 185px);
    left: calc(50vw - 186px);
}

#loader img {
    border-radius: 10%;
    box-shadow: 0 0 10px rgba(0, 0, 0, 0.2);
}

#loader.show {
    display: block;
}
Note
The loading image is set to be hidden by default (display: none;). However, if the show class is added to the loading image it will appear (display: block). You can test this by inspecting the page, finding the #loader element and adding or removing the show class manually.
Include the new
public/css/loader.cssand add the image to theafter_app_contentblock of thetemplates/thredds_tutorial/home.htmltemplate:
{% block styles %}
  {{ block.super }}
  <link rel="stylesheet" href="https://unpkg.com/leaflet@1.8.0/dist/leaflet.css"
   integrity="sha512-hoalWLoI8r4UszCkZ5kL8vayOGVae1oxXe/2A4AO6J9+580uKHDO3JdHb7NzwwzK5xr/Fs0W40kiNHxM9vyTtQ=="
   crossorigin=""/>
  <link rel="stylesheet" href="https://cdn.jsdelivr.net/npm/leaflet-timedimension@1.1.1/dist/leaflet.timedimension.control.min.css" />
  <link rel="stylesheet" href="{% static tethys_app|public:'css/leaflet_map.css' %}"/>
  <link rel="stylesheet" href="{% static tethys_app|public:'css/loader.css' %}" />
{% endblock %}
{% block after_app_content %}
  <div id="loader">
    <img src="{% static tethys_app|public:'images/map-loader.gif' %}">
  </div>
{% endblock %}
Add the following module function declarations to the PRIVATE FUNCTION DECLARATIONS section of
public/js/leafet_map.js:
// Loader Methods
var show_loader, hide_loader;
Add the
show_loaderandhide_loadermethods after theclear_legendmethod inpublic/js/leaflet_map.js:
// Loader Methods
show_loader = function() {
    $('#loader').addClass('show');
};

hide_loader = function() {
    $('#loader').removeClass('show');
};
Note
The show_loader and hide_loader methods are very simple, because all they need to do is add or remove the show class to the #loader element. The style definitions in public/css/loader.css handle the rest.
Bind the
show_loaderandhide_loadermethods to the tile loading events of the layer when it is created. Replace theupdate_layermethod inpublic/js/leaflet_map.jswith this updated implementation:
update_layer = function() {
    if (m_td_layer) {
        m_map.removeLayer(m_td_layer);
    }

    // Clear the legend
    clear_legend();

    // Layer
    m_layer = L.tileLayer.wms(m_curr_wms_url, {
        layers: m_curr_variable,
        format: 'image/png',
        transparent: true,
        colorscalerange: '250,350',  // Hard-coded color scale range won't work for all layers
        abovemaxcolor: "extend",
        belowmincolor: "extend",
        numcolorbands: 100,
        styles: m_curr_style
    });

    // Wrap WMS layer in Time Dimension Layer
    m_td_layer = L.timeDimension.layer.wms(m_layer, {
        updateTimeDimension: true
    });

    // Add events for loading
    m_layer.on('loading', function() {
        show_loader();
    });

    m_layer.on('load', function() {
        hide_loader();
    });

    // Add Time-Dimension-Wrapped WMS layer to the Map
    m_td_layer.addTo(m_map);

    // Update the legend graphic
    update_legend();
};
Note
The loading event is called whenever tile layers start loading and the load event is called when the visible tiles of a tile layer have finished loading. See: TileLayer.WMS reference.
Also show the map loader when the variable control is updating (the
fetchcall to get the WMS layers could take some time to run). Replace theupdate_variable_controlmethod inpublic/js/leaflet_map.jswith the following updated implementation:
update_variable_control = function() {
    // Show loader
    show_loader();

    // Use REST endpoint to get WMS layers
    fetch('./get-wms-layers/?' + new URLSearchParams({'wms_url': m_curr_wms_url}))
      .then((response) => response.json())
      .then((data) => {
        if (!data.success) {
            console.log('An unexpected error occurred!');
            return;
        }

        // Clear current variable select options
        $('#variable').select2().empty();

        // Save layer metadata
        m_layer_meta = data.layers;

        // Create new variable select options
        let first_option = true;
        for (var layer in data.layers) {
            if (first_option) {
                m_curr_variable = layer;
            }

            let new_option = new Option(layer, layer, first_option, first_option);
            $('#variable').append(new_option);
            first_option = false;
        }

        // Trigger a change to refresh the select box
        $('#variable').trigger('change');

        // Hide the loader
        hide_loader();
      });
};
11. Clean Up
During development it is common to use print statements. Rather than delete these when you are done, turn them into log statements so that you can use them for debugging in the future.
Use the Python logging module to setup logging in
controllers.py:
import logging

log = logging.getLogger(__name__)
Replace
printandpprintcalls with log statements incontrollers.py:
@controller
def home(request):
    """
    Controller for the app home page.
    """
    catalog = app.get_spatial_dataset_service(app.THREDDS_SERVICE_NAME, as_engine=True)

    # Retrieve dataset options from the THREDDS service
    log.info('Retrieving Datasets...')
    datasets = parse_datasets(catalog)
    initial_dataset_option = datasets[0]
    log.debug(datasets)
    log.debug(initial_dataset_option)

    ...
@controller
def get_wms_layers(request):
    json_response = {'success': False}

    if request.method != 'GET':
        return HttpResponseNotAllowed(['GET'])

    try:
        wms_url = request.GET.get('wms_url', None)

        log.info(f'Retrieving layers for: {wms_url}')

        ...
Replace
printandpprintcalls with log statements inthredds_methods.py:
import logging

log = logging.getLogger(__name__)
def get_layers_for_wms(wms_url):
    """
    Retrieve metadata from a WMS service including layers, available styles, and the bounding box.

    Args:
        wms_url(str): URL to the WMS service endpoint.

    Returns:
        dict<layer_name:dict<styles,bbox>>: A dictionary with a key for each WMS layer available and a dictionary value containing metadata about the layer.
    """
    wms = WebMapService(wms_url)
    layers = wms.contents
    log.debug('WMS Contents:')
    log.debug(layers)

    layers_dict = dict()
    for layer_name, layer in layers.items():
        layer_styles = layer.styles
        layer_bbox = layer.boundingBoxWGS84
        leaflet_bbox = [[layer_bbox[1], layer_bbox[0]], [layer_bbox[3], layer_bbox[2]]]
        layers_dict.update({
            layer_name: {
                'styles': layer_styles,
                'bbox': leaflet_bbox
            }
        })

    log.debug('Layers Dict:')
    log.debug(layers_dict)
    return layers_dict
Tip
Logging excessively can impact the performance of your app. Use info, error, and warning to log minimal, summary information that is useful for monitoring normal operation of the app. Use debug to log more detailed information to help you assess bugs or other issues with your app without needing to modify the code. In production, the Tethys Portal can be configured to log at different levels of detail using these classifications. See: Python Logging HOWTO and Tethys Portal Configuration.
12. Test and Verify
Browse to http://localhost:8000/apps/thredds-tutorial in a web browser and login if necessary. Verify the following:
A Leaflet map should be loaded on the page with one of the datasets visualized
There should be 3 controls in the navigation menu on the left: Dataset, Variable, and Style
There should be a legend for the current layer under the control in the navigation menu.
The map should feature an animation slider. If the dataset selected has time varying data, the slider should display a time step. Otherwise it will say "Time not available".
Select the "Best GFS Half Degree Forecast Time Series" dataset using the Dataset control to test a time-varying layer. Press the Play button on the Time-Dimension control to animate the layer.
13. Solution
This concludes the New App Project portion of the THREDDS Tutorial. You can view the solution on GitHub at https://github.com/tethysplatform/tethysapp-thredds_tutorial/tree/thredds-service-solution-3.0 or clone it as follows:
git clone https://github.com/tethysplatform/tethysapp-thredds_tutorial.git
cd tethysapp-thredds_tutorial
git checkout -b visualize-leaflet-solution visualize-leaflet-solution-4.2