Advanced Concepts
Last Updated: May 2022
This tutorial introduces advanced concepts for Tethys developers. The topics covered include:
Tethys Services API
PersistentStores API
Gizmo JavaScript APIs
JavaScript and AJAX
Permissions API
Advanced HTML Forms - File Upload
Plotting Gizmos
0. Start From Intermediate Solution (Optional)
If you wish to use the intermediate solution as a starting point:
git clone https://github.com/tethysplatform/tethysapp-dam_inventory.git
cd tethysapp-dam_inventory
git checkout -b intermediate-solution intermediate-4.2
1. Persistent Store Database
In the Intermediate Concepts tutorial we implemented a file-based database as the persisting mechanism for the app. However, simple file based databases typically don't perform well in a web application environment, because of the possibility of many concurrent requests trying to access the file. In this section we'll refactor the Model to use an SQL database, rather than files.
Add necessary dependencies:
Persistent stores is an optional feature in Tethys, and requires that the sqlalchemy<2 and psycopg2 libraries are installed. Install these libraries using one of the following commands:
# conda: conda-forge channel strongly recommended
conda install -c conda-forge "sqlalchemy<2" psycopg2

# pip
pip install "sqlalchemy<2" psycopg2
Now add the new dependencies to your install.yml as follows so that the app will work when installed in a new environment:
# This file should be committed to your app code.
version: 1.0
# This should match the app - package name in your setup.py
name: dam_inventory

requirements:
  # Putting in a skip true param will skip the entire section. Ignoring the option will assume it be set to False
  skip: false
  conda:
    channels:
      - conda-forge
    packages:
      - sqlalchemy<2
      - psycopg2

  pip:

post:
Open the
app.pyand define a newPersistentStoreDatabaseSettingby adding thepersistent_store_settingsmethod to your app class:from tethys_sdk.app_settings import PersistentStoreDatabaseSetting class DamInventory(TethysAppBase): """ Tethys app class for Dam Inventory. """ ... def persistent_store_settings(self): """ Define Persistent Store Settings. """ ps_settings = ( PersistentStoreDatabaseSetting( name='primary_db', description='primary database', initializer='dam_inventory.model.init_primary_db', required=True ), ) return ps_settings
Tethys provides the library SQLAlchemy as an interface with SQL databases. SQLAlchemy provides an Object Relational Mapper (ORM) API, which allows data models to be defined using Python and an object-oriented approach. With SQLAlchemy, you can harness the power of SQL databases without writing SQL. As a primer to SQLAlchemy ORM, we highly recommend you complete the Object Relational Tutorial.
Define a table called
damsby creating a new class inmodel.pycalledDam:import json from sqlalchemy.ext.declarative import declarative_base from sqlalchemy import Column, Integer, Float, String from sqlalchemy.orm import sessionmaker from .app import App Base = declarative_base() # SQLAlchemy ORM definition for the dams table class Dam(Base): """ SQLAlchemy Dam DB Model """ __tablename__ = 'dams' # Columns id = Column(Integer, primary_key=True) latitude = Column(Float) longitude = Column(Float) name = Column(String) owner = Column(String) river = Column(String) date_built = Column(String)
Tip
SQLAlchemy Data Models: Each class in an SQLAlchemy data model defines a table in the database. The model you defined above consists of a single table called "dams", as denoted by the
__tablename__property of theDamclass. TheDamclass inherits from aBaseclass that we created in the previous lines from thedeclarative_basefunction. This inheritance notifies SQLAlchemy that theDamclass is part of the data model.The class defines seven other properties that are instances of SQLAlchemy
Columnclass: id, latitude, longitude, name, owner, river, date_built. These properties define the columns of the "dams" table. The column type and options are defined by the arguments passed to theColumnclass. For example, the latitude column is of typeFloatwhile the id column is of typeInteger. Theidcolumn is flagged as the primary key for the table. IDs will be generated for each object when they are committed.This class is not only used to define the tables for your persistent store, it is also used to create new entries and query the database.
For more information on Persistent Stores, see: Persistent Stores API.
Replace the
add_new_damandget_all_damsfunctions inmodel.pywith versions that use the SQL database instead of the files:def add_new_dam(location, name, owner, river, date_built): """ Persist new dam. """ # Convert GeoJSON to Python dictionary location_dict = json.loads(location) location_geometry = location_dict['geometries'][0] longitude = location_geometry['coordinates'][0] latitude = location_geometry['coordinates'][1] # Create new Dam record new_dam = Dam( latitude=latitude, longitude=longitude, name=name, owner=owner, river=river, date_built=date_built ) # Get connection/session to database Session = app.get_persistent_store_database('primary_db', as_sessionmaker=True) session = Session() # Add the new dam record to the session session.add(new_dam) # Commit the session and close the connection session.commit() session.close() def get_all_dams(): """ Get all persisted dams. """ # Get connection/session to database Session = app.get_persistent_store_database('primary_db', as_sessionmaker=True) session = Session() # Query for all dam records dams = session.query(Dam).all() session.close() return dams
Important
Don't forget to close your
sessionobjects when you are done. Eventually you will run out of connections to the database if you don't, which will cause unsightly errors.Create a new function called
init_primary_dbat the bottom ofmodel.py. This function is used to initialize the database by creating the tables and adding any initial data.def init_primary_db(engine, first_time): """ Initializer for the primary database. """ # Create all the tables Base.metadata.create_all(engine) # Add data if first_time: # Make session Session = sessionmaker(bind=engine) session = Session() # Initialize database with two dams dam1 = Dam( latitude=40.406624, longitude=-111.529133, name="Deer Creek", owner="Reclamation", river="Provo River", date_built="April 12, 1993" ) dam2 = Dam( latitude=40.598168, longitude=-111.424055, name="Jordanelle", owner="Reclamation", river="Provo River", date_built="1941" ) # Add the dams to the session, commit, and close session.add(dam1) session.add(dam2) session.commit() session.close()
Refactor
homecontroller incontrollers.pyto use the updated model methods:@controller def home(request): """ Controller for the app home page. """ # Get list of dams and create dams MVLayer: dams = get_all_dams() features = [] lat_list = [] lng_list = [] for dam in dams: lat_list.append(dam.latitude) lng_list.append(dam.longitude) dam_feature = { 'type': 'Feature', 'geometry': { 'type': 'Point', 'coordinates': [dam.longitude, dam.latitude], }, 'properties': { 'id': dam.id, 'name': dam.name, 'owner': dam.owner, 'river': dam.river, 'date_built': dam.date_built } } features.append(dam_feature) ...
Refactor the
add_damcontroller to use the updated model methods:@controller(url='dams/add') def add_dam(request): """ Controller for the Add Dam page. """ # Default Values name = '' owner = 'Reclamation' river = '' date_built = '' location = '' # Errors name_error = '' owner_error = '' river_error = '' date_error = '' location_error = '' # Handle form submission if request.POST and 'add-button' in request.POST: # Get values has_errors = False name = request.POST.get('name', None) owner = request.POST.get('owner', None) river = request.POST.get('river', None) date_built = request.POST.get('date-built', None) location = request.POST.get('geometry', None) # Validate if not name: has_errors = True name_error = 'Name is required.' if not owner: has_errors = True owner_error = 'Owner is required.' if not river: has_errors = True river_error = 'River is required.' if not date_built: has_errors = True date_error = 'Date Built is required.' if not location: has_errors = True location_error = 'Location is required.' if not has_errors: add_new_dam(location=location, name=name, owner=owner, river=river, date_built=date_built) return App.redirect(App.reverse('home')) messages.error(request, "Please fix errors.") ...
Refactor the
list_damscontroller to use updated model methods:@controller(name='dams', url='dams') def list_dams(request): """ Show all dams in a table view. """ dams = get_all_dams() table_rows = [] for dam in dams: table_rows.append( ( dam.name, dam.owner, dam.river, dam.date_built ) ) ...
Add a Persistent Store Service to Tethys Portal:
Go to Tethys Portal Home in a web browser (e.g. http://localhost:8000/apps/)
Select Site Admin from the drop down next to your username.
Scroll down to the Tethys Services section and select Persistent Store Services link.
Click on the Add Persistent Store Service button.
Give the Persistent Store Service any name and fill out the connection information.
Press Save to create the new Persistent Store Service.
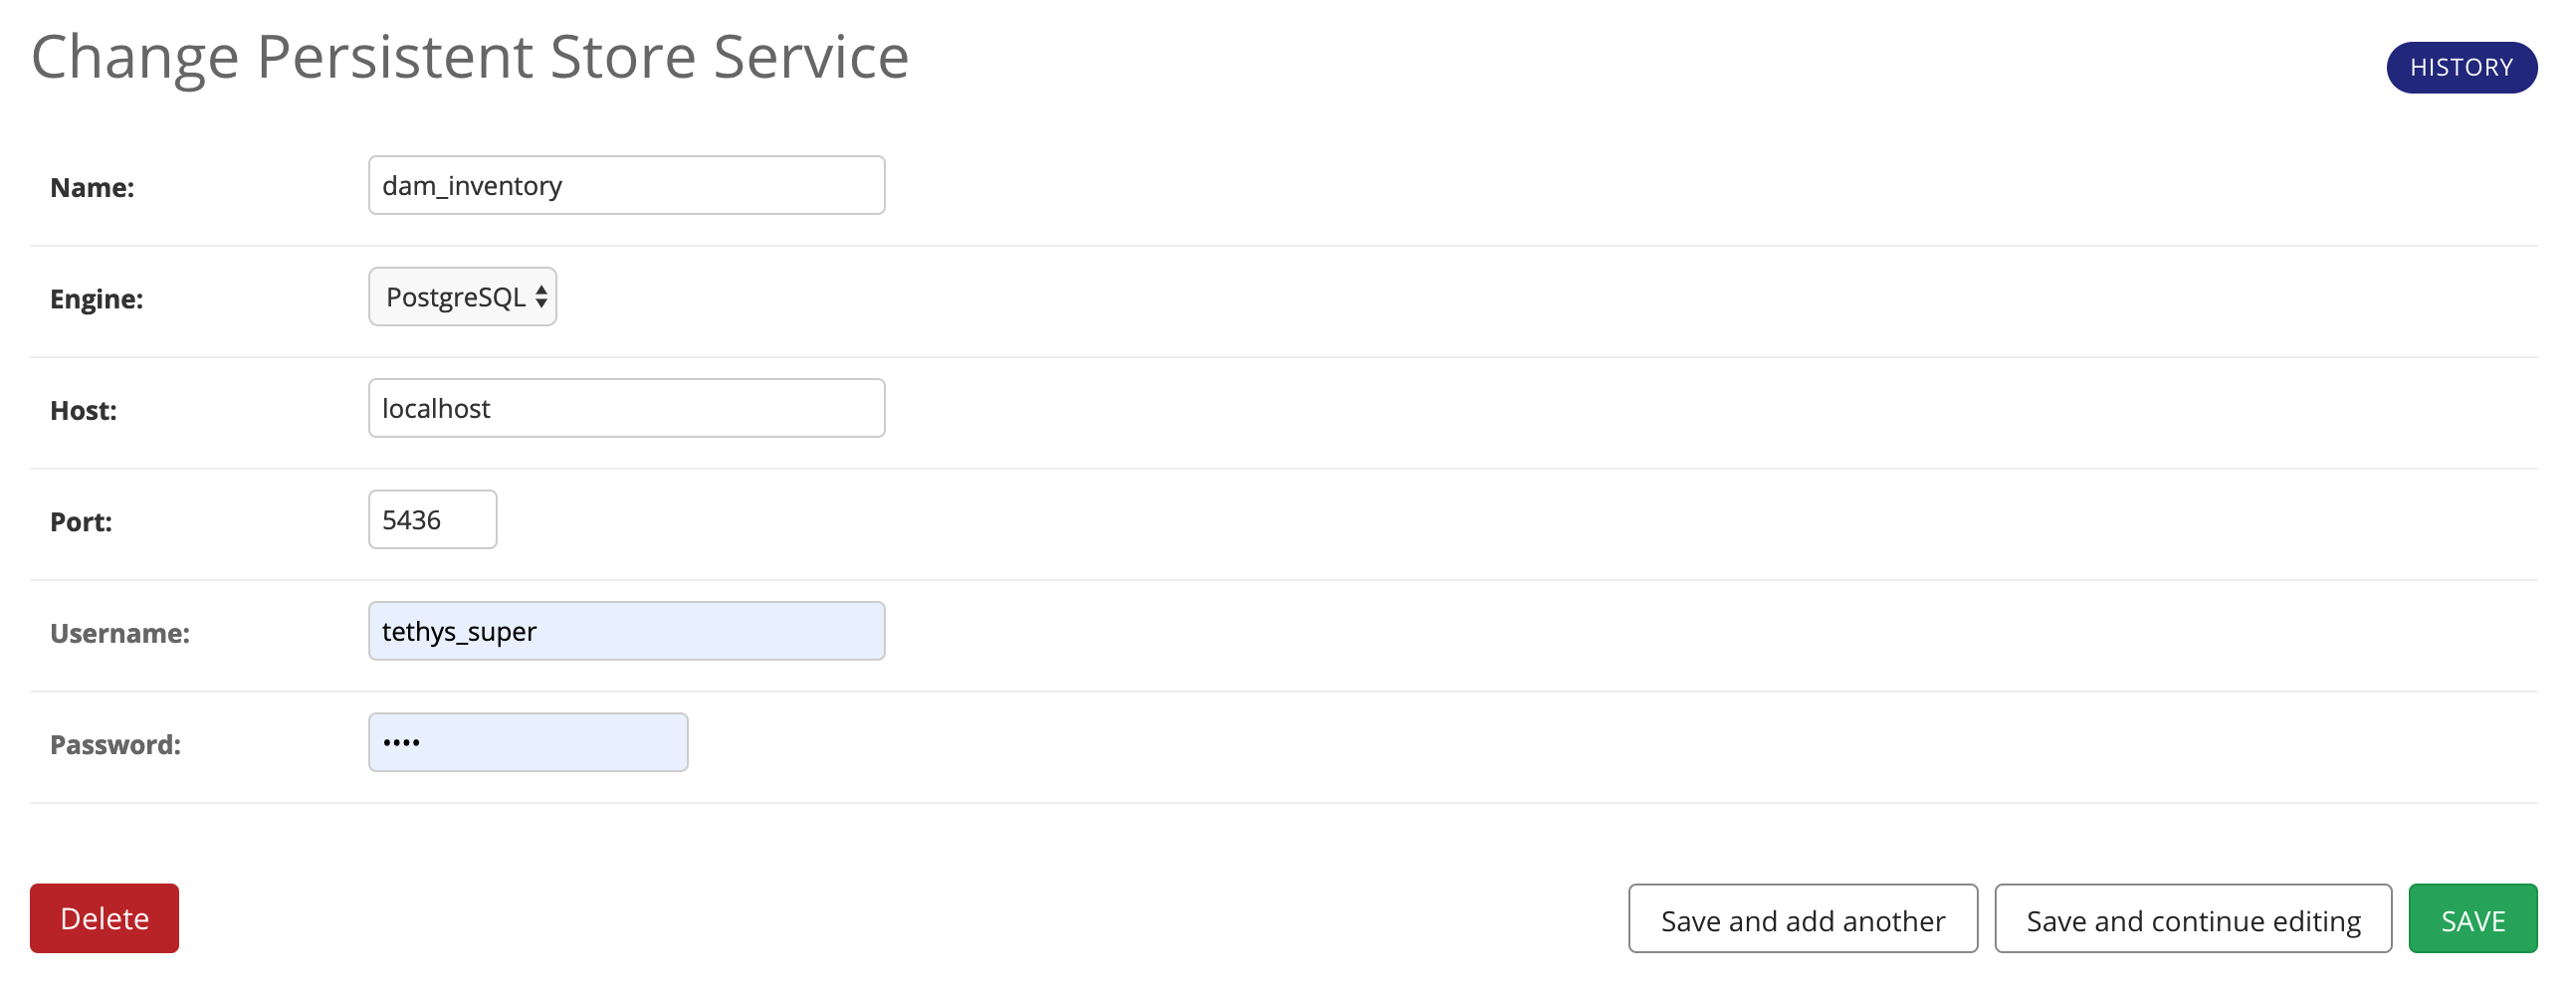
Important
The username and password for the persistent store service must be a superuser to use spatial persistent stores. Note that the default installation of Tethys Portal includes a superuser named "tethys_super", password: "pass".
Assign the new Persistent Store Service to the Dam Inventory App:
Go to Tethys Portal Home in a web browser (e.g. http://localhost:8000/apps/)
Select Site Admin from the drop down next to your username.
Scroll down to the Tethys Apps section and select the Installed App link.
Select the Dam Inventory link.
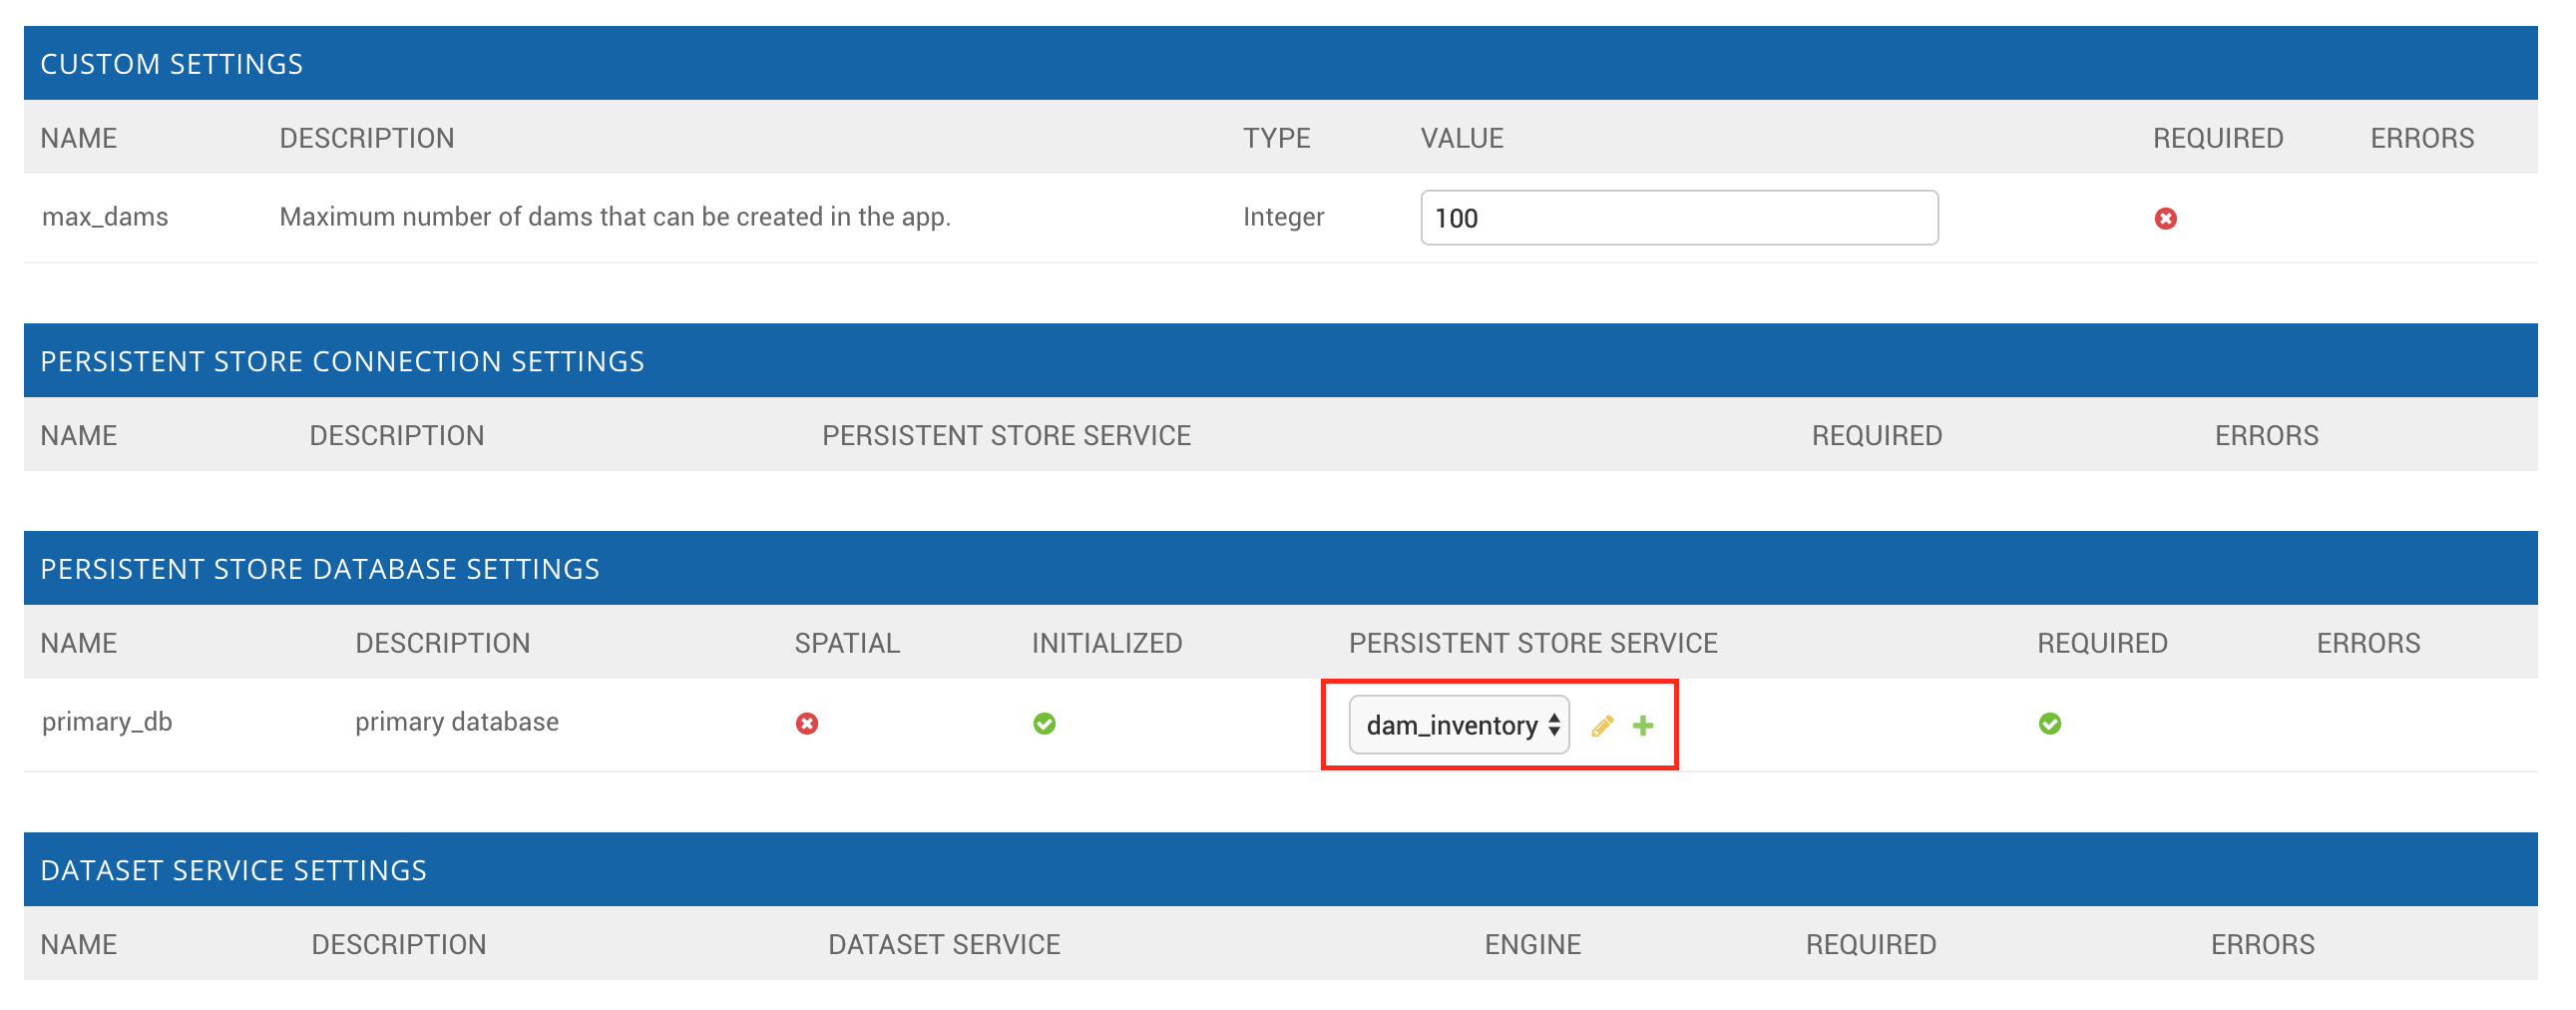
Scroll down to the Persistent Store Database Settings section.
Assign the Persistent Store Service that you created in Step 4 to the primary_db setting.
Press Save to save the settings.
Execute the syncstores command to create the tables in the Persistent Store database:
tethys syncstores dam_inventory
2. Use Custom Settings
In the Beginner Concepts tutorial, we created a custom setting named max_dams. In this section, we'll show you how to use the custom setting in one of your controllers.
Modify the add_dam controller, such that it won't add a new dam if the max_dams limit has been reached:
from .model import Dam
from .app import App

...

@controller(url='dams/add')
def add_dam(request):
    """
    Controller for the Add Dam page.
    """
    # Default Values
    name = ''
    owner = 'Reclamation'
    river = ''
    date_built = ''
    location = ''

    # Errors
    name_error = ''
    owner_error = ''
    river_error = ''
    date_error = ''
    location_error = ''

    # Handle form submission
    if request.POST and 'add-button' in request.POST:
        # Get values
        has_errors = False
        name = request.POST.get('name', None)
        owner = request.POST.get('owner', None)
        river = request.POST.get('river', None)
        date_built = request.POST.get('date-built', None)
        location = request.POST.get('geometry', None)

        # Validate
        if not name:
            has_errors = True
            name_error = 'Name is required.'

        if not owner:
            has_errors = True
            owner_error = 'Owner is required.'

        if not river:
            has_errors = True
            river_error = 'River is required.'

        if not date_built:
            has_errors = True
            date_error = 'Date Built is required.'

        if not location:
            has_errors = True
            location_error = 'Location is required.'

        if not has_errors:
            # Get value of max_dams custom setting
            max_dams = app.get_custom_setting('max_dams')

            # Query database for count of dams
            Session = app.get_persistent_store_database('primary_db', as_sessionmaker=True)
            session = Session()
            num_dams = session.query(Dam).count()

            # Only add the dam if custom setting doesn't exist or we have not exceed max_dams
            if not max_dams or num_dams < max_dams:
                add_new_dam(location=location, name=name, owner=owner, river=river, date_built=date_built)
            else:
                messages.warning(request, 'Unable to add dam "{0}", because the inventory is full.'.format(name))

            return App.redirect(reverse('home'))

        messages.error(request, "Please fix errors.")

    ...
Tip
For more information on app settings, see App Settings API.
3. Use JavaScript APIs
JavaScript is the programming language that is used to program web browsers. You can use JavaScript in your Tethys apps to enrich the user experience and add dynamic effects. Many of the Tethys Gizmos include JavaScript APIs to allow you to access the underlying JavaScript objects and library to customize them. In this section, we'll use the JavaScript API of the Map View gizmo to add pop-ups to the map whenever a user clicks on one of the dams.
Modify the MVLayer in the
homecontroller to make the layer selectable:... dams_layer = MVLayer( source='GeoJSON', options=dams_feature_collection, legend_title='Dams', layer_options={'style': style}, feature_selection=True ) ...
Create a new file called
/public/js/map.jsand add the following contents:$(function() { // Create new Overlay with the #popup element var popup = new ol.Overlay({ element: document.getElementById('popup') }); // Get the Open Layers map object from the Tethys MapView var map = TETHYS_MAP_VIEW.getMap(); // Get the Select Interaction from the Tethys MapView var select_interaction = TETHYS_MAP_VIEW.getSelectInteraction(); // Add the popup overlay to the map map.addOverlay(popup); // When selected, call function to display properties select_interaction.getFeatures().on('change:length', function(e) { var popup_element = popup.getElement(); if (e.target.getArray().length > 0) { // this means there is at least 1 feature selected var selected_feature = e.target.item(0); // 1st feature in Collection // Get coordinates of the point to set position of the popup var coordinates = selected_feature.getGeometry().getCoordinates(); var popup_content = '<div class="dam-popup">' + '<h5>' + selected_feature.get('name') + '</h5>' + '<h6>Owner:</h6>' + '<span>' + selected_feature.get('owner') + '</span>' + '<h6>River:</h6>' + '<span>' + selected_feature.get('river') + '</span>' + '<h6>Date Built:</h6>' + '<span>' + selected_feature.get('date_built') + '</span>' + '</div>'; // Clean up last popup and reinitialize $(popup_element).popover('dispose'); // Delay arbitrarily to wait for previous popover to // be deleted before showing new popover. setTimeout(function() { popup.setPosition(coordinates); $(popup_element).popover({ 'placement': 'top', 'animation': true, 'html': true, 'content': popup_content }); $(popup_element).popover('show'); }, 500); } else { // remove pop up when selecting nothing on the map $(popup_element).popover('dispose'); } }); });
Open
/templates/dam_inventory/home.html, add a newdivelement to theapp_contentarea of the page with an idpopup, and load themap.jsscript to the bottom of the page:{% extends tethys_app.package|add:"base.html" %} {% load static tethys %} {% block styles %} {{ block.super }} <link href="{% static tethys_app|public:'css/map.css' %}" rel="stylesheet"/> {% endblock %} {% block app_content %} {% gizmo dam_inventory_map %} <div id="popup"></div> {% endblock %} {% block app_actions %} {% gizmo add_dam_button %} {% endblock %} {% block scripts %} {{ block.super }} <script src="{% static tethys_app|public:'js/map.js' %}" type="text/javascript"></script> {% endblock %}
Open
public/css/map.cssand add the following contents:.popover { width: 240px; } #inner-app-content { padding: 0; } #app-content, #inner-app-content, #map_view_outer_container { height: 100%; }
4. App Permissions
By default, any user logged into the app can access any part of it. You may want to restrict access to certain areas of the app to privileged users. This can be done using the Permissions API. Let's modify the app so that only admin users of the app can add dams to the app.
Define permissions for the app by adding the
permissionsmethod to the app class in theapp.py:... from tethys_sdk.permissions import Permission, PermissionGroup class DamInventory(TethysAppBase): """ Tethys app class for Dam Inventory. """ ... def permissions(self): """ Define permissions for the app. """ add_dams = Permission( name='add_dams', description='Add dams to inventory' ) admin = PermissionGroup( name='admin', permissions=(add_dams,) ) permissions = (admin,) return permissions
Protect the Add Dam view with the
add_damspermission by setting thepermissions_requiredargument of thecontrollerdecorator:@controller(url='dams/add', permission_required='add_dams') def add_dam(request): """ Controller for the Add Dam page. """ ...
Add a context variable called
can_add_damsto the context of each controller with the value of the return value of thehas_permissionfunction:from tethys_sdk.permissions import has_permission from .app import App @controller def home(request): """ Controller for the app home page. """ ... context = { ... 'can_add_dams': has_permission(request, 'add_dams') } return App.render(request, 'home.html', context) @controller(url='dams/add', permission_required='add_dams') def add_dam(request): """ Controller for the Add Dam page. """ ... context = { ... 'can_add_dams': has_permission(request, 'add_dams') } return App.render(request, 'add_dam.html', context) @controller(name='dams', url='dams') def list_dams(request): """ Show all dams in a table view. """ ... context = { ... 'can_add_dams': has_permission(request, 'add_dams') } return App.render(request, 'list_dams.html', context)
Use the
can_add_damsvariable to determine whether to show or hide the navigation link to the Add Dam View inbase.html:{% block app_navigation_items %} {% url tethys_app|url:'home' as home_url %} {% url tethys_app|url:'add_dam' as add_dam_url %} {% url tethys_app|url:'dams' as list_dam_url %} <li class="nav-item title">Navigation</li> <li class="nav-item"><a class="nav-link{% if request.path == home_url %} active{% endif %}" href="{{ home_url }}">Home</a></li> <li class="nav-item"><a class="nav-link{% if request.path == list_dam_url %} active{% endif %}" href="{{ list_dam_url }}">Dams</a></li> {% if can_add_dams %} <li class="nav-item"><a class="nav-link{% if request.path == add_dam_url %} active{% endif %}" href="{{ add_dam_url }}">Add Dam</a></li> {% endif %} {% endblock %}
Use the
can_add_damsvariable to determine whether to show or hide the "Add Dam" button inhome.html:{% block app_actions %} {% if can_add_dams %} {% gizmo add_dam_button %} {% endif %} {% endblock %}
The
adminuser of Tethys is a superuser and has all permissions. To test the permissions, create two new users: one with theadminpermissions group and one without it. Then login with these users:Go to Tethys Portal Home in a web browser (e.g. http://localhost:8000/apps/)
Select Site Admin from the drop down next to your username.
Scroll to the Authentication and Authorization section.
Select the Users link.
Press the Add User button.
Enter "diadmin" as the username and enter a password. Take note of the password for later.
Press the Save and continue editing button.
Scroll down to the Groups section.
Select the dam_inventory:admin group and press the right arrow to add the user to that group.
Press the Save and add another button.
Enter "diviewer" as the username and enter a password. Take note of the password for later. DO NOT add "diviewer" user to any groups.
Press the Save button.
Log in with each user account. If the permission has been applied correctly, "diviewer" should not be able to see the Add Dam link and should be redirected if the Add Dam view is linked to directly. "diadmin" should be able to add dams.
Tip
For more details on Permissions, see: Permissions API.
6. File Upload
CSV File Upload Create new page for uploading the hydrograph.
New Model function
def assign_hydrograph_to_dam(dam_id, hydrograph_file):
    """
    Parse hydrograph file and add to database, assigning to appropriate dam.
    """
    # Parse file
    hydro_points = []

    try:
        for line in hydrograph_file:
            line = line.decode('utf-8')
            sline = line.split(',')

            try:
                time = int(sline[0])
                flow = float(sline[1])
                hydro_points.append(HydrographPoint(time=time, flow=flow))
            except ValueError:
                continue

        if len(hydro_points) > 0:
            Session = app.get_persistent_store_database('primary_db', as_sessionmaker=True)
            session = Session()

            # Get dam object
            dam = session.query(Dam).get(int(dam_id))

            # Overwrite old hydrograph
            hydrograph = dam.hydrograph

            # Create new hydrograph if not assigned already
            if not hydrograph:
                hydrograph = Hydrograph()
                dam.hydrograph = hydrograph

            # Remove old points if any
            for hydro_point in hydrograph.points:
                session.delete(hydro_point)

            # Assign points to hydrograph
            hydrograph.points = hydro_points

            # Persist to database
            session.commit()
            session.close()

    except Exception as e:
        # Careful not to hide error. At the very least log it to the console
        print(e)
        return False

    return True
New Template:
assign_hydrograph.html{% extends tethys_app.package|add:"/base.html" %} {% load tethys %} {% block app_content %} <h1>Assign Hydrograph</h1> <p>Select a dam and a hydrograph file to assign to that dam. The file should be a csv with two columns: time (hours) and flow (cfs).</p> <form id="add-hydrograph-form" method="post" enctype="multipart/form-data"> {% csrf_token %} {% gizmo dam_select_input %} <div class="form-group{% if hydrograph_file_error %} has-error{% endif %}"> <label class="control-label">Hydrograph File</label> <input type="file" name="hydrograph-file"> {% if hydrograph_file_error %}<p class="help-block">{{ hydrograph_file_error }}</p>{% endif %} </div> </form> {% endblock %} {% block app_actions %} {% gizmo cancel_button %} {% gizmo add_button %} {% endblock %}
New Controller
from .model import assign_hydrograph_to_dam
from .app import App

...

@controller(url='hydrographs/assign')
def assign_hydrograph(request):
    """
    Controller for the Add Hydrograph page.
    """
    # Get dams from database
    Session = App.get_persistent_store_database('primary_db', as_sessionmaker=True)
    session = Session()
    all_dams = session.query(Dam).all()

    # Defaults
    dam_select_options = [(dam.name, dam.id) for dam in all_dams]
    selected_dam = None
    hydrograph_file = None

    # Errors
    dam_select_errors = ''
    hydrograph_file_error = ''

    # Case where the form has been submitted
    if request.POST and 'add-button' in request.POST:
        # Get Values
        has_errors = False
        selected_dam = request.POST.get('dam-select', None)

        if not selected_dam:
            has_errors = True
            dam_select_errors = 'Dam is Required.'

        # Get File
        if request.FILES and 'hydrograph-file' in request.FILES:
            # Get a list of the files
            hydrograph_file = request.FILES.getlist('hydrograph-file')

        if not hydrograph_file and len(hydrograph_file) > 0:
            has_errors = True
            hydrograph_file_error = 'Hydrograph File is Required.'

        if not has_errors:
            # Process file here
            success = assign_hydrograph_to_dam(selected_dam, hydrograph_file[0])

            # Provide feedback to user
            if success:
                messages.info(request, 'Successfully assigned hydrograph.')
            else:
                messages.info(request, 'Unable to assign hydrograph. Please try again.')
            return App.redirect(App.reverse('home'))

        messages.error(request, "Please fix errors.")

    dam_select_input = SelectInput(
        display_text='Dam',
        name='dam-select',
        multiple=False,
        options=dam_select_options,
        initial=selected_dam,
        error=dam_select_errors
    )

    add_button = Button(
        display_text='Add',
        name='add-button',
        icon='plus-square',
        style='success',
        attributes={'form': 'add-hydrograph-form'},
        submit=True
    )

    cancel_button = Button(
        display_text='Cancel',
        name='cancel-button',
        href=App.reverse('home')
    )

    context = {
        'dam_select_input': dam_select_input,
        'hydrograph_file_error': hydrograph_file_error,
        'add_button': add_button,
        'cancel_button': cancel_button,
        'can_add_dams': has_permission(request, 'add_dams')
    }

    session.close()

    return App.render(request, 'assign_hydrograph.html', context)
Update navigation
{% block app_navigation_items %}
{% url tethys_app|url:'home' as home_url %}
{% url tethys_app|url:'add_dam' as add_dam_url %}
{% url tethys_app|url:'dams' as list_dam_url %}
{% url tethys_app|url:'assign_hydrograph' as assign_hydrograph_url %}
<li class="nav-item title">Navigation</li>
<li class="nav-item"><a class="nav-link{% if request.path == home_url %} active{% endif %}" href="{{ home_url }}">Home</a></li>
<li class="nav-item"><a class="nav-link{% if request.path == list_dam_url %} active{% endif %}" href="{{ list_dam_url }}">Dams</a></li>
{% if can_add_dams %}
<li class="nav-item"><a class="nav-link{% if request.path == add_dam_url %} active{% endif %}" href="{{ add_dam_url }}">Add Dam</a></li>
<li class="nav-item"><a class="nav-link{% if request.path == assign_hydrograph_url %} active{% endif %}" href="{{ assign_hydrograph_url }}">Assign Hydrograph</a></li>
{% endif %}
{% endblock %}
Test upload with these files:
7. URL Variables and Plotting
Create a new page with hydrograph plotted for selected Dam
Create Template
hydrograph.html{% extends tethys_app.package|add:"/base.html" %} {% load tethys %} {% block app_navigation_items %} <li class="nav-item title">App Navigation</li> <li class="nav-item "><a class="nav-link" href="{% url tethys_app|url:'dams' %}">Back</a></li> {% endblock %} {% block app_content %} {% gizmo hydrograph_plot %} {% endblock %}
Create
helpers.pyfrom plotly import graph_objs as go from tethys_gizmos.gizmo_options import PlotlyView from .app import App from .model import Hydrograph def create_hydrograph(hydrograph_id, height='520px', width='100%'): """ Generates a plotly view of a hydrograph. """ # Get objects from database Session = App.get_persistent_store_database('primary_db', as_sessionmaker=True) session = Session() hydrograph = session.query(Hydrograph).get(int(hydrograph_id)) dam = hydrograph.dam time = [] flow = [] for hydro_point in hydrograph.points: time.append(hydro_point.time) flow.append(hydro_point.flow) # Build up Plotly plot hydrograph_go = go.Scatter( x=time, y=flow, name='Hydrograph for {0}'.format(dam.name), line={'color': '#0080ff', 'width': 4, 'shape': 'spline'}, ) data = [hydrograph_go] layout = { 'title': 'Hydrograph for {0}'.format(dam.name), 'xaxis': {'title': 'Time (hr)'}, 'yaxis': {'title': 'Flow (cfs)'}, } figure = {'data': data, 'layout': layout} hydrograph_plot = PlotlyView(figure, height=height, width=width) session.close() return hydrograph_plot
Create Controller
from .helpers import create_hydrograph

...

@controller(url='hydrographs/{hydrograph_id}')
def hydrograph(request, hydrograph_id):
    """
    Controller for the Hydrograph Page.
    """
    hydrograph_plot = create_hydrograph(hydrograph_id)

    context = {
        'hydrograph_plot': hydrograph_plot,
        'can_add_dams': has_permission(request, 'add_dams')
    }
    return App.render(request, 'hydrograph.html', context)
Tip
For more information about plotting in Tethys apps, see Plotly View, Bokeh View, and Plot View.
Add
get_hydrographhelper function tomodel.pydef get_hydrograph(dam_id): """ Get hydrograph id from dam id. """ Session = app.get_persistent_store_database('primary_db', as_sessionmaker=True) session = Session() # Query if hydrograph exists for dam hydrograph = session.query(Hydrograph).filter_by(dam_id=dam_id).first() session.close() if hydrograph: return hydrograph.id else: return None
Modify
list_damscontroller (and add needed imports):from django.utils.html import format_html from .model import get_hydrograph ... @controller(name='dams', url='dams') def list_dams(request): """ Show all dams in a table view. """ dams = get_all_dams() table_rows = [] for dam in dams: hydrograph_id = get_hydrograph(dam.id) if hydrograph_id: url = App.reverse('hydrograph', kwargs={'hydrograph_id': hydrograph_id}) dam_hydrograph = format_html('<a class="btn btn-primary" href="{}">Hydrograph Plot</a>'.format(url)) else: dam_hydrograph = format_html('<a class="btn btn-primary disabled" title="No hydrograph assigned" ' 'style="pointer-events: auto;">Hydrograph Plot</a>') table_rows.append( ( dam.name, dam.owner, dam.river, dam.date_built, dam_hydrograph ) ) dams_table = DataTableView( column_names=('Name', 'Owner', 'River', 'Date Built', 'Hydrograph'), rows=table_rows, searching=False, orderClasses=False, lengthMenu=[[10, 25, 50, -1], [10, 25, 50, "All"]], ) context = { 'dams_table': dams_table, 'can_add_dams': has_permission(request, 'add_dams') } return App.render(request, 'list_dams.html', context)
Test by going to the Dams page and clicking on the new
Hydrograph Plotbutton in the table for a dam that has already been assigned a hydrograph.
8. Dynamic Hydrograph Plot in Pop-Ups
Add Hydrographs to pop-ups if they exist.
Add Plotly Gizmo dependency to
home.html:{% extends tethys_app.package|add:"/base.html" %} {% load static tethys %} {% block import_gizmos %} {% import_gizmo_dependency plotly_view %} {% endblock %} ...
Create a template for the AJAX plot (
hydrograph_ajax.html){% load tethys %} {% if hydrograph_plot %} {% gizmo hydrograph_plot %} {% endif %}
Create an AJAX controller
hydrograph_ajax@controller(url='hydrographs/{dam_id}/ajax') def hydrograph_ajax(request, dam_id): """ Controller for the Hydrograph Page. """ # Get dams from database Session = app.get_persistent_store_database('primary_db', as_sessionmaker=True) session = Session() dam = session.query(Dam).get(int(dam_id)) if dam.hydrograph: hydrograph_plot = create_hydrograph(dam.hydrograph.id, height='300px') else: hydrograph_plot = None context = { 'hydrograph_plot': hydrograph_plot, } session.close() return App.render(request, 'hydrograph_ajax.html', context)
Load the plot dynamically using JavaScript and AJAX (modify
map.js)$(function() { // Create new Overlay with the #popup element var popup = new ol.Overlay({ element: document.getElementById('popup') }); // Get the Open Layers map object from the Tethys MapView var map = TETHYS_MAP_VIEW.getMap(); // Get the Select Interaction from the Tethys MapView var select_interaction = TETHYS_MAP_VIEW.getSelectInteraction(); // Add the popup overlay to the map map.addOverlay(popup); // When selected, call function to display properties select_interaction.getFeatures().on('change:length', function(e) { var popup_element = popup.getElement(); if (e.target.getArray().length > 0) { // this means there is at least 1 feature selected var selected_feature = e.target.item(0); // 1st feature in Collection // Get coordinates of the point to set position of the popup var coordinates = selected_feature.getGeometry().getCoordinates(); var popup_content = '<div class="dam-popup">' + '<h5>' + selected_feature.get('name') + '</h5>' + '<h6>Owner:</h6>' + '<span>' + selected_feature.get('owner') + '</span>' + '<h6>River:</h6>' + '<span>' + selected_feature.get('river') + '</span>' + '<h6>Date Built:</h6>' + '<span>' + selected_feature.get('date_built') + '</span>' + '<div id="plot-content"></div>' + '</div>'; // Clean up last popup and reinitialize $(popup_element).popover('dispose'); // Delay arbitrarily to wait for previous popover to // be deleted before showing new popover. setTimeout(function() { popup.setPosition(coordinates); $(popup_element).popover({ 'placement': 'top', 'animation': true, 'html': true, 'content': popup_content }); $(popup_element).popover('show'); // Load hydrograph dynamically $('#plot-content').load('/apps/dam-inventory/hydrographs/' + selected_feature.get('id') + '/ajax/'); }, 500); } else { // remove pop up when selecting nothing on the map $(popup_element).popover('dispose'); } }); });
Update
map.css:.popover-body { width: 400px; max-height: 300px; overflow-y: auto; } .popover { max-width: none; } #inner-app-content { padding: 0; } #app-content, #inner-app-content, #map_view_outer_container { height: 100%; }
9. Solution
This concludes the Advanced Tutorial. You can view the solution on GitHub at https://github.com/tethysplatform/tethysapp-dam_inventory or clone it as follows:
git clone https://github.com/tethysplatform/tethysapp-dam_inventory.git
cd tethysapp-dam_inventory
git checkout -b advanced-solution advanced-4.2