Production Installation
Last Updated: June, 2017
This article will provide an overview of how to install Tethys Portal in a production setup ready to host apps. Currently production installation of Tethys is only supported on Linux. Some parts of these instructions are optimized for Ubuntu 16.04, though installation on other Linux distributions will be similar.
1. Install Tethys Portal
Follow the default Installation on Linux and Mac OSX instructions to install Tethys Portal with the following considerations
Make sure to checkout the correct branch. The master branch provides the latest stable release.
Assign strong passwords to the database users.
A new settings file with production specific settings will be generated and will overwrite an existing settings file. If you want to preserve existing settings make sure to rename or move the existing
settings.pyfile.Optionally, Follow the Distributed Configuration instructions to install Docker and the components of the software suite on separate servers.
For a production installation the installation script should be run with all of the following settings:
$ bash install_tethys.sh -allowed-host <YOUR_SERVERS_HOSTNAME> --db-username <SECURE_DB_USERNAME> --db-password <SECURE_DB_PASSWORD> --db-port <PORT_FOR_YOUR_DB_SERVER> --superuser <PORTAL_ADMIN_USERNAME> --superuser-email <PORTAL_ADMIN_EMAIL> --superuser-pass <PORTAL_ADMIN_PASSWORD> --production
Note
The parameters indicated with angle brackets <> should be replaced with appropriate values for your production server.
2. Customize Production Settings
A new settings.py file will have been generated during the production installation specifically for a production environment. Notwithstanding, the internet is a hostile environment and you need to take every precaution to make sure your Tethys Platform installation is secure. Django provides a Deployment Checklist that points out critical settings. You should review this checklist carefully before launching your site. Follow the process described below to review and edit settings. Only a few examples are included here, but be sure to review and update any settings that are needed to provide a secure production server environment.
Open the settings.py module for editing using vim or another text editor:
sudo vim $TETHYS_HOME/src/tethys_apps/settings.py
Press i to start editing and change settings as necessary for your production environment. Some settings you may want to customize include:
Social authentication settings
If you wish to enable social authentication capabilities in your Tethys Portal, follow the Social Authentication instructions.
Email settings
If you would like to enable resetting passwords then an email server needs to be configured. See the next section for details.
Press ESC to exit INSERT mode and then press :x and ENTER to save changes and exit.
Important
Review the Deployment Checklist carefully.
3. Setup Email Capabilities (optional)
Tethys Platform provides a mechanism for resetting forgotten passwords that requires email capabilities, for which we recommend using Postfix. Install Postfix as follows:
sudo apt-get install postfix
When prompted select "Internet Site". You will then be prompted to enter you Fully Qualified Domain Name (FQDN) for your server. This is the domain name of the server you are installing Tethys Platform on. For example:
foo.example.org
Next, configure Postfix by opening its configuration file:
sudo vim /etc/postfix/main.cf
Press i to start editing, find the myhostname parameter, and change it to point at your FQDN:
myhostname = foo.example.org
Find the mynetworks parameter and verify that it is set as follows:
mynetworks = 127.0.0.0/8 [::ffff:127.0.0.0]/104 [::1]/128
Press ESC to exit INSERT mode and then press :x and ENTER to save changes and exit. Finally, restart the Postfix service to apply the changes:
sudo service postfix restart
Several email settings need to be configured for the forget password functionality to work properly. The following exampled illustrates how to setup email in the settings.py file.
EMAIL_BACKEND = 'django.core.mail.backends.smtp.EmailBackend'
EMAIL_HOST = 'localhost'
EMAIL_PORT = 25
EMAIL_HOST_USER = ''
EMAIL_HOST_PASSWORD = ''
EMAIL_USE_TLS = False
DEFAULT_FROM_EMAIL = 'Example <noreply@exmaple.com>'
For more information about setting up email capabilities for Tethys Platform, refer to the Sending email documentation.
For an excellent guide on setting up Postfix on Ubuntu, refer to How To Install and Setup Postfix on Ubuntu 14.04.
4. Setup SSL (https) on the Tethys and Geoserver (Recommended)
SSL is the standard technology for establishing a secured connection between a web server and a browser. In order to create a secured connection, an SSL certificate and key are needed. An SSL certificate is simply a paragraph with letters and numbers that acts similar to a password. When users visit your website via https this certificate is verified and if it matches, then a connecton is established. An SSL certificate can be self-signed, or purchased from a Certificate Authority. Some of the top certificate authorities include: Digicert, VertiSign, GeoTrust, Comodo, Thawte, GoDaddy, and Nework Solutions. If your instance of Tethys is part of a larger organization, contact your IT to determine if an agreement with one of these authorities already exists.
Once a certificate is obtained, it needs to be referenced in the Nginx configuration, which is the web server that Tethys uses in production. The configuration file can be found at:
/home/<username>/tethys/src/tethys_portal/tethys_nginx.conf
The file should look something like this:
# tethys_nginx.conf

# the upstream component nginx needs to connect to
upstream django {
    server unix://run/uwsgi/tethys.sock; # for a file socket
}
# configuration of the server
server {
    # the port your site will be served on
    listen      80;
    # the domain name it will serve for
    server_name <domain-name>; # substitute your machine's IP address or FQDN
    charset     utf-8;

    # max upload size
    client_max_body_size 75M;   # adjust to taste

    # Tethys Workspaces
    location /workspaces  {
        internal;
        alias /home/<username>/tethys/workspaces;  # your Tethys workspaces files - amend as required
    }

    location /static {
        alias /home/<username>/tethys/static; # your Tethys static files - amend as required
    }

    # Finally, send all non-media requests to the Django server.
    location / {
        uwsgi_pass  django;
        include /etc/nginx/uwsgi_params;
    }
}
If you need your site to be accessible through both secured (https) and non-secured (http) connections, you will need a server block for each type of connection. Otherwise just edit the existing block.
Make a copy of the existing non-secured server block and paste it below the original. Then modify it as shown below:
server {

listen   443;

ssl    on;
ssl_certificate    /home/<username>/tethys/ssl/your_domain_name.pem; (or bundle.crt)
ssl_certificate_key    /home/<username>/tethys/ssl/your_domain_name.key;


# the domain name it will serve for
server_name <domain-name>; # substitute your machine's IP address or FQDN
charset     utf-8;

# max upload size
client_max_body_size 75M;   # adjust to taste

# Tethys Workspaces
location /workspaces  {
    internal;
    alias /home/<username>/tethys/workspaces;  # your Tethys workspaces files - amend as required
}

location /static {
    alias /home/<username>/tethys/static; # your Tethys static files - amend as required
}

# Finally, send all non-media requests to the Django server.
location / {
    uwsgi_pass  django;
    include /etc/nginx/uwsgi_params;
}
Note
SSL works on port 443, hence the server block above listens on 443 instead of 80
Geoserver SSL
A secured server can only communicate with other secured servers. Therefore to allow the secured Tethys Portal to communicate with Geoserver, the latter needs to be secured as well. To do this, add the following location at the end of your server block.
server {

listen   443;

ssl    on;
ssl_certificate    /home/<username>/tethys/ssl/your_domain_name.pem; (or bundle.crt)
ssl_certificate_key    /home/<username>/tethys/ssl/your_domain_name.key;


# the domain name it will serve for
server_name <domain-name>; # substitute your machine's IP address or FQDN
charset     utf-8;

# max upload size
client_max_body_size 75M;   # adjust to taste

# Tethys Workspaces
location /workspaces  {
    internal;
    alias /home/<username>/tethys/workspaces;  # your Tethys workspaces files - amend as required
}

location /static {
    alias /home/<username>/tethys/static; # your Tethys static files - amend as required
}

# Finally, send all non-media requests to the Django server.
location / {
    uwsgi_pass  django;
    include /etc/nginx/uwsgi_params;
}

#Geoserver
location /geoserver {
      proxy_pass http://127.0.0.1:8181/geoserver;
}
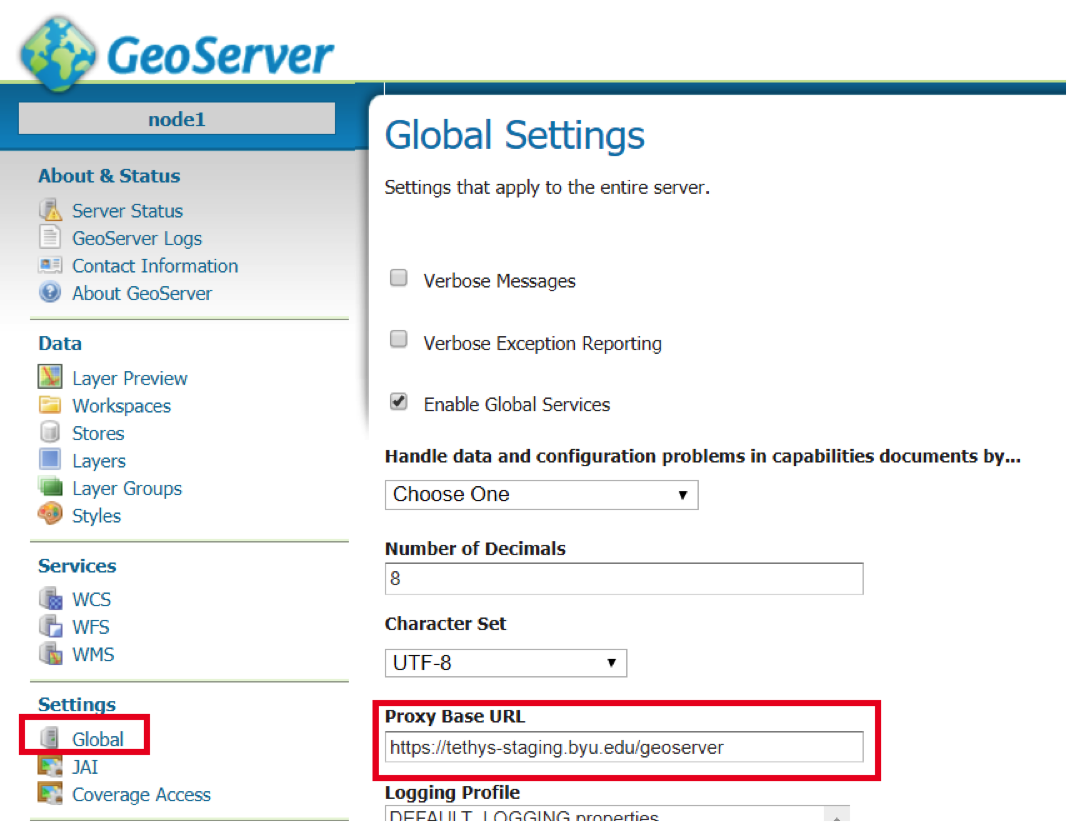
Next, go to your Geoserver web interface (http://domain-name:8181/geoserver/web), sign in, and set the Proxy Base URL in Global settings to:
https://<domain-name>/geoserver
Finally, restart uWSGI and Nginx services to effect the changes:
$ sudo systemctl restart tethys.uwsgi.service
$ sudo systemctl restart nginx
Tip
Use the alias trestart as a shortcut to doing the final step.
The portal should now be accessible from: https://domain-name
Geoserver should now be accessible from: https://domain-name/geoserver
Note
Notice that the Geoserver port (8181) is not necessary once the proxy is configured
5. Install Apps
Download and install any apps that you want to host using this installation of Tethys Platform. For more information see: Installing Apps in Production.
Todo
Troubleshooting: Here we try to provide some guidance on some of the most commonly encountered issues. If you are experiencing problems and can't find a solution here then please post a question on the Tethys Platform Forum.